Waterwingz (talk | contribs) |
Waterwingz (talk | contribs) mNo edit summary Tag: Visual edit |
||
| (21 intermediate revisions by 6 users not shown) | |||
| Line 1: | Line 1: | ||
| − | {| |
+ | {| style="border-collapse:collapse; font-size: x-small;" align="right" |
| __TOC__ |
| __TOC__ |
||
|} |
|} |
||
| Line 5: | Line 5: | ||
==Background== |
==Background== |
||
| − | [[File:Usbr.png |
+ | [[File:Usbr.png|left|100px|USB Remote]] |
Since its earliest inception, CHDK has provided a simple method of operating a Canon P&S camera from a remote switch connected to the camera's USB port. Built-in functionality allowed basic "press half" and "press full" actions - with the additional ability to synchronize the release of the shutter between multiple camera connected to a common control unit. There was also a limited remote zoom functionality, useful for coordinating the zoom position when many cameras were connected together. |
Since its earliest inception, CHDK has provided a simple method of operating a Canon P&S camera from a remote switch connected to the camera's USB port. Built-in functionality allowed basic "press half" and "press full" actions - with the additional ability to synchronize the release of the shutter between multiple camera connected to a common control unit. There was also a limited remote zoom functionality, useful for coordinating the zoom position when many cameras were connected together. |
||
| Line 31: | Line 31: | ||
==Supported Hardware == |
==Supported Hardware == |
||
| − | [[File:Usb_cable_release_v2_0_800.png| |
+ | [[File:Usb_cable_release_v2_0_800.png|right|130px|Homemade Switch]] |
CHDK now supports the use of several different remote control devices to control a set of camera shooting functions. |
CHDK now supports the use of several different remote control devices to control a set of camera shooting functions. |
||
| − | [[File:Ricon_ca-1.jpg| |
+ | [[File:Ricon_ca-1.jpg|right|130px|Ricoh CA-1]] |
For basic shooting functions, a simple switch can be used to provide 3V-5V from set of batteries to the USB connector power pin on the jack on your camera. Details about how to build such a device can be found below. |
For basic shooting functions, a simple switch can be used to provide 3V-5V from set of batteries to the USB connector power pin on the jack on your camera. Details about how to build such a device can be found below. |
||
| Line 70: | Line 70: | ||
===Homemade USB Remote Cable with Wireless Adapter=== |
===Homemade USB Remote Cable with Wireless Adapter=== |
||
| − | [[File:IMG_2336.jpg |
+ | [[File:IMG_2336.jpg|364px|right]] |
To make a CHDK remote that will allow you to also connect a Canon wireless remote you need modifiy things a little bit. [[User:Colon247|Colon247]] added a 2.5mm jack with 3 connectors, so you can use Canon 2.5mm wireless remote by plugging it into the jack and bypassing the CHDK remote circuit. |
To make a CHDK remote that will allow you to also connect a Canon wireless remote you need modifiy things a little bit. [[User:Colon247|Colon247]] added a 2.5mm jack with 3 connectors, so you can use Canon 2.5mm wireless remote by plugging it into the jack and bypassing the CHDK remote circuit. |
||
| Line 76: | Line 76: | ||
| + | |||
| + | <br style="clear: both:" /> |
||
===Improvised USB Remote Using a USB Charger=== |
===Improvised USB Remote Using a USB Charger=== |
||
| − | [[File:CHDK-Improvised-Remote USB-Charger.jpg |
+ | [[File:CHDK-Improvised-Remote USB-Charger.jpg|364px|right]] |
| − | If you |
+ | If you own a portable USB charger with a USB A output, you can use it as an improvised USB remote for CHDK. Simply utilize your regular USB cable that you would have used to connect your camera to your computer. In many cases, this is a plain and inexpensive USB A to Mini USB B cable. |
| − | The sequence of turning the |
+ | The sequence of turning the charger on and off again will create a "OnePush" event (see below). Configured this way, the CHDK camera will auto-focus when turning the switch to the “on” position, and then take the photo when turning the switch back to the "off" position. |
While this is certainly kind of clumsy, as you will need to flick a switch back and forth instead of just pressing a button, with a bit of exercise this also works quite nicely for bracket shots. |
While this is certainly kind of clumsy, as you will need to flick a switch back and forth instead of just pressing a button, with a bit of exercise this also works quite nicely for bracket shots. |
||
| − | This is by far sufficient for your first experiments with CHDK's USB remote functionality. You can purchase inexpensive battery driven "USB Emergency Charger" devices [http://www.youtube.com/watch?v=NicNGwm0c3E |
+ | This is by far sufficient for your first experiments with CHDK's USB remote functionality. You can purchase other inexpensive battery driven "USB Emergency Charger" devices : [http://www.youtube.com/watch?v=NicNGwm0c3E video link here] |
| + | |||
| + | |||
| + | |||
| + | |||
| + | |||
| + | . |
||
| + | |||
| + | |||
<br style="clear: both:" /> |
<br style="clear: both:" /> |
||
==Enabling USB Remote operation== |
==Enabling USB Remote operation== |
||
| − | [[File:USB_Remote_01.png |
+ | [[File:USB_Remote_01.png|250px|right]] |
To enable USB remote operation, go to the CHDK Remote parameters menu and select Enable Remote. |
To enable USB remote operation, go to the CHDK Remote parameters menu and select Enable Remote. |
||
| Line 98: | Line 108: | ||
==Switch Types== |
==Switch Types== |
||
| − | [[File:USB_Remote_02.png |
+ | [[File:USB_Remote_02.png|250px|right]] |
===None=== |
===None=== |
||
| Line 107: | Line 117: | ||
| ⚫ | |||
| − | |||
| − | |||
| − | |||
| − | |||
| − | |||
| ⚫ | |||
===OnePush=== |
===OnePush=== |
||
Used with simple switch inputs. Pressing the switch initiates a "half-press" state. Releasing the switch initiates a "full-press" state for 100 mSec. There is no mechanism to cancel a "half-press" once this sequence is started. Also note that the "half press" will timeout after 10 seconds even if USB power is still applied. |
Used with simple switch inputs. Pressing the switch initiates a "half-press" state. Releasing the switch initiates a "full-press" state for 100 mSec. There is no mechanism to cancel a "half-press" once this sequence is started. Also note that the "half press" will timeout after 10 seconds even if USB power is still applied. |
||
| Line 118: | Line 123: | ||
| ⚫ | |||
| − | |||
| ⚫ | |||
===TwoPush=== |
===TwoPush=== |
||
Used with simple switch inputs. Pressing the switch initiates a "half-press" state. Releasing the switch and then immediately pressing the again switch in less than 1/2 second initiates a "full-press" state. Full press state continues while the switch is held. Failing to immediately press the switch the second time will cancel the sequence. |
Used with simple switch inputs. Pressing the switch initiates a "half-press" state. Releasing the switch and then immediately pressing the again switch in less than 1/2 second initiates a "full-press" state. Full press state continues while the switch is held. Failing to immediately press the switch the second time will cancel the sequence. |
||
| Line 125: | Line 129: | ||
| ⚫ | |||
| − | |||
| ⚫ | |||
===CA-1 === |
===CA-1 === |
||
Used with a Ricoh CA-1 switch device. Half pressing the button causes the CA-1 to create a 30 mSec pulse that initiates a "half press" state. Releasing the switch at that point will generate 2x30 mSec pulses that cancel the shooting sequences. Full pressing the button will create a 150 mSec pulse that will initiate a "full press" state for 100 mSec. |
Used with a Ricoh CA-1 switch device. Half pressing the button causes the CA-1 to create a 30 mSec pulse that initiates a "half press" state. Releasing the switch at that point will generate 2x30 mSec pulses that cancel the shooting sequences. Full pressing the button will create a 150 mSec pulse that will initiate a "full press" state for 100 mSec. |
||
| Line 136: | Line 139: | ||
===None=== |
===None=== |
||
| − | [[File:USB_Remote_06.png |
+ | [[File:USB_Remote_06.png|250px|right]] |
Tells CHDK to do nothing with switch inputs. Allows the input devices to operate - useful for scripting modes. |
Tells CHDK to do nothing with switch inputs. Allows the input devices to operate - useful for scripting modes. |
||
<br style="clear: both" /> |
<br style="clear: both" /> |
||
===Normal=== |
===Normal=== |
||
| − | [[File:USB_Remote_07.png |
+ | [[File:USB_Remote_07.png|250px|right]] |
Reacts to the state of the input device. On half press it places the camera in "half press" mode to focus, set exposure and flash settings. On full press it places the camera in "full press" mode to take the actual photograph. |
Reacts to the state of the input device. On half press it places the camera in "half press" mode to focus, set exposure and flash settings. On full press it places the camera in "full press" mode to take the actual photograph. |
||
Supports sync mode - see below. |
Supports sync mode - see below. |
||
| Line 147: | Line 150: | ||
===Quick=== |
===Quick=== |
||
| − | [[File:USB_Remote_08.png |
+ | [[File:USB_Remote_08.png|250px|right]] |
Causes the camera to immediatly enter shooting mode (focus, exposure, flash) and take a picture immediately on the occurance of a "half shoot". Useful for automation projects where the picture should occur as quickly as possible after some condition is detected. |
Causes the camera to immediatly enter shooting mode (focus, exposure, flash) and take a picture immediately on the occurance of a "half shoot". Useful for automation projects where the picture should occur as quickly as possible after some condition is detected. |
||
| Line 154: | Line 157: | ||
===Burst=== |
===Burst=== |
||
| − | [[File:USB_Remote_09.png |
+ | [[File:USB_Remote_09.png|250px|right]] |
Cause the camera to enter continuous shooting mode while a half press is active. Similiar to the built in camera continuous function except much slower and it does not reset each time the camera power is removed. |
Cause the camera to enter continuous shooting mode while a half press is active. Similiar to the built in camera continuous function except much slower and it does not reset each time the camera power is removed. |
||
| Line 162: | Line 165: | ||
===Bracket=== |
===Bracket=== |
||
| − | [[File:USB_Remote_10.png |
+ | [[File:USB_Remote_10.png|250px|right]] |
Uses the CHDK ''Bracketing in Continuous Mode'' settings on each half press / full press operation, changing the bracketing setting on each shot. Times out after 5 seconds of no operations. Useful for bracketing operations as it does not require settting up camera continuous mode or timer settings, which clear after each camera power cycle. |
Uses the CHDK ''Bracketing in Continuous Mode'' settings on each half press / full press operation, changing the bracketing setting on each shot. Times out after 5 seconds of no operations. Useful for bracketing operations as it does not require settting up camera continuous mode or timer settings, which clear after each camera power cycle. |
||
| Line 170: | Line 173: | ||
<br style="clear: both" /> |
<br style="clear: both" /> |
||
===Zoom=== |
===Zoom=== |
||
| − | [[File:USB_Remote_11.png |
+ | [[File:USB_Remote_11.png|250px|right]] |
Uses the built-in pulse counting capability of the USB remote code to control zoom operations. The following action happens for the listed pulse counts. |
Uses the built-in pulse counting capability of the USB remote code to control zoom operations. The following action happens for the listed pulse counts. |
||
| − | 1 pulse = zoom |
+ | 1 pulse = zoom in one step |
| − | 2 pulses = zoom |
+ | 2 pulses = zoom out one step |
3 pulses = shoot |
3 pulses = shoot |
||
| − | 4 pulses = zoom completely |
+ | 4 pulses = zoom completely in |
| − | 5 pulses = zoom completely |
+ | 5 pulses = zoom completely out |
Note : pulses needs to be "on" for longer than 100 mSec, "off" for longer than 50 mSec and a 500mSec gap indicates the end of the counting period. |
Note : pulses needs to be "on" for longer than 100 mSec, "off" for longer than 50 mSec and a 500mSec gap indicates the end of the counting period. |
||
Sync not currently available in this mode |
Sync not currently available in this mode |
||
<br style="clear: both" /> |
<br style="clear: both" /> |
||
| + | |||
===Video=== |
===Video=== |
||
| − | [[File:USB_Remote_12.png |
+ | [[File:USB_Remote_12.png|250px|right]] |
If camera is in video shooting mode, activates filming on the first half press. Stops filming on the next half press. |
If camera is in video shooting mode, activates filming on the first half press. Stops filming on the next half press. |
||
| Line 194: | Line 198: | ||
===Enable Sync=== |
===Enable Sync=== |
||
| − | [[File:USB_Remote_13.png |
+ | [[File:USB_Remote_13.png|250px|right]] |
| Line 200: | Line 204: | ||
<br style="clear: both" /> |
<br style="clear: both" /> |
||
===Enable Sync Delay=== |
===Enable Sync Delay=== |
||
| − | [[File:USB_Remote_14.png |
+ | [[File:USB_Remote_14.png|250px|right]] |
To more precisely tune the synchronization between cameras, CHDK allows a precise fixed delay to be added to each camera to adjust for differences in the time each camera takes to finish shooting a picture. The sync delay value is given in units of 0.1 mSec. |
To more precisely tune the synchronization between cameras, CHDK allows a precise fixed delay to be added to each camera to adjust for differences in the time each camera takes to finish shooting a picture. The sync delay value is given in units of 0.1 mSec. |
||
<br style="clear: both" /> |
<br style="clear: both" /> |
||
| − | [[File:USB_Remote_15a.png |
+ | [[File:USB_Remote_15a.png|250px|right]] |
Notice in the example pictures the use of the "range multiplier" function in the upper right corner of the screenshot - used to more easily change the delay adjustment value. The range multiplier is changed in ALT mode using the zoom in / zoom out keys. |
Notice in the example pictures the use of the "range multiplier" function in the upper right corner of the screenshot - used to more easily change the delay adjustment value. The range multiplier is changed in ALT mode using the zoom in / zoom out keys. |
||
<br style="clear: both" /> |
<br style="clear: both" /> |
||
| Line 213: | Line 217: | ||
===Enable Script Start=== |
===Enable Script Start=== |
||
| − | [[File:USB_Remote_16.png |
+ | [[File:USB_Remote_16.png|250px|right]] |
Tells CHDK to activate the currently loaded script when the USB remote performs a full press. Useful for repetitive activation of a script without needing to press the shutter button. |
Tells CHDK to activate the currently loaded script when the USB remote performs a full press. Useful for repetitive activation of a script without needing to press the shutter button. |
||
<br style="clear: both" /> |
<br style="clear: both" /> |
||
===Bracketing in Continuous Mode=== |
===Bracketing in Continuous Mode=== |
||
| − | [[File:USB_Remote_17.png |
+ | [[File:USB_Remote_17.png|250px|right]] |
A menu link to provide convenient access to the bracketing parameters used in USB remote bracketing mode. |
A menu link to provide convenient access to the bracketing parameters used in USB remote bracketing mode. |
||
| Line 227: | Line 231: | ||
==Scripting Interface== |
==Scripting Interface== |
||
| + | ===is_key "remote"=== |
||
| ⚫ | |||
| ⚫ | |||
| − | |||
| ⚫ | |||
| ⚫ | |||
| − | |||
while 1 |
while 1 |
||
wait_click 1 |
wait_click 1 |
||
| Line 237: | Line 240: | ||
| ⚫ | |||
| ⚫ | |||
| ⚫ | |||
| ⚫ | |||
| ⚫ | |||
| ⚫ | |||
| − | + | ====get_usb_power(0)==== |
|
| ⚫ | |||
| ⚫ | |||
| ⚫ | |||
| + | do |
||
| ⚫ | |||
| + | until p>0 |
||
| ⚫ | |||
| − | + | ====get_usb_power(1)==== |
|
| ⚫ | |||
| − | '''Note :''' USB remote must be enabled for this function to work |
||
| + | * this function works whether or not USB remote mode is enabled. |
||
| + | do |
||
| + | p = get_usb_power 1 |
||
| + | until p>0 |
||
| + | ====get_usb_power(2)==== |
||
| ⚫ | |||
| ⚫ | |||
| ⚫ | |||
| + | * this function works whether or not USB remote mode is enabled. |
||
| + | do |
||
| + | p = get_usb_power 2 |
||
| + | ntil p>0 |
||
| − | '''Note :''' USB remote must be enabled for this function to work |
||
| + | ====get_usb_power(3)==== |
||
| ⚫ | |||
| + | * this function works whether or not USB remote mode is enabled. |
||
| + | do |
||
| + | p = get_usb_power 3 |
||
| + | until p>0 |
||
| + | |||
| ⚫ | |||
| + | ====set_remote_timing(uSec)==== |
||
| + | ( CHDK 1.3.0 or newer only - originally called enable_remote_hp_timer() in early releases of 1.3.0) |
||
| + | |||
| + | Standard measurement of USB pulse widths is performed by the USB remote task based on the assumption that it runs every 10 mSec. However, variations in this interval - especially when the camera is in shooting mode - are possible and can result in poor timer accuracy. The set_remote_timing() command enables the use of a higher precision timer for these measurements. This time does not depend on task "tic timer" accuracy, providing a much more stable and reliable source for the measurement of pulse width and space information. |
||
| + | |||
| + | The parameter passed to the function specifies the rate at which the <span style="font-size:14px;">USB pulse will be sampled in uSeconds. Valid values are 1000 and larger.</span> |
||
| + | |||
| ⚫ | |||
---- |
---- |
||
| Line 297: | Line 322: | ||
set_config_value(121,1) -- make sure USB remote is enabled |
set_config_value(121,1) -- make sure USB remote is enabled |
||
| − | pcount=0 |
||
| − | scount=0 |
||
usb_state=-1 |
usb_state=-1 |
||
rkey=0 |
rkey=0 |
||
| Line 372: | Line 395: | ||
*[http://chdk.setepontos.com/index.php?topic=7717 CHDKremote2 - a two stage remote control adapter for CHDK] |
*[http://chdk.setepontos.com/index.php?topic=7717 CHDKremote2 - a two stage remote control adapter for CHDK] |
||
'''External Web Sites''' |
'''External Web Sites''' |
||
| + | * [http://dalybulge.blogspot.co.uk/2014/07/ghetto-remote-camera-shutter.html Wireless remote shutter by Benbojangles] |
||
| + | |||
*[http://digitaldimensionoftechnology.com/2012/05/09/going-beyond-the-device-expanding-the-horizons-of-super-zoom/ Remote Shutter Release Project] |
*[http://digitaldimensionoftechnology.com/2012/05/09/going-beyond-the-device-expanding-the-horizons-of-super-zoom/ Remote Shutter Release Project] |
||
*[http://www.gentles.ltd.uk/gentwire/usb.htm Gentles USB Remote Switches] |
*[http://www.gentles.ltd.uk/gentwire/usb.htm Gentles USB Remote Switches] |
||
Revision as of 04:51, 8 December 2014
Using just an inexpensive push button switch, a converted USB cable, and a small battery, you can construct a remote device that will allow you to control the operation of your CHDK-enabled camera. If you want software control over USB, see PTP Extension
Background
Since its earliest inception, CHDK has provided a simple method of operating a Canon P&S camera from a remote switch connected to the camera's USB port. Built-in functionality allowed basic "press half" and "press full" actions - with the additional ability to synchronize the release of the shutter between multiple camera connected to a common control unit. There was also a limited remote zoom functionality, useful for coordinating the zoom position when many cameras were connected together.
With the passing of time, the code base supporting this functionality had become increasingly complicated and difficult to maintain or extend. To that end, as of August 2012, a new set of functionality has been released. This new version provides a more stable and easy to understand interface and expanded functionality.
Introduction
The current CHDK version of USB remote operation introduced a modular concept for the selection of what device is connected to the camera and how the camera reacts to that device. A logic block diagram is shown below - click to obtain a full-size view.
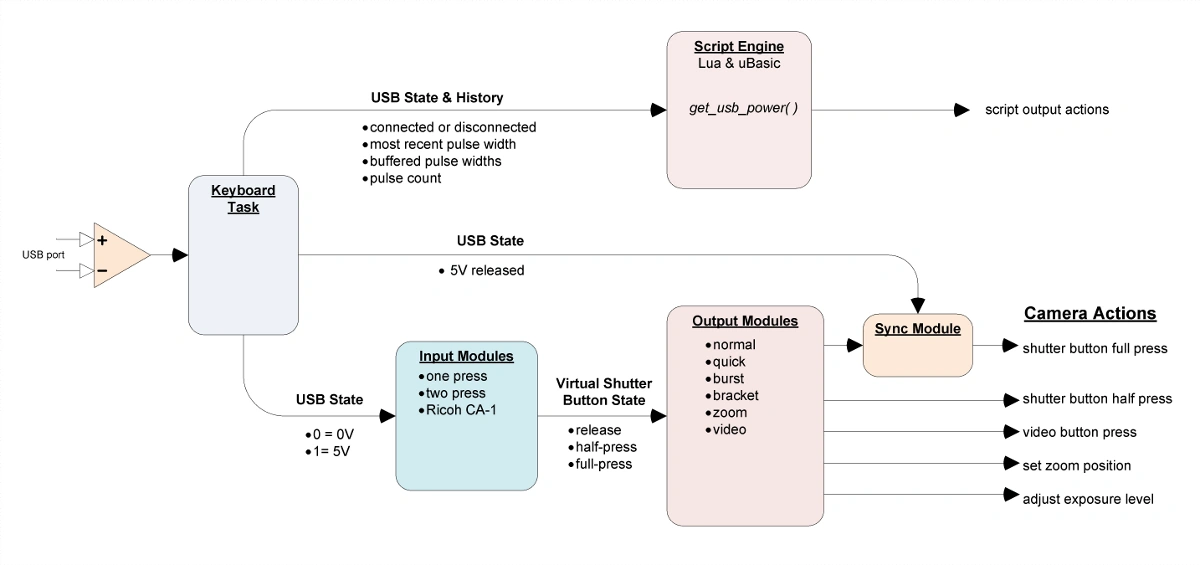
In operation the state of a remote device connected to the USB port is converted to one the following states:
- switch released
- switch half pressed
- switch full pressed
and action is taken based on the output module selected via the CHDK Remote menu.
In addition, values indicating number of activations (pulse count) and a duration of each activation (pulse width / pulse gap) is also maintained for use by CHDK scripts.
Supported Hardware
CHDK now supports the use of several different remote control devices to control a set of camera shooting functions.
For basic shooting functions, a simple switch can be used to provide 3V-5V from set of batteries to the USB connector power pin on the jack on your camera. Details about how to build such a device can be found below.
In addition to "home made" devices, a commercial product called a Ricoh CA-1 can also be used. These are widely available at camera stores or online from many sources.
For more complex operations, devices that produce multiple pulses or pulses of different time duration (width) can be used. These are popular with radio controlled airplane enthusiasts and kite aerial photographers using hardware from vendors like Gentles UK. In addition, using this ability and any of the popular Arduino-type microcontrollers gives almost total flexibility in what your CHDK enable Canon P&S camera can do. Its all up to your imagination and electronics building and programming skills ! A list of sources for USB remote switch devices is posted at the bottom of this page : Links .
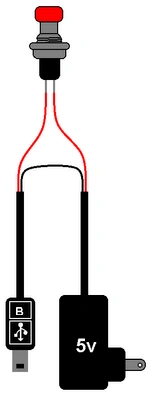
Homemade USB Remote Cable
A popular method for remotely triggering CHDK-enabled cameras involves constructing a simple triggering device from a 3V CR2032 coin battery, a USB extension cable, and a push switch. The camera's USB cable is then attached to the camera at one end and to the triggering device by the other end.
Below is a circuit diagram of such a switch.
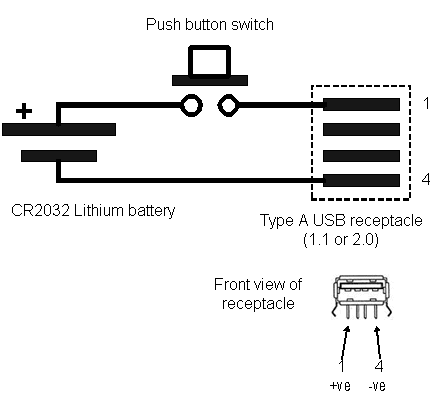
If you are cutting up a commercially-made USB extension cable, then wires 1 and 4 are red and black, respectively, according to the USB standard. It seems that even cheaply made USB cables follow this standard.
Note that the 3V CR2032 battery might not be enough to trigger your camera; if not, you may need to use a different power source, e.g. three 1.5V AAA cells connected in series or a spare camera battery like the NB-5L (a 3.7V camera battery).
If you are building a book scanner or creating a copy board application, you can also buy one of the little USB chargers you see at the counter and switch the + side of the cable and not worry about batteries. You know you will always have the correct voltage this way.
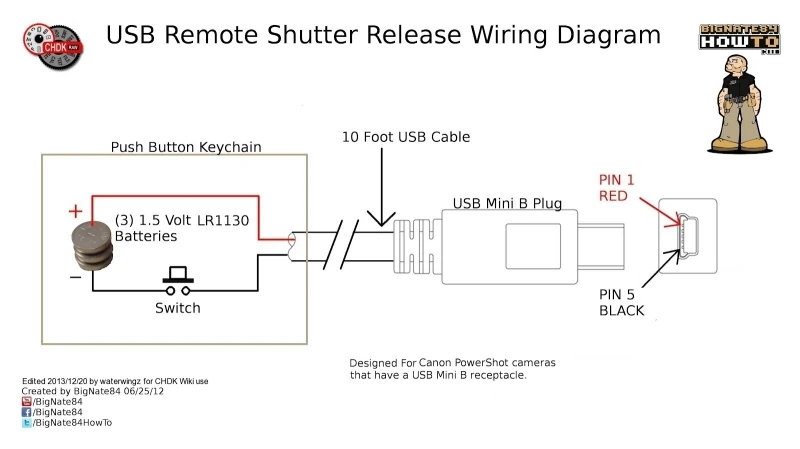
Here's a different schematic, click for a larger view :
Note: combined USB & Video Connector
Newer Powershots now have a combined USB + video connector; to use both video and USB remote feature a "splitter" cable is necessary.
- http://www.achillies.com/CHDK_Files/USB_Splitter.htm
- http://chdk.setepontos.com/index.php?topic=294.msg64551#msg64551
The HTC splitter is actually wired correctly for the usb and video composite cable but the non standard shields do not fit the body of the camera or allow the video cable into the connector. You can alter the connector to fit the body if you are VERY CAREFUL and pry off the male connector shield and shave off the edge to fit the camera, then, open the case and pry open the non standard square looking female connector to allow the canon video cable to fit, then press the case back together. Works very well no soldering small parts. Just be careful prying it apart.
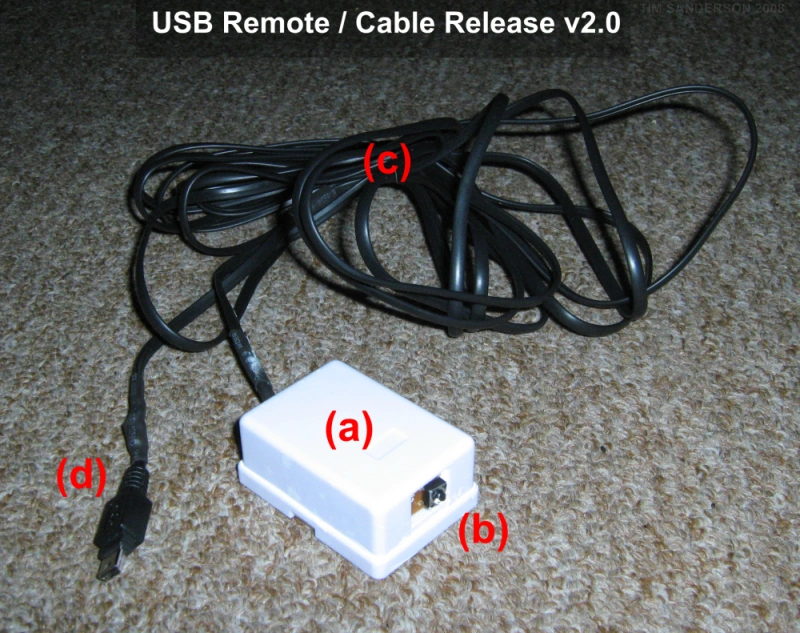
Homemade USB Remote Cable with Wireless Adapter
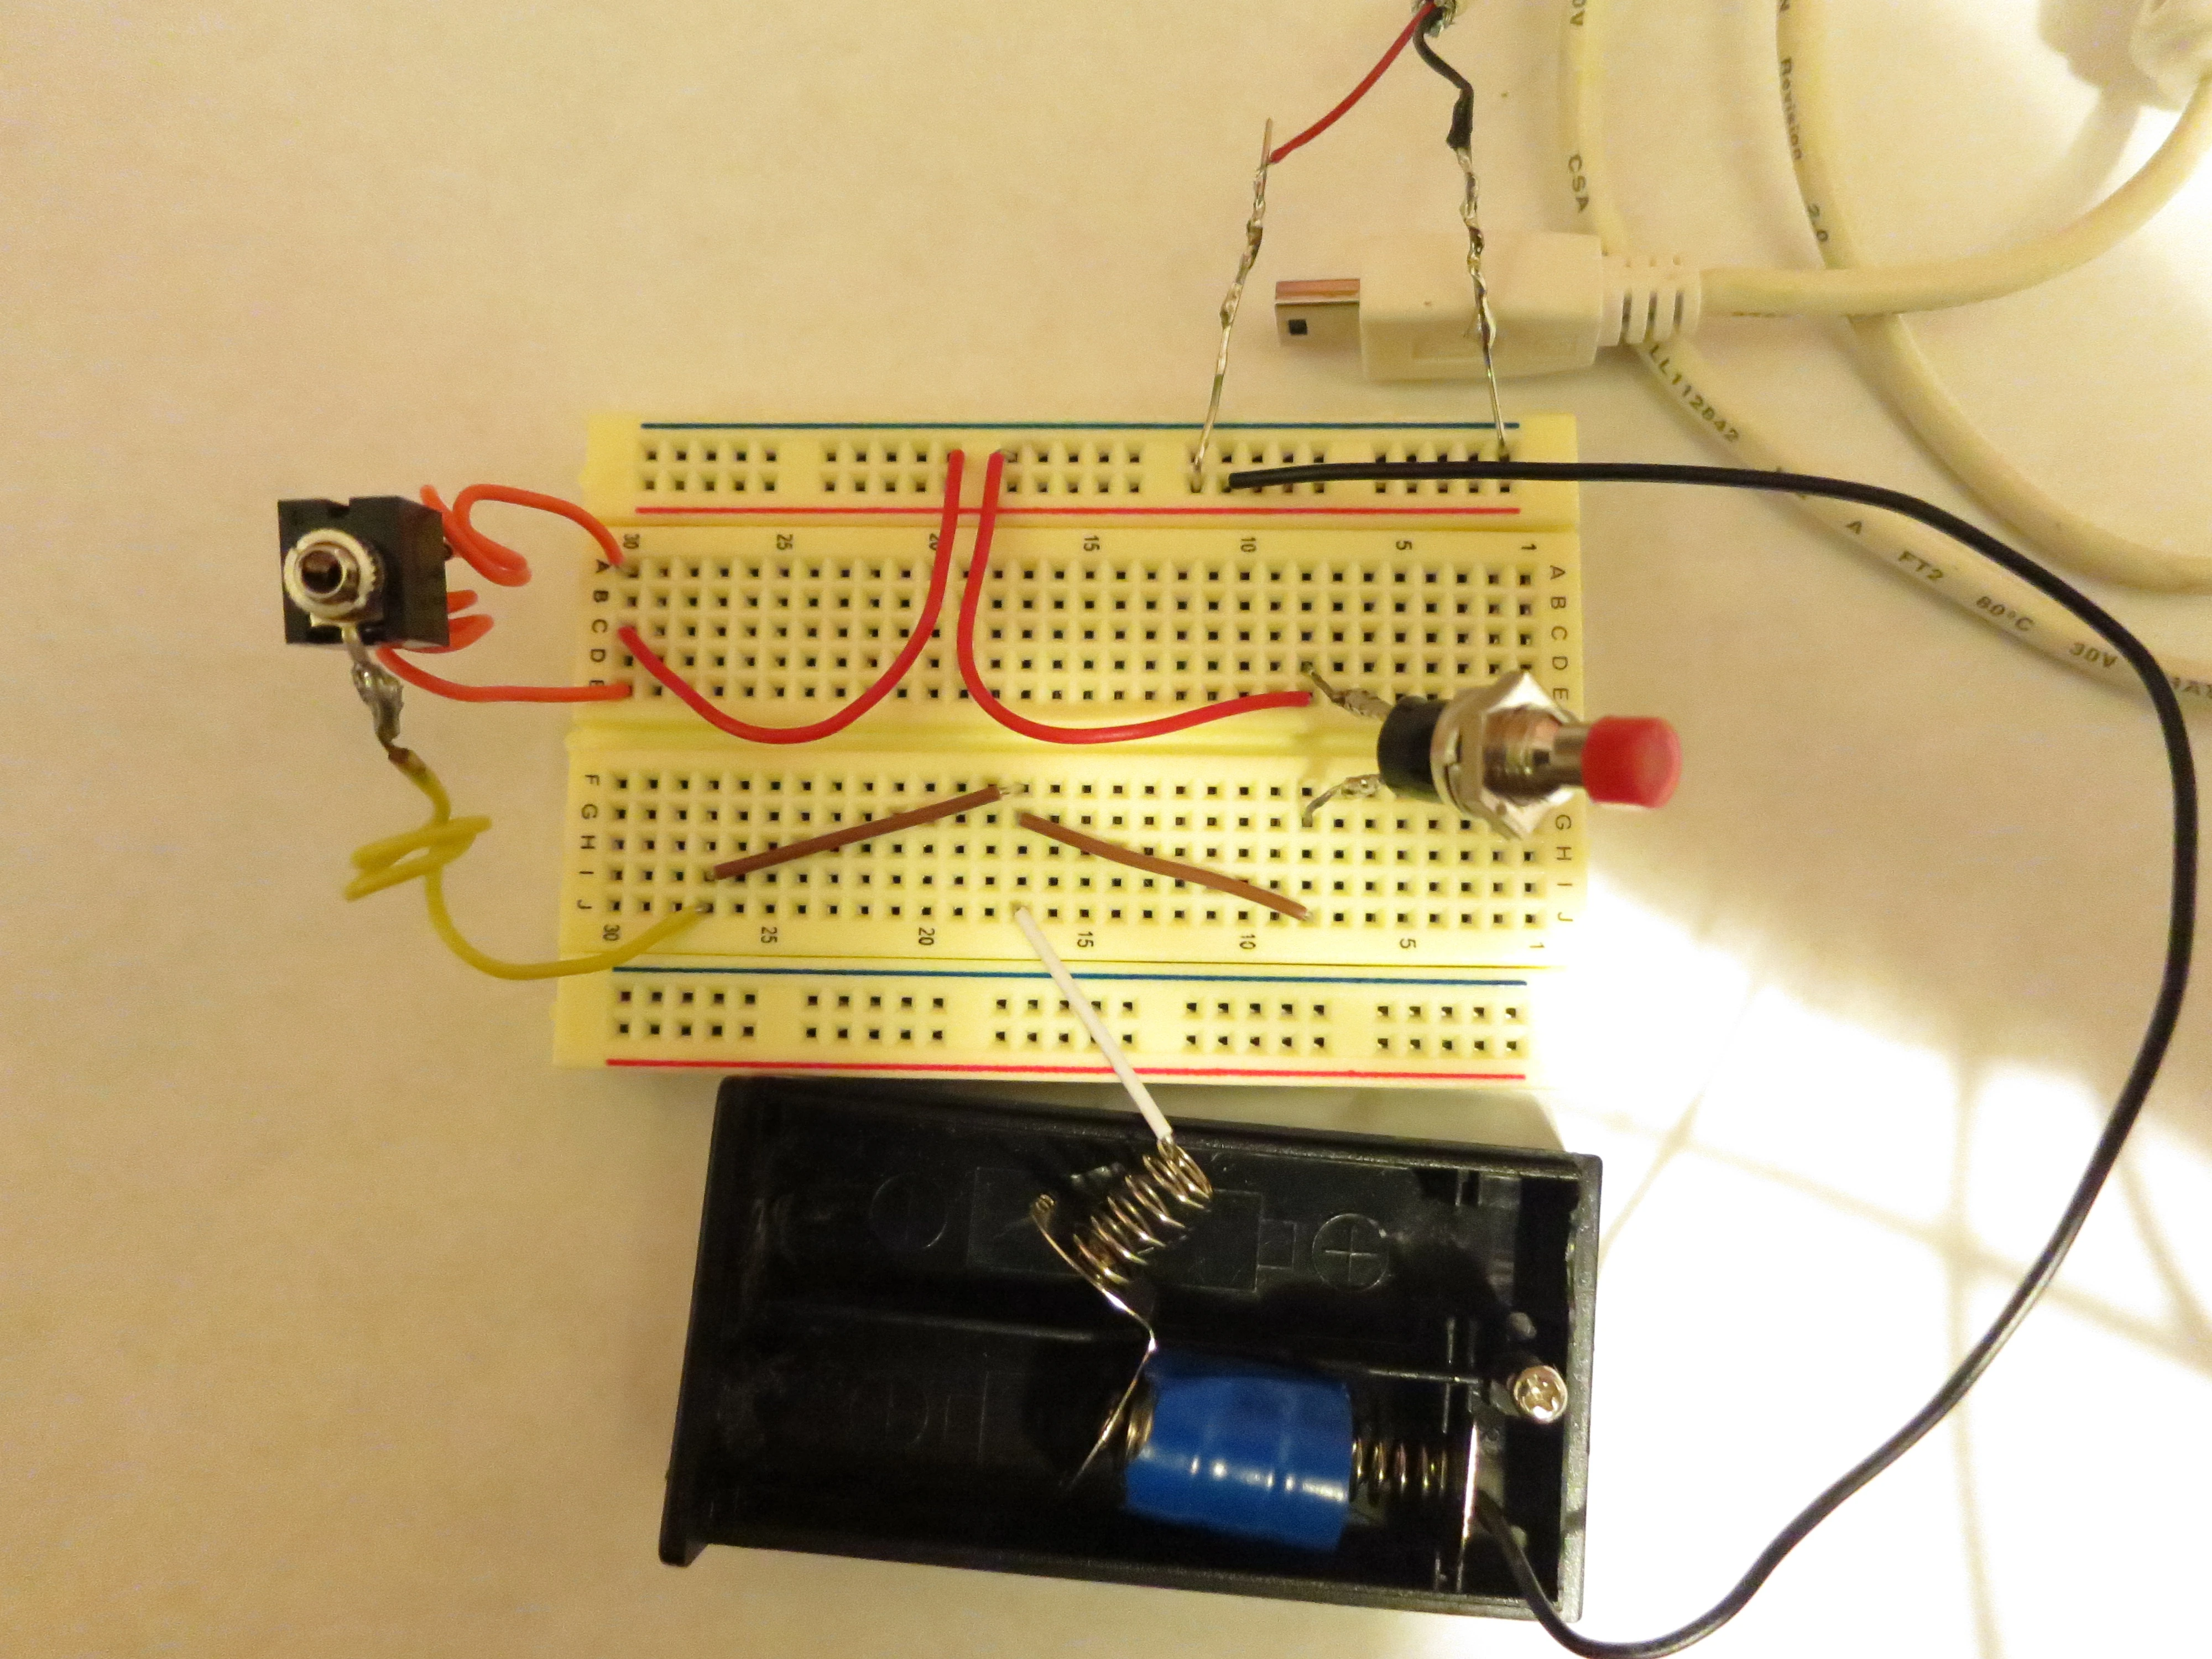
To make a CHDK remote that will allow you to also connect a Canon wireless remote you need modifiy things a little bit. Colon247 added a 2.5mm jack with 3 connectors, so you can use Canon 2.5mm wireless remote by plugging it into the jack and bypassing the CHDK remote circuit.
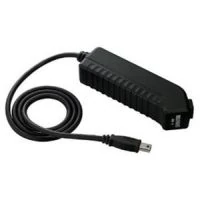
Improvised USB Remote Using a USB Charger
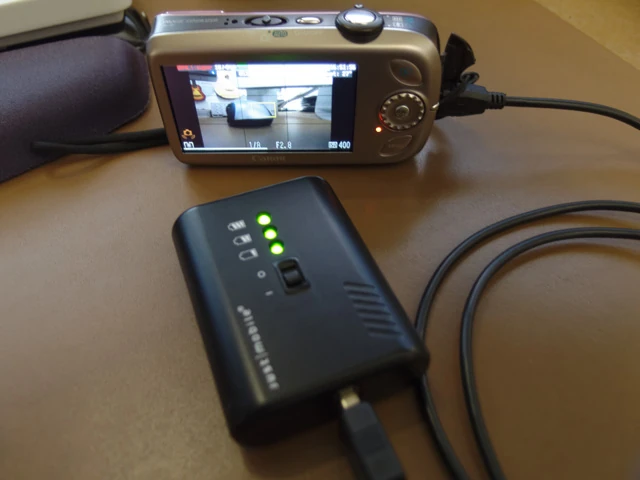
If you own a portable USB charger with a USB A output, you can use it as an improvised USB remote for CHDK. Simply utilize your regular USB cable that you would have used to connect your camera to your computer. In many cases, this is a plain and inexpensive USB A to Mini USB B cable.
The sequence of turning the charger on and off again will create a "OnePush" event (see below). Configured this way, the CHDK camera will auto-focus when turning the switch to the “on” position, and then take the photo when turning the switch back to the "off" position.
While this is certainly kind of clumsy, as you will need to flick a switch back and forth instead of just pressing a button, with a bit of exercise this also works quite nicely for bracket shots.
This is by far sufficient for your first experiments with CHDK's USB remote functionality. You can purchase other inexpensive battery driven "USB Emergency Charger" devices : video link here
.
Enabling USB Remote operation
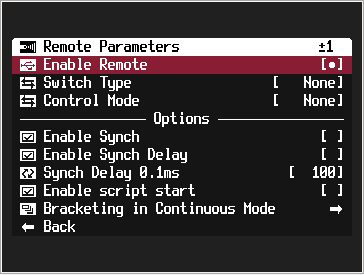
To enable USB remote operation, go to the CHDK Remote parameters menu and select Enable Remote.
Note : When this option is selected, the USB port on the camera will no longer be available for uploading picture files or PTP operations.
Switch Types
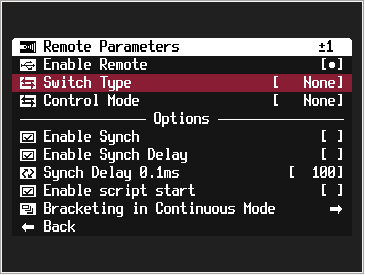
None
Default setting at start-up. Indicates that no USB device is to be monitored. Useful when a script will be interacting with the USB port.

OnePush
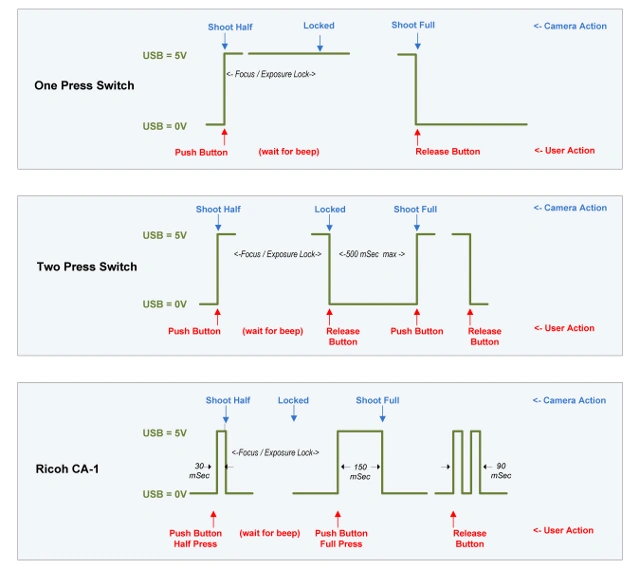
Used with simple switch inputs. Pressing the switch initiates a "half-press" state. Releasing the switch initiates a "full-press" state for 100 mSec. There is no mechanism to cancel a "half-press" once this sequence is started. Also note that the "half press" will timeout after 10 seconds even if USB power is still applied.
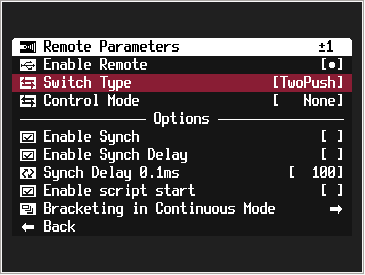
TwoPush
Used with simple switch inputs. Pressing the switch initiates a "half-press" state. Releasing the switch and then immediately pressing the again switch in less than 1/2 second initiates a "full-press" state. Full press state continues while the switch is held. Failing to immediately press the switch the second time will cancel the sequence.
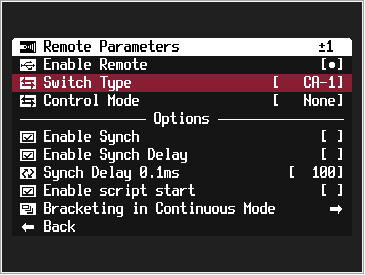
CA-1
Used with a Ricoh CA-1 switch device. Half pressing the button causes the CA-1 to create a 30 mSec pulse that initiates a "half press" state. Releasing the switch at that point will generate 2x30 mSec pulses that cancel the shooting sequences. Full pressing the button will create a 150 mSec pulse that will initiate a "full press" state for 100 mSec.
Control Modes
CHDK control modes support the translation of input device activation sequences into specific camera operations.
None
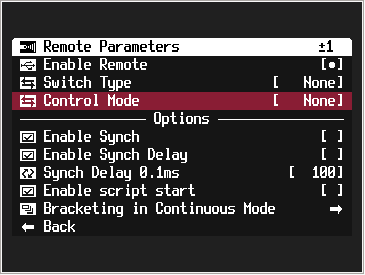
Tells CHDK to do nothing with switch inputs. Allows the input devices to operate - useful for scripting modes.
Normal

Reacts to the state of the input device. On half press it places the camera in "half press" mode to focus, set exposure and flash settings. On full press it places the camera in "full press" mode to take the actual photograph.
Supports sync mode - see below.
Quick
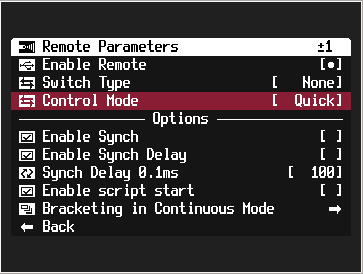
Causes the camera to immediatly enter shooting mode (focus, exposure, flash) and take a picture immediately on the occurance of a "half shoot". Useful for automation projects where the picture should occur as quickly as possible after some condition is detected.
Sync not curently available in this mode.
Burst

Cause the camera to enter continuous shooting mode while a half press is active. Similiar to the built in camera continuous function except much slower and it does not reset each time the camera power is removed.
Sync not curently available in this mode.
Bracket
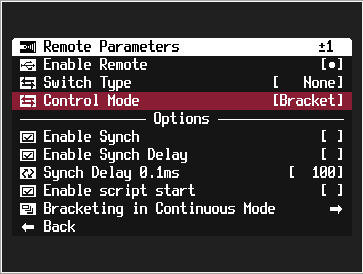
Uses the CHDK Bracketing in Continuous Mode settings on each half press / full press operation, changing the bracketing setting on each shot. Times out after 5 seconds of no operations. Useful for bracketing operations as it does not require settting up camera continuous mode or timer settings, which clear after each camera power cycle.
Note that you may need to disable your camera's "Servo AF" mode in the Canon shooting menu for this to work.
Sync not available in this mode.
Zoom
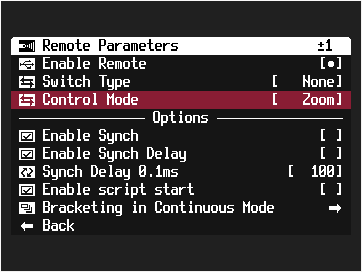
Uses the built-in pulse counting capability of the USB remote code to control zoom operations. The following action happens for the listed pulse counts.
1 pulse   = zoom in one step
2 pulses  = zoom out one step
3 pulses  = shoot
4 pulses  = zoom completely in
5 pulses  = zoom completely out
Note : pulses needs to be "on" for longer than 100 mSec, "off" for longer than 50 mSec and a 500mSec gap indicates the end of the counting period.
Sync not currently available in this mode
Video
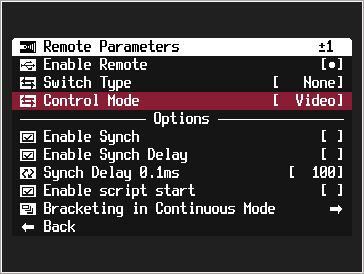
If camera is in video shooting mode, activates filming on the first half press. Stops filming on the next half press.
If camera has a dedicated video button, will start and stop video using that button rather than the shutter switch.
Sync not curently available in this mode.
Multi-Camera Synchronization
Enable Sync
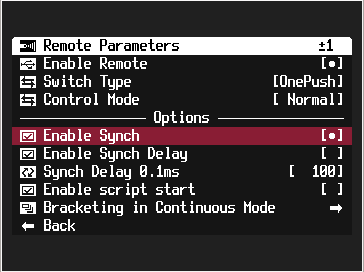
A useful application of CHDK is the ability to connect two or more cameras together via a common USB cable so that their operations can be synchronized. The fact that the cameras are connected in parallel ensures that things happen at approximately the same time. To achieve better synchronization when taking an actual photograph, CHDK has the ability to stop the picture taking process immediately before the image is actually captured. This allows CHDK on several cameras to focus, adjust exposure, setup the flash and then wait for a shared signal to complete the shot (i.e. sync). If the Enable Sync option is set in CHDK then each camera will wait for the final transition of the USB signal ( 5V to 0V ) before shooting. Note : the camera will wait a maximum of 10 seconds for the sync signal. Waiting any longer results in unpredictable bad camera behaviour.
Enable Sync Delay
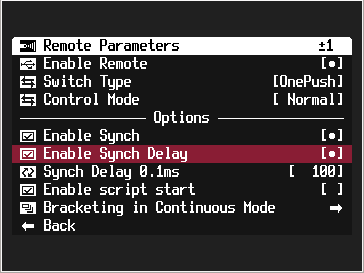
To more precisely tune the synchronization between cameras, CHDK allows a precise fixed delay to be added to each camera to adjust for differences in the time each camera takes to finish shooting a picture. The sync delay value is given in units of 0.1 mSec.
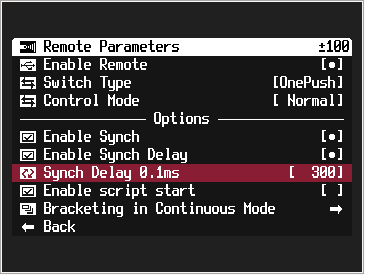
Notice in the example pictures the use of the "range multiplier" function in the upper right corner of the screenshot - used to more easily change the delay adjustment value. The range multiplier is changed in ALT mode using the zoom in / zoom out keys.
Developer's note : the USB remote code includes optional code that can be used to calibrate the sync delay units precisely for each camera.
Other Settings
Enable Script Start
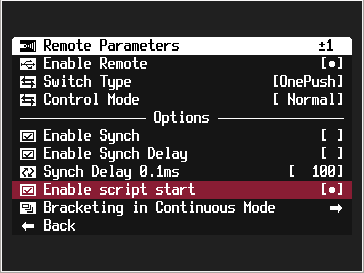
Tells CHDK to activate the currently loaded script when the USB remote performs a full press. Useful for repetitive activation of a script without needing to press the shutter button.
Bracketing in Continuous Mode
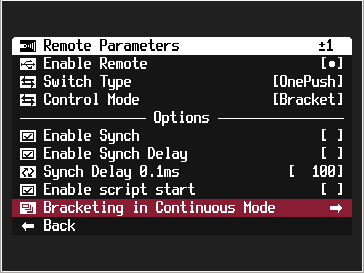
A menu link to provide convenient access to the bracketing parameters used in USB remote bracketing mode.
USB Remote Timing Diagrams
Scripting Interface
is_key "remote"
- state of the USB port 5V pin can be queried as any other camera key
- this function works whether or not USB remote mode is enabled.
while 1
  wait_click 1
  if is_key "remote" then shoot
wend
get_usb_power
USB Remote V2 provides extensive scripting functionationality using the get_usb_power() function.
get_usb_power(0)
- returns the pulse width of the most recent USB power activation and clears that value.
- USB remote must be enabled for this function to work
do
p = get_usb_power 0
until p>0
get_usb_power(1)
- returns the current state of USB power ( 0=off, 1=on)
- this function works whether or not USB remote mode is enabled.
do
p = get_usb_power 1
until p>0
get_usb_power(2)
- returns the buffered pulse width or pulse gap timing. Width values are positive, gap values are negative.
- this function works whether or not USB remote mode is enabled.
do
p = get_usb_power 2
ntil p>0
get_usb_power(3)
- returns the count of pulses since that last time the function was called. Function return 0 when no pulses are receive in the previons 1 second.
- this function works whether or not USB remote mode is enabled.
do
p = get_usb_power 3
until p>0
set_remote_timing(uSec)
( CHDK 1.3.0 or newer only - originally called enable_remote_hp_timer() in early releases of 1.3.0)
Standard measurement of USB pulse widths is performed by the USB remote task based on the assumption that it runs every 10 mSec. However, variations in this interval - especially when the camera is in shooting mode - are possible and can result in poor timer accuracy. The set_remote_timing() command enables the use of a higher precision timer for these measurements. This time does not depend on task "tic timer" accuracy, providing a much more stable and reliable source for the measurement of pulse width and space information.
The parameter passed to the function specifies the rate at which the USB pulse will be sampled in uSeconds. Valid values are 1000 and larger.
Sample Lua test script
--[[
@title USB Tester

@param m Mode
   @default m 0
   @values  m State Width Pulses Count Key

--]]

function printf(...)
    local tic = get_day_seconds()
    print (string.format("%02d:%02d:%02d %s", tic/3600, tic%3600/60, tic%60, ...))
end

mode = m
set_console_layout(1, 1, 44, 10)

print("USB remote test started")
if(mode == 1) then mstr="pulse width"
elseif (mode ==2) then mstr="pulses"
elseif (mode ==3) then mstr="pulse count"
elseif (mode ==4) then mstr="key"
else mstr="state" end
print("   test mode : "..mstr)
print("Press MENU to exit")

set_config_value(121,1) -- make sure USB remote is enabled

usb_state=-1
rkey=0

repeat
    now = get_day_seconds()

 -- check USB state ?
    if ( mode == 0 ) then
        new_state = get_usb_power(1)
        if ( new_state ~= usb_state ) then
            printf("state="..new_state)
            usb_state=new_state
        end
    end

 -- check USB pulse width ?
    if ( mode == 1 ) then
        x=get_usb_power(0)
        if ( x > 0 ) then printf("width ="..(x*10).." mSec") end
    end

 -- check USB pulse train?
    if ( mode == 2 ) then
        x=get_usb_power(2)
        if (x ~= 0 ) then
            if ( x > 0 ) then printf("mark ="..(x*10).." mSec")
            else printf("space="..(-1*x*10).." mSec") end
        end
    end

 -- check USB pulse count ?
    if ( mode == 3 ) then
        x=get_usb_power(3)
        if ( x > 0 ) then printf("count="..x) end
    end

    wait_click(100)

  -- read USB as a camera key ?
    if ( mode == 4 ) then
        if (is_key("remote")) then
            if (rkey==0) then
                printf("remote pressed")
                rkey=1
            end
        else
            if (rkey==1) then
                printf("remote released")
                rkey=0
            end
        end
    end

until is_pressed("menu")

set_config_value(121,0) -- make sure USB remote is disabled
NOTE : changing the yield value used by the script ( see set_yield ) will change the minimum and maximum timing for pulse counts and will change the measured pulse width value. You will need to calibrate these values for each set_yield change you make.
Links
CHDK Forum
- Building a USB Remote Cable - many pages of ideas and pictures here
- DIY wireless remote with a chinese door ring bell
- USB Remote Shutter using Linear Voltage Regulator
- The perfect miniature USB remote?
- CHDKremote2 - a two stage remote control adapter for CHDK
External Web Sites
- Remote Shutter Release Project
- Gentles USB Remote Switches
- fvdk's USB Remote Wwitches
- fvdk's Various SDM / CHDK Remotes with External Port
- fvdk's USB Remote YouTube video
- Flickr USB Remote Switch Page
- Instructable for creating cable release from an Amiga joystick
- Short directions for building a cable release using an LED keychain flashlight
- DIY Wireless remote with a Chinese remote LED LAMP
- CanoRemote : Infrared Remote Control Receiver
- digi-dat SDM Canon USB remote
- DIY Shutter Release Cable For Canon Cameras with CHDK
Video Instructions