Capturing the screen of your camera allows you to easily share CHDK settings, quirks and bugs, as well as capture your camera's OSD and palette.
Capturing your screen in the past meant using another camera to take a picture of the camera's LCD or, if available, using the video output capabilities of your camera and capturing the video signal with a capture card. These methods can be inexact at best.
Another method, generally available for modern digital cameras, is using the Picture Transfer Protocol (PTP) with CHDK's PTP extensions.
Screen capture with chdkptp
This section focuses on screen capture using chdkptp .
To perform proper screen captures with chdkptp, you'll only need chdkptp and a supported camera.
An outline of steps:
- Make sure you've got chdk 1.1 or above installed on your camera
- Install chdkptp (If you're on Windows, don't forget to install libusb-win32 first)
- Optional, but recommended, install a screen capture utility that can capture pixel transparency data, such as Gadwin Printscreen when saving to BMP files. More information on this later.
- Plug the cable required for PTP into your camera and your computer (typically just a plain mini or micro USB cable)
- Turn on your camera, preferably in a dark environment or the lens blocked off*, and make sure your system recognizes it.
- Run chdkptp.
- In chdkptp... press the Connect button. If it fails to connect, double-check your chdk and chdkptp installs.
- Switch to the Live tab
- In the Stream group, enable Viewfinder so that chdkptp will start getting display data from chdk.
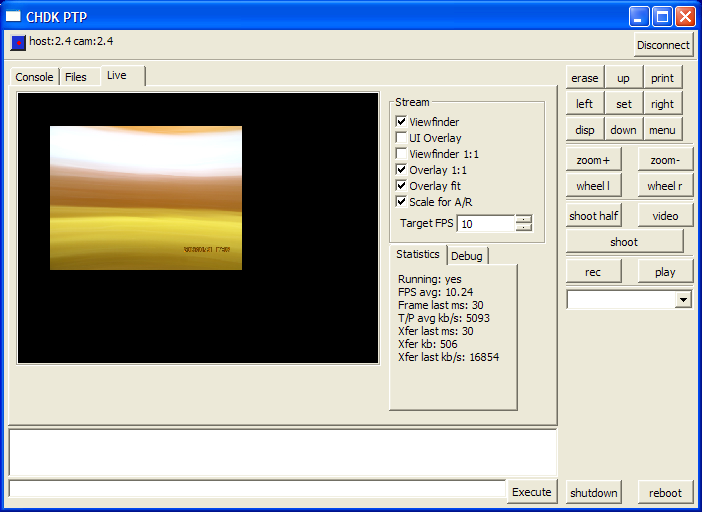
chdkptp Live view with viewfinder
If you take a screenshot at this point and paste it into your favorite application you should get something a little like the example screen (given for a Canon SX260 HS).
If it seems like there's something missing, it's because there is. The OSD elements are not displayed. To capture those as well, add the following steps:
- Enable UI Overlay. This will draw the OSD elements. At this point, the OSD elements may seem crudely drawn.
- Disable Scale for A/R. This will prevent chdkptp from trying to stretch the image to the LCD's dimensions. Note that this may cause circles to look like ovals - this is a good thing.
- Enable Viewfinder 1:1. This will cause chdkptp to draw the bitmap(s) received at a 1:1 scale - meaning that every pixel in the bitmap(s) will display as one on your screen. At this point some of your OSD elements may seem a little 'pixelized'. This is because main OSDs tend not to be drawn at the viewfinder's resolution, but at a different resolution. For example, the SX260 HS has a Viewfinder resolution of 740x480, but a native OSD resolution of 720x240.
- Optional: Disable Overlay Fit to prevent the OSD from being scaled to the same dimensions as the Viewfinder. This will draw the OSD elements at their native resolution - which can mean they will look rather squashed and, of course, will not fit the main Viewfinder. You may find it easier to leave this enabled.
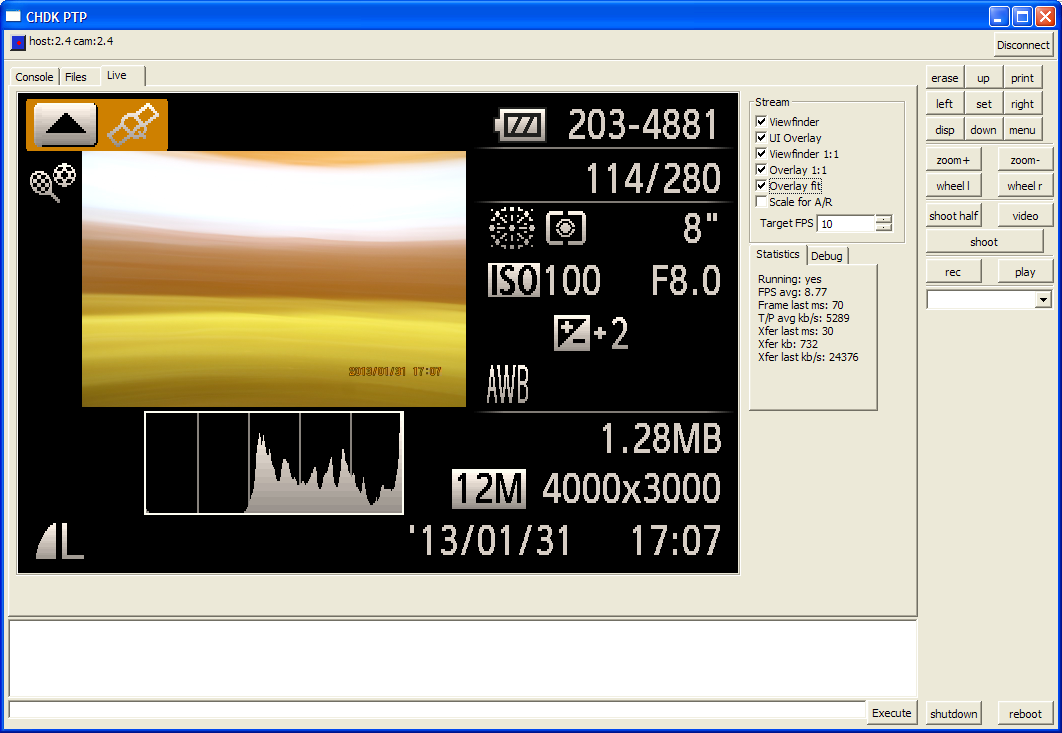
chdkptp Live view with UI overlay
If you take a screenshot now, things should look like what you're seeing on your camera's display.

chdkptp Live view, UI Overlay elements with transparency
If you installed a screen capture utility that captures pixel transparency data, try opening the resulting file directly into an application that can read this (The GIMP, for example) as it may contain that pixel transparency data. If the capture succeeded, and the application read it, you should see just the OSD elements, along with their actual transparency, and some random chdkptp UI elements that were marked as being opaque.
For some purposes, such as capturing OSD elements or the camera's Palette, this can be a big timesaved as you don't have to manually mask out the picture and determine OSD elements' transparency.
- This is also why you should perform captures in a dark environment or with the lens blocked off. The way transparency is handled is a simple mix between 2 colors. By causing the sensor to only see black (or close to it, due to sensor noise), semi-transparent elements are almost completely unaffected.
Note: Some OSD elements only appear with a sequence of button presses that you can't replicate using the chdkptp buttons. To perform these sequences anyway, use the command console in the bottom of the chdkptp window to send specific button presses. For example, on the SX260 HS exposure lock in P mode is entered by half-pressing the shutter button, then pressing the up button once exposure has been established, then the shutter button released. This can be replicated using the following command sequence (one line):
=press("shoot_half") sleep(1000) click("up") release("shoot_half")
For details on chdkptp usage and commands, check the chdkptp documentation and the CHDK Scripting Cross Reference Page.
You may find that it is difficult to invoke CHDK menus through chdkptp in order to take screenshots of them due to the way chdk gets mapped to buttons. For example, on the SX260 HS the play button is used to enter the menus, and pressing that button in the chdkptp UI just makes the camera switch to playback mode.
Fortunately, you can still use the CHDK-mapped button on the camera itself. You may have to press it twice for the CHDK menus to pop up, but once they do you should have them on your chdkptp Live view as well.
Note: You will have to perform navigation of the CHDK menus on the camera itself - using the chdkptp buttons will cause your camera's original button functions to be used, and while you wonder why the chdk menus aren't responding to button presses, you may have inadvertently performed operations in the camera's menus - such as deleting an image.
Capturing the camera palette
Once you've got things ready for capturing the CHDK menus, you may wish to make a capture of the camera's Palette, for example to create your own Grids or to make a Palette Sheet.
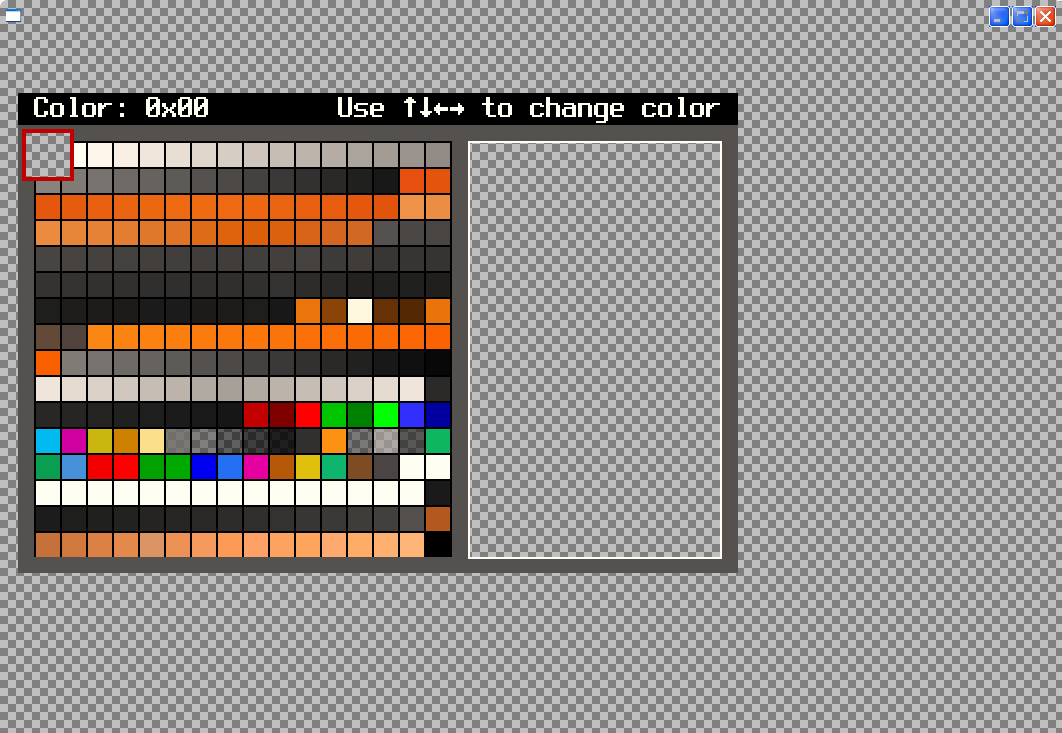
chdkptp Live view, chdk Draw Palette captured
To do so, it's simply a matter of accessing the CHDK menu (see Capturing CHDK menus), navigating to the Miscellaneous Stuff menu entry and choosing the Draw Palette command - capture away. ( Shown here with a checkerboard background to better illustrate palette entries' transparency on the web. )
Scaling the captures
Depending on your camera and how you captured you may have to scale the images for eventual use.
If you want to illustrate your screen, for example in forums, and your captured Viewfinder size is 720x480 (a 3:2 aspect ratio) while the physical dimensions on your camera are a 4:3 aspect, you may wish to scale the image by approximately 88.89% horizontally to get the image to conform to what you're actually seeing.
If you captured OSD elements at 720x480 and want to make a Grid that steers clear of certain elements, you may wish to scale the image to 720x240 without interpolation first, and to 360x240 with interpolation second to retain as accurate a positioning of the OSD elements as possible (the margin of error should be no more than 1 pixel).