Q. What does the CHDK program do?
A. CHDK enhances the capabilities of your camera in a non-destructive, non-permanent way.
After loading of CHDK program you will get the following functionality:
- Shutter-priority (Tv) exposure - via shutter value override feature
- Aperture-priority (Av) exposure - via aperture value override feature
- Shooting in RAW, with RAW Average, RAW Sum, and RAW Develop features
- Live histogram (RGB, blended, luminance and for each RGB channel)
- Zebra mode (a live view of over and under-exposed areas of your picture)
- Depth-of-field (DOF)-calculator, Hyperfocal-calculator with instant Hyperfocal and Infinity focus-set, and more
- Battery indicator
- RAW and Video space-remaining gauges with custom low-limit alerts
- USB cable remote shutter release
- Motion-detection trigger - automatically fires camera on motion detection. (Fast enough to capture lightning strikes.)
- Customizable high-speed continuous (burst) Shutter-based (Tv), aperture-based (Av) and ISO-based exposure bracketing (unlimited shots)
- Focus bracketing (unlimited shots)
- 99 constant bit-rate and 10 constant-quality video compression levels
- Elimination of 1 Gig video-size limit
- Zoom during video function (for cameras without this feature)
- Shutter, Aperture, and ISO Overrides
- Ultra-long shutter speeds - up to 64 seconds
- Ultra-fast shutter speeds - up to 1/10,000" and higher
- High-speed Flash Sync at all speeds up to 1/64,000 second (even faster in some cameras)
- Custom user-editable visible Grids for framing, cropping, and alignment
- File browser
- Text reader
- Calendar
- Some fun tools and games :)
- Fully customizable CHDK display, info placement, user-colors, fonts in menus, etc.
- Custom CHDK User-Menu (for instant recall of up to 10 favorite functions)
- Scripts execution - including exposure bracketing, focus bracketing, intervalometer and more)
- And other features too numerous to mention here. See the CHDK Firmware and Allbest Firmware usage pages for a more complete overview.
These features work on all camera models supported by CHDK. The camera does not need to have "related" or "inherent" features already present - CHDK will add the required functionality. New features are accessed through CHDK-specific menus, rather than the default camera menus.
As CHDK is continually evolving, new features are often added. Thus, some of the listed features depend on you using a version of CHDK that has those features. Check out the Downloads page for information on finding the right build for your needs.
Q. What camera models are supported by the CHDK program?
A. Currently, the CHDK program is available for Canon digital cameras of the following models:
Camera: Firmware Versions
- A410: 100e, 100f
- A420: 100b
- A430: 100b
- A450: 100d
- A460: 100d
- A470: 100e, 101a, 101b, 102c
- A480: 100b
- A490: 100d, 100e, 100f
- A495: 100d, 100e, 100f
- A530: 100a
- A540: 100b
- A550: 100c
- A560: 100a
- A570: 100e, 101a
- A580: 100c, 101b
- A590: 100e, 101b
- A610: 100d, 100e, 100f
- A620: 100f
- A630: 100c
- A640: 100b
- A650: 100d
- A700: 100b
- A710: 100a
- A720: 100c
- A800: 100b, 100c
- A810: 100b, 100d, 100e
- A1000: 100a, 100b
- A1100: 100a, 100b, 100c
- A1200: 100a, 100b, 100c
- A1300: 100b, 100d, 100e
- A1400: 100b
- A2000: 100a, 100b, 100c
- A2100: 100a
- A2200: 100b, 100c, 100d
- A2300: 100c, 100e, 100f
- A2400: 100c, 100d, 100e
- A2500: 100a
- A2600: 100c, 100d
- A3000: 100b, 100c, 100d
- A3100: 100a, 100b, 100d
- A3200: 100a, 100c, 100d
- A3300: 100a, 100c, 100d
- A3400: 100f, 101a, 101b
- A4000: 100c, 101a, 101b, 102a
- D10: 100a, 100b
- D20: 100b
- D30: 100a
- EOS M3: 101a, 120f, 121a
- EOS M10: 110d, 110f, 110g, 111a
- G1X: 100e, 100f, 100g, 101a
- G5X: 100c, 101a, 101b, 101c, 101d
- G7: 100e, 100g, 100i, 100j
- G7X: 100b, 100c, 100d
- G7X Mk 2: 101a, 110b
- G9: 100d, 100f, 100g, 100h, 100i
- G10: 102a, 103b, 104a
- G11: 100f, 100h, 100j, 100k, 100l
- G12: 100c, 100e, 100f, 100g
- G15: 100b, 100e
- G16: 100h, 101a, 101b, 101c
- IXUS30 (SD200): 100k
- IXUS40 (SD300): 100j, 100k
- IXUS50 (SD400): 101a, 101b
- IXUS55 (SD450): 100b, 100c, 100d
- IXUS60 (SD600): 100a, 100d
- IXUS65 (SD630): 100a
- IXUS70 (SD1000): 100c, 101a, 101b, 102a
- IXUS75 (SD750): 100b, 101a, 101b, 102a
- IXUS80 (SD1100): 100c, 101a, 101b
- IXUS85 (SD770): 100a, 100b
- IXUS90 (SD790): 100c, 100d, 100e
- IXUS95 (SD1200): 100b, 100c
- IXUS100 (SD780): 100b, 100c
- IXUS105 (SD1300): 100b, 100c, 100d
- IXUS110 (SD960): 100b, 101d, 101f, 101g
- IXUS115 (ELPH100HS): 100c, 101a, 101b, 101c
- IXUS120 (SD940): 100e, 101a, 102c, 103b, 103c
- IXUS125 (ELPH110HS): 100d, 100e, 101a
- IXUS130 (SD1400): 100a, 100c
- IXUS132 (ELPH115): 100b
- IXUS135 (ELPH120): 100b
- IXUS140 (ELPH130): 100a, 100b
- IXUS145 (ELPH135): 100c
- IXUS150 (ELPH140): 100c
- IXUS155 (ELPH150): 100b
- IXUS160 (ELPH160): 100a, 100b
- IXUS170 (ELPH170): 100a
- IXUS175 (ELPH180): 100a, 100b, 100c
- IXUS185: 100a
- IXUS180 (ELPH190): 100a
- IXUS190 (ELPH200): 100d. 110a
- IXUS200 (SD980): 100c, 101c, 101d
- IXUS220 (ELPH300HS): 100c, 101a, 101c, 101d, 101e, 101g
- IXUS230 (ELPH310HS): 100a, 100b, 100e
- IXUS240 (ELPH320HS): 100c, 100d, 101a, 102a
- IXUS255 (ELPH330HS): 100f, 100h
- IXUS265 (ELPH340HS): 100a, 100c
- IXUS275 (ELPH350HS): 100a
- IXUS285 (ELPH360HS): 100b, 100c
- IXUS300 (SD4000): 100d
- IXUS310 (ELPH500HS): 100a, 101a, 101b, 101c
- IXUS700 (SD500): 101a, 101b
- IXUS750 (SD550): 100f, 100g, 100h
- IXUS800 (SD700): 100b, 101a, 101b
- IXUS850 (SD800): 100d, 100e
- IXUS860 (SD870): 100c
- IXUS870 (SD880): 100e, 101a, 102b
- IXUS900 (SD900): 100c
- IXUS950 (SD850): 100c
- IXUS960 (SD950): 100c, 100d
- IXUS970 (SD890): 100b, 100c, 100d, 100f
- IXUS980 (SD990): 100e, 101b
- IXUS990 (SD970): 100a, 100b
- IXUS1000 (SD4500): 100b, 100d, 100f, 101a, 102b, 102c
- IXUSIZOOM (SD30): 100e, 100f, 100g, 100h
- IXUSW (SD430): 110a
- Powershot N: 100a
- Powershot N Facebook: 100a
- S2IS: 100e, 100f, 100g, 100i
- S3IS: 100a
- S5IS: 101a, 101b
- S80: 100g, 101b
- S90: 100c, 101a, 101b, 101c
- S95: 100e, 100h, 100i, 100k
- S100: 100d, 100e, 101a, 101b, 102a
- S110: 101b, 102b, 103a
- SX1: 200h, 201a
- SX10: 100c, 101a, 101b, 102b, 103a
- SX20: 100f, 102b, 102c, 102d
- SX30: 100e, 100h, 100l, 100m, 100n, 100p
- SX40HS: 100d, 100f, 100g, 100i
- SX50HS: 100b, 100c
- SX60HS: 100b, 100c, 100f, 100g, 100h
- SX100IS: 100b, 100c
- SX110IS: 100b
- SX120IS: 100b
- SX130IS: 101c, 101d, 101f
- SX150IS: 100a
- SX160IS: 100a
- SX170IS: 100a, 101a
- SX200IS: 100c, 100d
- SX210IS: 100c
- SX220HS: 100a, 101a, 101b, 101c, 101e
- SX230HS: 100c, 101a, 101b, 101c, 101e
- SX240HS: 100a, 100c, 101a
- SX260HS: 100b, 100c, 101a
- SX270HS: 102b, 102c
- SX275HS: 102b, 102c
- SX280HS: 102b, 102c, 102d
- SX400IS: 100b
- SX410IS: 100b, 100c
- SX420IS: 100a, 110a
- SX430IS: 100b
- SX500IS: 100c, 100d, 100e
- SX510HS: 100a, 100c, 100d, 101a
- SX520HS: 100b, 100c
- SX530HS: 100a, 100c
- SX600HS: 100d, 100f
- SX610HS: 100a
- SX620HS: 100b, 100c, 110a
- SX700HS: 100d, 100e
- SX710HS: 100a, 101a
- SX730HS: 100b, 100c, 100d, 100e
- TX1: 100g, 101b
Firmware versions in green are available in stable and/or dev for download
Firmware versions in gray do not have official CHDK releases. Check porting status here
For the development status of not-yet-supported cameras, see For Developers.
In theory it can be modified to support any camera based on the DIGIC II or DIGIC III platform. (How do you do this?).
- If your camera model is not listed here then there is no CHDK for it at the present time !
- See also Unsupported Cameras
Q. How can I get the original firmware version number of my camera?
A. To get the version number, you need to:
- create a file called ver.req in the root directory of your SD card. If you're using Notepad on Windows, be sure you don't name it "ver.req.txt" by changing "Save as type" to display "all files".
- IMPORTANT: Note that it is spelled ver.req, as in VERsion REQuest, that Q is NOT a G, Type it correctly!!!
- switch on the camera in playback mode and wait for the main screen (don't switch on in rec mode and change to playback later)
- press the func set+disp. buttons together (press set first, hold it down, then press disp.).
You will see a string like Firmware Ver GM1.00E. The 1.00E part is the firmware version.
ver.req is just an empty dummy file.
--be certain that the last file on your card is a picture, not a movie clip. If it is a movie, the directions won't work. (Just take a pic of anything, and try again and it should work.)(At least with my SD400 1.01B)
Creating the ver.req file
- Windows based systems
- Download Card Tricks and start it. Select card, click Format as FAT: done, ver.req is now on your card.
- One manual way to create this file is to switch to cmd shell and type:
echo. > ver.req <ENTER>
- and copy ver.req to your SD card.
- Another way to create this file: make an empty text file with Notepad and rename it to "ver.req".
- Yet another way to create the file is to open the memory card in My Computer, right click inside the window and select New... and then Text Document. An empty text document will be created and you can rename it to "ver.req" (be sure to have windows display the file-extension, otherwise it will become "ver.req.txt").
- GNU/Linux or *nix based systems
- Or on *nix (Linux,Solaris,BSD etc) based systems, from the shell cd to your SD card's mount point and run the following command:
touch ver.req
- Mac based systems
- When using a Mac, open a blank document in TextEdit, then choose save, and save as ver.req , then select the root folder on your memory card from the menu provided.
Important: change plain text encoding from Western (Mac OS Roman) to Unicode (UTF-16), and uncheck "if no extension is provided, use .txt" (if you don't see these options then you need to select "Make Plain Text" from the Format menu). Then click on Save.
Please note! your camera's firmware version is NOT 1.0.0.0 or 1.0.1.0! It's a number that looks similar to this example: 1.01e. If you get a number like 1.0.1.0, then you did not do it properly. Try again.
[It has been found that some cameras now also support finding a "vers.req" file in the same way. Note that it is called "vers.req" and not just "ver.req". That extra S in the filename now allows you to even see the total number of shots that have been taken with your camera with the same keys pressed multiple times. For further info see this thread on the new CHDK Forum.]
In cameras that support vers.req, ver.req may no longer work, and all you'll get when you press [SET]+[DISP] will be the time clock. If this happens, you need to create "vers.req" instead of "ver.req" on your SD card (or create both to be sure). Then pressing [SET]+[DISP] will get you the version information instead of the time clock.
Q. How can I update the original Canon firmware?
A. Official Canon firmware updates (if available) can be found here at the Canon website or in this list here.
Information about an unofficial upgrade of the A620 firmware from an early version to 1.00F can be found in this message. The 1.00F Firmware can be obtained from this link If the link is down, go to drop.io and download the canon_a620.f.fw-update-original-by-canon.7z from there.
Attention: These firmware updates will permanently change the firmware of your camera (unlike the CHDK program, which is only temporary). If anything goes wrong during the update process (for example because you tried it when the batteries were low), you may end up with a dead camera. Please also note that using one of these updates may void your warranty - at least if they are not directly from Canon. (I don't know... please check for yourself.)
Note: If you update the firmware in your A620 be sure to delete the file (PSA620.FIR) from your memory card before you run CHDK, otherwise CHDK won't run.
Q. Does using the CHDK program void your warranty?
A. First, please bear in mind that CHDK comes with no warranty for any use; you use it at your own risk. What follows is just a few thoughts, and is not a legal opinion. Many believe that using the CHDK does not harm your warranty, since it is said to be loaded into the memory only temporarily (turn off the cam and it's gone completely) and that it leaves the original camera firmware untouched.
Canon Tech Support says: "Unfortunately, any upgrades to the software of the camera not performed by an authorized Canon Repair Facility, would void the warranty." ... and ... In further discussion with Canon about this specific hack, their response is: "If it is not Canon firmware the warranty would be void."
Is it an "upgrade" of the camera firmware when the firmware remains untouched? It's up to you to decide. Don't use it if you are not willing to take the slightest chance. Many many people have used CHDK on their cameras (including some very experimental versions) and there is no report of any permanent malfunction. Thus, CHDK appears to be quite safe to use as long as you make sure that it's the CHDK and not a real firmware update (A real firmware update which is not an official Canon update could alter or completely screw up the camera and will void the warranty). Addressing their second comment (i.e. "if it is not Canon firmware"): CHDK is NOT firmware. By very definition, FIRMware is software that remains in the memory of the device when it is not using any power-source.
However, this is not a legal opinion and the user accepts all risk of using it. And as a practical matter, if you send your camera in for warranty service, and Canon says your warranty is void because they found evidence of CHDK on your memory card, there is not much you can really do (what are you going to do? Spend thousands of dollars suing them to get your camera repaired?)
However, you can just wipe or remove the card. ;)
> This is to report that I had to send in my A710 IS for repairs when the play/capture switch stopped functioning reliably. I had used the CHDK but did remove the SD card before posting it. The letter I received along with the camera indicates that some parts were replaced, i.e. it was a hardware defect. The camera was under full warranty and I did not have to pay for the repairs. This dates back around March 2007.
> One guy asked the warranty question to Canon support through email:
Hello,

Will CHDK violate the warranty of my Powershot A720? CHDK is a kind of
software program on a SD card and gets loaded into the camera's memory
upon bootup. It provides additional functionality beyond that currently
provided by the native camera firmware, it provides for example an "always on" full range Battery indicator.

So does this CHDK software violate the warranty of my camera?

Thank you for answering my question.

Sincerely,
Cet Senol
And got the reply:
Dear Cet Senol:

Thank you for your reply. After researching this software on the
internet it appears that CHDK doesn't make any actual changes to your
camera. If you delete the CHDK software from your memory card, or if
you choose not to activate the CHDK software on the card (or remove and
replace the batteries), then the camera will behave absolutely normally
- nothing has been (or ever is) changed, so the warranty is not
affected.

We hope this information is helpful to you. Please let us know if we
can be of any further assistance with your A720 IS camera.

Thank you for choosing Canon.

Sincerely,

Joann
Technical Support Representative
please note - under most countries laws service agents cannot refuse warranty work unless they can prove your actions outside the warranty contract have caused the malfunction.
Q. Can CHDK damage your camera ?
Short answer: Yes. It is unlikely, but theoretically possible. As stated above CHDK comes with no warranty for any use; you use it at your own risk. CHDK is created by reverse engineering an undocumented system that directly controls hardware. Because of this, it is impossible to be certain that it is completely safe.
Long answer: It is very unlikely that CHDK will permanently harm your camera. There have been no reports of CHDK damaging a camera, and both the original firmware and the CHDK developers do their best to avoid situations where this could happen. There are at least two ways in which CHDK could theoretically do damage:
- By commanding physical hardware to do something it was not designed to do. For example, it is possible to command the lens hardware to move when the lens is closed. It is also possible to move lens hardware beyond limits allowed by Canons firmware, using scripts or overrides. See UBASIC/Scripts:_Tele-Macro-Mode and Talk:UBASIC/Scripts#Tele-Super-Macro_Mode_Comments. It's worth noting that neither of these cases have resulted in actual damage, and both required direct input from the user.
- By overwriting the internal flash ROM where the Canon firmware is kept, rendering the camera un-bootable. Since CHDK does not ever intentionally write to internal flash, it would take an extremely unlikely sequence of events to make this happen.
If you are concerned about this, you can minimize your risk by avoiding untested development builds (such as the autobuilds, or test builds posted on the forum) and being careful about what scripts you run.
Q. Where can I download the CHDK program?
A. Go to the Downloads page.
Q. Where can I find a changelog of the CHDK program?
A. Go to the ChangeLog Page. Click on the Chgset number of the build you want to know about and read the log message. For CHDK archaeology, go here Older ChangeLog Page or Even older ChangeLog Page ;)
Q. I'm confused! What do I download? How is CHDK organized?
A. As CHDK is a collaborative effort, there is no formal "structure", nor is there a single version of CHDK. This can make it confusing for people to know what to download.
CHDK consists of two major portions: the CHDK program itself, and user-developed "scripts" that run on the CHDK platform.
The CHDK program itself is further subdivided into different "builds". Builds are developed by different people or groups, and then distributed. Each build can have different functionality, but they are all based on some "original" core CHDK code, so they all have at least a certain core number of features.
Builds are further subdivided into builds for different cameras. Builds may support several camera types. For example, the "Allbest" build is available for almost every camera supported by CHDK.
This situation arises from the fact that CHDK has never had a "central" authority. Development can be done by anyone, in any way, at any time! So, to understand CHDK involves understanding CHDK history.
In the beginning, there were builds written by GrAnd (although many others contributed). These "GrAnd Builds" formed the basis for all CHDK builds. In other words, the features from the GrAnd builds are included in all versions of CHDK. Much of the description in this wiki either refers to the GrAnd builds, and/or assumes that you know what features are included in GrAnd's builds.
After the GrAnd builds came a number of newer builds developed by different authors. Features such as Tv/Av mode, motion detection, and so forth were developed in different versions that co-existed at the same time. These include Owen's builds, Fingalo's builds, Ewavr's / Zosim's builds, SDM, and others.
It wasn't long before there were enough new features to consider gathering the best features into one build. Thus was born the AllBest builds. AllBest consolidated all of the "best" features from the disparate builds of CHDK - VitalyB, GrAnd, Ewavr, Fingalo and Mx3 - into a single version. There is an AllBest build for nearly every camera supported by CHDK.
As AllBest improved, still more features were added. Eventually some authors developed a new branch, variously called the "Juciphox" branch (after the two "main" authors, Jucifer & PhyrePhoX, although many others contributed), "The Collaborative CHDK build", and the "MoreBest" builds - although indications are that the authors are not happy with any of these names, so the name will probably change again! These builds added still more functionality to CHDK by once again trying to gather all of the best available features into a single build.
So, to get the full CHDK experience, you need to:
- Identify the camera you need to run CHDK on
- Identify which builds are available for your camera
- Get the build you feel has the right combination of features, and install it
- (Optional) Identify and install the scripts you need/want.
Still confused? Start with the "AllBest" build, where possible. Once you find yourself wanting more, start looking for scripts or an alternative build. Just download the correct AllBest build for your camera from the Downloads page.
If there is no AllBest build for your camera, try a Juciphox/MoreBest build. As this is being written, Juciphox is a work in progress and might not be as stable / bug-free as the other versions, but it does support a few cameras not supported by AllBest.
If you stick with AllBest or Juciphox, you will get at least the features mentioned in question #1, above. If this includes the features you are after, you need look no further!
Q. What is an "Autobuild"?
A. An "Autobuild" version is a version of CHDK that is still under development. As the developers compile new versions to test, their efforts are "automatically built" and made available on the web for beta testing.
As with most beta software, not all new features have been fully tested. Some features may not work with all camera models. Your feedback and bug-reports concerning these new builds are welcome on the CHDK forum.
Newcomers may find it more comfortable to not use an Autobuild, unless it is necessary to run CHDK on your camera. Although CHDK does not make any changes to the actual firmware on your camera, it may be possible to cause mechanical damage to your camera, but this is extremely unlikely due to the safeguards put in place by Canon - most people prefer not to work with software that hasn't been thoroughly debugged.
Q. How do I get CHDK onto my camera's SD memory card?
Note: If you are using a Mac, please see Mac FAQ.
A. For experienced users:
- Remove the SD card from your camera
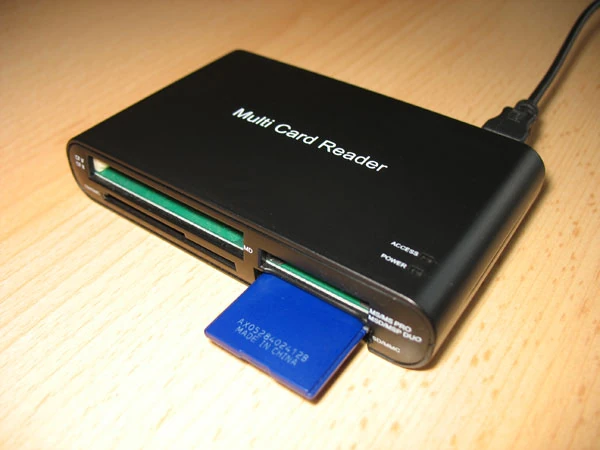
- Connect the card to your computer using a regular card reader (Do I need a card reader?)
- Download the firmware archive suitable for your camera and extract the contents
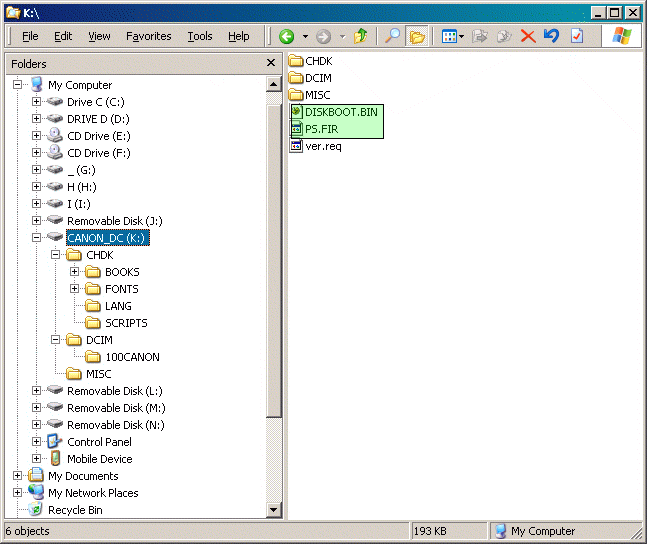
- Copy the file Diskboot.bin into the root folder of your card (on older camera models, you may also need to copy the PS.fir file, if present) (What is the root folder?)
- Copy the folder CHDK and all its contents into the root folder (unless you have created two partitions on the card, in which case the CHDK folder should be copied to the second partition)
- Safely remove the card from the reader
- Place the card in your camera. If CHDK does not load, you may need to lock the card for writing.
B. For less experienced users:
Note: This method uses a Windows only software called CardTricks and works using cards up to 4GB
- Remove the SD card from your camera
- Connect the card to your computer using a regular card reader (Do I need a card reader?)
- Download and install Card Tricks.
- Open the application and select the CARD's LETTER, when asked. (please pay attention to select the proper drive, otherwise you may lose important data) (What is the root directory of my SD memory card?)
- Click the Format as FAT button, read and accepted the notice.
- Click the Make Bootable button, read and accepted the notice.
- Download the ZIP file with the CHDK version of your choice. If you not sure, just click the Download CHDK button and pick your camera model ZIP file.
- Click the CHDK binary button and point to the ZIP file you downloaded.
- Remove the card from the card reader.
- Lock the card for writing by flipping the "lock" switch on the side of your card. This is required! You will still be able to take pictures and record movies just fine.
- The card is now configured to start CHDK automatically when camera starts (How do I start CHDK automatically?)
- Remove the card from your card reader and place it in your camera. Leave the card write protected
- If everything went right, when you turn on the camera, the CHDK splash screen will blink (CHDK splash screen)
|
A pictured installation guide for MS Windows users is here: CHDK/Installing with Cardtricks |
Other notes:
The methods presented above require cards to be formatted using the FAT16 file system, which is limited to a maximum of 4 GB. Some cameras support the new SDHC (SD High Capacity) flash cards, which can go over 4 GB.
If you have a card larger than 4 GB, the solution is to create two partitions on your card: a small FAT16 partition, and a larger FAT32 partition. (The FAT16 partition can be very small, like 2 MB, and must be the first partition on the card.) You would then install the CHDK boot files (DISKBOOT.BIN and possibly PS.FIR) on the FAT16 partition, and everything else on the FAT32 one.
When using this system, CHDK will start from the FAT16 part of the card. It will then automatically detect the larger FAT32 partition, and "switch over" to use that one. All images, movies, etc. will be stored on the large partition, and all CHDK scripts and data files will be read from there. (The smaller partition cannot be accessed once CHDK is loaded, so don't put any scripts or other files you want to use on it!)
Q. How do I manually load CHDK so I can use it?
A. Follow these steps:
- First, copy CHDK onto your camera's SD memory card (see that question above)
- Start the camera in Play mode. (It WILL work* if you start in 'record' mode and then switch to playback mode BUT you will have to push the "play" button twice, then the zoom will retract, and then you must go to "menu" options and "firm update" new option, and choose YES when the camera ask you for the "updating" version. Your camera will be COMPLETELY SAFE)
- Press the Menu button.
- Go to the new menu entry "Firm Update" (usually, it's the last option in the menu). If you are unable to find this menu on your camera, do not worry; some models automatically load the firmware.
- Select that function and confirm that you want to update with "OK". (If you don't see that option in the menu, then either you didn't correctly copy the files to the SD memory card, or you didn't start your camera directly into playback mode)
The camera will now reboot (in about 1-2 seconds), the blue LED on your camera will blink once and a splash screen will appear.
If the camera hangs or is switched off during updating process and/or does not respond to the power button, then this means that this CHDK program is not compatible with your camera firmware. If that happens, don't worry! Just open up the battery compartment and remove the batteries to turn the camera off, stick them back in and everything should be fine.
See also How can I make the CHDK program load automatically at startup?
If you later want to update a CHDK version, just copy the new PS.fir and Diskboot.bin files onto the SD card and overwrite the old ones. You do not have to delete any other file. All settings are forward/backward compatible.
After running CHDK and setting all your options for histograms, zebra-mode, OSD (on-screen display) layout, fonts, colors, last script loaded, etc. all your settings are saved in the /CHDK/CHDK.CFG file. It even saves the last position you were reading in the last text-file you were viewing using the File-Reader. If you want to recreate those exact same settings on another SD card with CHDK on it, just copy that file from one SD card to another, making sure it's in the /CHDK/ folder on the new SD card.
Q. There's no PS.FIR file in the CHDK download for my camera. What do I do?
A. This works for the new camera models, based on DryOS (such as A720IS, A650IS, A590IS):
- Make the SD memory card bootable. Read these instructions how to do it.
- Copy the DISKBOOT.BIN file to the root directory of the SD card.
- Write protect the memory card (Lock setting)
The root directory
Q. What is the root directory of my SD card?
A. The root directory is the first or top-most directory. If your SD card has the drive letter "K", then the root directory is "K:\".
What is the root directory of my SD card (when using a Mac)?
A. It's what you see when you double click the SD card icon on your desktop and a window opens.
Q. Do I need a special card reader, or is it sufficient to connect the cam to the PC?
a card reader
A. Digicanon has an uploader for the A610 on his page which you can use to upload the CHDK program files to the A610 without a card reader. This uploader may work also for other camera models with VxWorks operating system, sucessfully tested with A620, SD400 & S2. Link.
How to use it:
- Put your CHDK program files PS.FIR and DISKBOOT.BIN into the same folder as the uploader
- Make sure your SD-card is not write-protected
- There is a textfile named "FirmInfo.txt". It contains this text: "[Firmware File Name]". Just change the name below it into the filename you want to upload. Then save the text file and start the UploadFirmware.exe. You have to do this two times: 1x for PS.FIR and 1x for DISKBOOT.BIN.
I personally find it more convenient to use a cheap USB card reader. Cheap readers have no sensor for the write protection switch on the card, and this is great. Otherwise, you would have to switch the card to "unlocked" everytime you want to put something on the card, or delete something with your PC.
Another option is to use a camera which behaves as a USB Mass Storage device. Even if your camera does not support this feature, you may be able to borrow such a camera from a friend for the installation procedure.
Q. When I switch off my camera and then switch it on again, the CHDK program does not work. What's wrong?
A. When you update your camera with CHDK, it doesn't actually change the firmware. Because it is just a memory-resident program, it only remains in the camera's memory until the camera is turned all the way off. So, if something goes wrong and camera does not respond, you can always switch the camera off (or remove the battery, and perhaps delete it from the memory card) to return to the original firmware.
Recently, CHDK gained the ability to autoload (see the next answer).
Q. How can I make the CHDK program load automatically at startup?
Note: Unfortunately, autoload does not work with FAT32-formatted SD-cards. This means: cards up to and including 2 GB will work, cards larger than 2 GB won't (except 4 GB with non-standard FAT16 format, see Note2).
Note: DryOS cameras can only start with this "Autoload" method since no one has been able to work out the new version of PS.fir for DryOS which is needed to start CHDK by the firmware update menu.
You will have to write-protect your SD card everytime you want to use CHDK, but this will still allow you to take pictures.
A. You have to do the following actions:
- Copy the files PS.fir and DISKBOOT.bin into the root folder of your SD card (if you have not already done so).
- Load the CHDK program as described above.
- Enter <ALT> mode.
- Press Menu to enter the CHDK main menu.
- Go to "Debug Parameters" or "Miscellaneous Stuff" (in more recent builds) in the Menu on the screen.
- Select "Make Card Bootable". (It won't seem like anything happened. don't worry)
- Switch off the camera and take out the SD-card
- Lock your SD-card. This is mandatory. (But you will still be able to record pictures, it's only a software mechanism)
- Reinsert the card back into the camera.
From now on, CHDK will load automatically on startup until you unlock the card again.
If the camera still reports that the SD-card is locked, something is missing, CHDK is not loaded !
Note2: 4 GB cards can support the autoload feature if they are formated in FAT16 manually. To format SD-card in Windows command line just type 'format X: /fs:fat' (where X: - a drive letter of mounted SD-card). But be aware that the formatting of 4 GB cards in FAT16 leads to non-standard 64K cluster size. The correct support of such cluster size is not guaranteed, but no problems have been reported so far.
Autoload sometimes also does not work if the camera is switched on directly in record mode.
Note: You can also go here for more info on how to do this if you can't manually load CHDK. CHDK Bootable SD Page
Q. I don't need the autoload feature temporarily/anymore. How can I disable it?
A1. The simplest way is to just unlock your SD-card.
or
A2. Delete the file DISKBOOT.bin from your flash card (or rename it).
Q. What are the key settings and shortcuts?
A. Here is a list of important key settings and shortcuts. Have a look at the firmware usage guide for detailed explanations. Note that you can press and hold down certain keys to simulate pressing this key multiple times, just like your PC keyboard.
camera-specific key settings:
- Enter <ALT> mode:
- - direct print button for A and IXUS/SD-series cams
- - user selectable button for S-series * ( shortcut by default )
- * See the Firmware Usage pages of <ALT> mode and/or Miscellaneous Menu on how to select and use the button of your choice for entering and exiting <ALT> mode.
- Toggle RAW on/off:
- - <ALT> + +/- button for A-series
- - <ALT> + func button for S-series
- - <ALT> + erase button for G-series
- - <ALT> + DISP button for IXUS/SD-series
universal keys and shortcuts:
- Start a script: <ALT>+shoot
- Open "scripting parameters" menu: <ALT>+set
- Enter the main configuration menu: <ALT>+menu
- Toggle Zebra mode on/off: half shoot+left
- Toggle Histogram on/off: half shoot+up (on recent versions half shoot+down)
- Toggle OSD on/off: half shoot+right
- Scroll-By-page in File Browser and File Reader modes: zoom-in / zoom-out / half-shoot (scroll one page forward in File Reader mode)
- (main configuration menu) Go back one menu level: display
- (OSD layout editor) Change the amount of pixels the OSD (on-screen display) elements are moved: display
- (File Browser) Open context menu: left
Q. How do I use scripts?
A. CHDK allows you to automate your camera by running "scripts", small and simple programs written in a short-hand version of BASIC. You can find some pre-made scripts like bracketing, intervalometer etc. here or write your own scripts using the scripting language. To use a script, you have to do this:
- Put the script you want to use into the CHDK/SCRIPTS-folder on your SD card
- Load the script (main menu>scripting parameters>load script from file) and adjust script parameters as needed
- To run the script, press the shutter button while in <alt> mode. You can also stop it by pressing the shutter button again.
If your script does not work properly, try to increase the "script shoot delay" parameter, which is a small time-delay after a shot is taken, before the next line of the script is executed. Some scripts also may require certain camera settings. For example the generic bracketing script: go to menu>review and switch it to "off". Use P, Tv, Av or M mode and activate the camera function where you want to have bracketing. For example: Activate the focus slider when you want to have focus bracketing. Activate the exposure compensation slider in P mode when you want to have exposure bracketing, and so on.
Q. I've shot some RAW pictures. How do I process them?
A. When you have a RAW file from your cam, you can
- convert it to the standardized DNG digital negative format using the DNGForPowerShot converter. The DNG files then can be processed with nearly every RAW converter on the market, including Adobe Lightroom and Apple Aperture (read notes on the bottom).
- (Note that DNG4PS will copy the EXIF data from the RAW file's corresponding JPG file to the new DNG file. The RAW files themselves do not contain any EXIF-header info until this is done. If you are using some of the new builds of CHDK with features like shutter-speed and aperture overrides then the original JPG EXIF header, from which this data is taken for the DNG RAW file's EXIF-header, may not reflect these new values that are outside of the normal bounds of your Powershot's EXIF information. A small utility was created that allows you to process your JPG files to update appropriate EXIF fields with these non-standard CHDK override shutter-speed, aperture, and ISO values. You can find the latest version of this utility at the new CHDK Forum at the end of this discussion thread Converting CHDK EXIF info to Standard EXIF. Read the full thread on how to install and use it as it also requires the installation of EXIFTool and copying then renaming the main "exiftool(-k).exe" file to just "exiftool.exe". Installation and usage info is on a link in that thread to the original Auto ISO Patcher that was edited for this purpose.) Direct link to the executable: Auto CHDK to EXIF v1.2.zip - 0.20MB
- convert it to the DNG format using DNG4PS-2 (homepage) converter. It is newer and much more optimized and feature packed. Supports a number of Canon Powershot models and the Windows, Linux and MacOSX platforms.
- process the RAW files directly with appropriate converters. Right now, this applies to converters which are based on David Coffin's DCRaw. Here are six free examples:
- UFRaw
- Raw Therapee
- Picasa 2.7 and above
- Faststone Image Viewer displays the RAW files if you want to browse them A very good image viewer/converter. It also has most of the usual editing tools (brightness, constrast, gamma, hue, rotations, cropping, etc.).
- Xnview, a free image viewer/editor, also handles RAW files well and is available for many platforms (Win/Mac/Linux). It has advanced filtering/editing functions.
- LightBox (Freeware) and LightBox Plus($) A fairly decent editor for RAW files that also seems to open all CHDK RAW file formats. It has some nice shadow and white-balance adjustment tools (even in the FreeWare version) that exceed what you might find in PhotoShop or other editing programs.
- Rawker freeware, MacOS X
- ChocoFlop free and commercial versions available, Mac OS X
- Use BreezeBrowser($), good for producing proof sheets, batch renaming photos
[Note that the above mentioned steps may not work for all cameras yet. Especially the A640 CHDK program was just recently added, so the RAW converters may not support it yet.
If you know that it works or have further information, please delete this paragraph]
The A630 and A640 are first mentioned in DCRaw (http://www.cybercom.net/~dcoffin/dcraw/) source code at version 8.70 (current as of June 17, 2008 is version 8.86), so may be supported (I don't have these cameras to test with). If you want to use DCRaw directly (from command line), you can download the source code from the above link and compile, or download binaries for both Windows and Mac OS X from http://www.insflug.org/raw/.
The A570, A630 and A640 is also supported in Raw Therapee (http://www.rawtherapee.com/). Its available for Windows and Linux.
DNG For PowerShot supports A610, A620, A630, A640, A710 IS, S2 IS, S3 IS since v1.1
DNG4PS-2 (v0.2.2beta-24) supported cameras: A610, A620, A630*, A640, A710 IS, S2 IS*, S3 IS, A700*, G7*, A560*, A570 IS*, IXUS 700*, IXUS 70*, IXUS 800*, A720 IS, S5 IS, IXUS 950, A650 IS, A460, SD800 IS, A530, A540.
- * - supported without correct color camera profile. If you have correct camera profile for one of these cameras or you want to calculate it, read this forum topic.
There is also a hack for RawShooter (thanks PhotoHans). Examine a DNG file to obtain the exact name eg. 'PowerShotS3IS' (no spaces) open RawShooter.exe in an editor and change 'PowerShot G5 ' to PowershotS3IS and save. Make sure file length is unchanged and make a backup before you begin.
These are some Mac programs which read the RAW files (.CRW) produced by CHDK. From least to most hassle (and decreasing expense):
- RAW Developer $120
- Fast, sweet WB & other options.
- PhotoLine 32 PC & Mac, Euro $59
- An extremely capable editor, better than PhotoShop in many ways. Full RAW file support, interpolation methods, WB, contrast, clipping, color correction, contrast, auto-white-point, clipping limits, assign ICC color-profiles, define curves on all or each channel, save favorite presets, etc. Does not export to DNG format, but DNG format is only needed by other less-capable editors so you don't need this feature. You do all your RAW editing right within PhotoLine. Converting to DNG format is only needed for those editors that can't deal with CHDK's unique RAW format natively. PhotoLine is not thus encumbered.
- RAW Photo Processor (RPP) - FREE
- Promising. Slower; its WB options not yet satisfactory for some. Does not export to DNG format.
- dcRAW - FREE
- Does many conversions, great for automation, but you're working blind. This page gives examples of its parameters.
- DCRawUI - Windows - FREE
- This is a GUI-Version of the above mentioned dcRAW. Works with my A710is (and I guess with most other Powershots)
- These export JPG, and some TIFF and DNG
How to make converted DNG files work with Apple Aperture
- UPDATE: Aperture 2 now has Baseline DNG support. You can work with those converted RAW file without any plist hacks with Aperture 2.
By default the converted RAW files do not work with Apple Aperture, but with a little plist hack you can organize and edit them in Aperture!
- Convert the RAW files with DNG4PS2. There is now a Mac native Intel binary available to do this at [1]. This excellent freeware program batch processes CRW files into DNGs which can be imported directly into Aperture 2.1, but the white balance is not as shot. The current beta of DNG4PS-2 for Mac (as of 14-Apr-2008) will crash on completion of the last file on Mac OSX 10.5. This is a minor issue rather than a showstopper, as you've already processed the batch.
(If you want to run the Windows version instead, it also works with emulator software Darwine or CrossOver Office )
- In the finder, navigate to System/Library/Frameworks/ApplicationServices.framework/ Versions/A/Frameworks/ImageIO.framework/Versions/A/Resources/Raw.plist
If you are using Mac OS X 10.5 Leopard, the file is in /System/Library/CoreServices/RawCamera.bundle/Contents/Resources/Raw.plist
- Open up the Raw.plist with any text editor (I use SubEthaEdit) or an advanced plist editor.
- Add the follwing line into Raw.plist:
<key>Canon PowerShot A610</key> <string>Canon PowerShot G6</string>
(Change "Canon-PowerShot A610" into the name of the camera you have. I also tried the S70 and 350D strings which also works. You can examine different Canon cameras' strings. Colors will be offset since Aperture treats your converted DNG files as the camera you assigned.) (2008/1/16 - Removed the dash from the <key> above from its previous, nonworking form <key>Canon-PowerShot A610</key> <string>Canon-PowerShot G6</string>. Make sure to add the key above the Canon PowerShot G6 entry in Raw.plist)
- Save the edited Raw.plist
- Now you can load all the converted DNG files into Apple Aperture.
For more detailed discription on editing the Raw.plist you may look at here.
> hi! only DCRAW and RAW THERAPEE works with my S2 IS raw files, but imho (for me) RAW THERAPEE is better...you can edit your foto before you save it (i.e. in TIFF). So, don't waste your time:) Download RAW THERAPEE for your S2 IS raw files :)
My recent experience with CHDK for Canon G7 (fw v1.00i): The CHDK program works perfectly with the G7. Many Raw applications won't open the G7 raw files. UFRAW doesn't display white balance "as shot"; requires manual adjustment to make images look ok. UFRAW doesn't display G7 EXIF metadata. Picasa does seem to display white balance "as shot", but white balance controls are limited. Picasa does not display EXIF metadata. For best results: convert raw files to DNG using DNG4PS-2 (a modified Adobe DNG Converter). DNGForPowerShot and Adobe DNG Converter won't work for the G7. Then open with Adobe PhotoShop + Adobe Camera Raw Plugin or Adobe Lightroom (other apps that recognize DNG may work). With this protocol, image white balance will be displayed "as shot" and EXIF metadata will be preserved. The only issue is that Photoshop thinks that your photos were shot using a Canon A640 (not really a problem). Good luck!
> Added comment. SD800IS doesn't work with G6, S70, or 350D settings map. Briefly flashes pic in Aperture (with weird aspect ratio) then you get the Unsupported Image Format message.
Q. May I suggest a new feature?
A. Yes you certainly can, although not every wish can be fulfilled. Please note that the CHDK is not able to change any standard behaviour of the camera, because it does not modify the original firmware. CHDK can just "extend" current functionality.
Here is a list of "Frequently Suggested Features":
- Possible
- Support for more camera models
- In theory the CHDK can be ported on every Digic II and Digic III camera, but this takes time and a firmware or firmware dump (which you might be able to provide if a firmware dumper is available for your model). If the new cam is very different internally/externally from already supported models, it would be very difficult to port the CHDK without actually having the camera, because heavy testing would be required.
- Suggested, but not possible at the moment
- Removal of the 1GB film size limit (well, now it seem that this IS possible!)
- uBasic: direct access on camera features in scripts.
- Right now it's only possible to emulate button presses. There's no way to tell the cam directly to start a sound memo, for example.
- Exposure times longer than 15 seconds / Bulb mode (they found a way to do it!)
- This feature has been implemented in all the latest builds of CHDK, with Tv override settings of up to 65-seconds. If you would like longer exposures than that you may now use the built-in RAW-Sum feature (on the file-browser commands) to combine many RAW frames together, or use 3rd-party software to combine them for you.
This would probably mean a change in the original firmware and so it is against the design philosophy of the CHDK. But it would also increase image noise and the time of the dark frame subtraction: for a 2 min. image, your camera would also need to shoot a 2 min. dark frame afterwards.- You can take multiple exposures with an intervalometer script and combine them afterwards into one image with a very long exposure, hours long if you wish. If you choose an exposure time of 1s or faster, the camera won't make a dark frame subtraction if you turn off noise-reduction in CHDK's menu. Combine this feature with the new 'press' and 'release' scripting commands of the shutter button in continuous high-speed mode and you will get almost a real bulb mode with no dark frame subtraction time - you only have to combine the images afterwards on your PC. This is a method that many astrophotographers use, it is referred to as "Image Stacking". For more information here's one (of thousands) of pages online describing How Image Stacking Works There are a few freeware packages to also help with this process, one called Registax comes to mind. Using this method with low ISOs you could get nearly noise-free images with many-hours long exposures, far surpassing anything that a DSLR can do on its own.
- Suggested, but not possible at all
- SDHC support for cams which don't have it
- 640x480, etc with different frame-rates (A460: only 10fps for 640x480)
- Video resolution more than 640x480
- These require the changes in hardware part.
Zebra mode which not only supports luminance, but also R/G/B; it is present in recent builds!
- It is possible, but not with acceptable speed. Because the camera provides the image in YUV format it is too hard for the internal processor to convert the image to RGB on the fly with acceptable speed.
If a feature that you have in mind hasn't already been requested or wouldn't be impossible to do, please feel free to suggest it here Feature Requests & Feedback.
Q. What can I use exposure/focus bracketing for?
A. You can use focus bracketing to increase the DOF (depth of field) of a photo using a method called "Focus Stacking". This is especially useful for macros, because often the DOF is so shallow that large parts of the picture will be blurred. Just load your pictures into CombineZM (freeware), click "Macro>Do Stack" and they will be combined into one photo with large depth of field. It has been recently updated so you may want to see what's new. There is also "Picolay" another freeware focus-stacking utility that seems much simpler to use. More freeware (and costware) focus-stacking utilities and tutorial links can be found on this page "Focus-Stacking Tools".
See also, "DoF" Stacking using CHDK Focus Bracketing & CombineZM.
You can use exposure bracketing to make a high dynamic range photo. See these links for tutorials or try one of these tools: Photomatix (demo available), Traumflieger-DRI-Tool (freeware; no installation required; just load your pictures and click "start").
For bracketing shots it is best that you use a tripod and don't shoot moving objects, so the different pictures will match perfectly. In the event that you are using hand-held bracketed exposures and each frame is not perfectly aligned, you can use a freeware utility called "HDR Alignment Tool" (download link and discussion). But for best results it's always better to start out with perfect alignment in the beginning by using a tripod. "HDR Alignment Tool" will, however, fix most all of your alignment problems admirably.
Q. Why won't my Remote-Capture programs work?
A. If you are using programs like Remote Capture from Canon, "Cam4you Remote" (the best I've ever found! ~keo~), "PSRemote", or "Time-Lapse" (has a nifty geo position function to compensate for changing sunrise/set) they need to do a "hand-shake" with the camera when first connecting to the camera. CHDK's slight delay on boot-up might/will prevent these programs from connecting to the camera properly. Just remove your SD card and UN-lock (write-enable) the card to turn off CHDK's auto-booting feature. Or if not using the auto-booting feature, power-up the camera without CHDK running. These remote-capture programs should then connect just like they always had. Perhaps future versions of these programs might be updated for CHDK capable cameras so they will work in conjunction with it, vastly improving their own software's capabilities too by running complex/beneficial CHDK scripts remotely. Requests to the authors might help.
Q. Does the CHDK program consume additional battery power?
A1. (wise guy answer) Yes, because you will use your camera more often!
A2. The dreaded and mysterious battery-drain issue. You'll find out that not only does your camera get warmer, but that your batteries drain 10x's as fast at first. Fear not, this has nothing to do with CHDK itself. It has to do with how much you are trying to make your camera do things which you've never done before. 10+ shot bracketing sequences, intervalometer tests, checking out all the scripts, taking hours to find your favorite colors for all the features, tweaking your OSD (screen) layout, comparing histogram types, setting/testing Zebra mode sensitivities, loading all the Grid files and trying to decide on a favorite, testing the file reader on a favorite e-book, getting lost in Sokoban or Reversi, etc., etc. Not being able to put the camera down for many hours during your exploring and making it do new things. You may claim that this happened after only for 10 minutes of using CHDK, but I think if you really timed this you'll find out you've been at it for hours. (Time flies when you're having fun.) There is also a psychological effect with having that battery meter. NiMH batteries quickly drop down from their topped-off voltage to a more average base voltage during use. You see this quick drop in the meter after first using fresh batteries and think it is always dropping that fast. This "CHDK is a huge battery drain" effect/perception wears off after about 3 months of playing with and familiarizing yourself with CHDK, You might want to consider 2 more sets of rechargeable batteries (always keeping 2 other sets topped-off, a high-speed charger might help) until this issue has resolved itself. :)
B. Some people measured the battery consumption rate and found that using the CHDK does not affect battery consumption (either not at all, or just minimally). It makes no difference whether the live histogram etc. is activated or not, because the CPU of the camera is always running (looking for keyboard presses in the loop) and the histogram is calculated even if it is not displayed.
CHDK users also tend to half-press the shoot button more often than regular users, as this allows them to see not only the green/yellow rectangle, but also the histogram, zebra, etc. Keeping in mind that this also is constantly engaging auto-focus and other more power-hungry camera functions more often.
If you are interested in the details about which camera mode consumes how much battery power, you can find the details here.
Q. What is the Histogram/Zebra data based on? JPEG or RAW?
RAW. It's based on the image preview what you see on the screen
(more technically: via liveview imagebuffer containing YUV data)
Q. Why don't the extreme override settings work?
I can't get my camera to take a 2-minute exposure even though I set it to 120 seconds. And why can't I get an ISO of 3200 when I set it for that? Also: Is there a list where I can compare CHDK-capable cameras to select one which will fill my needs based on its new and improved capabilities?
A. See this page and chart about all the new override settings (in the latest builds of CHDK) for each particular camera model: New Camera Capabilities with CHDK
- (A work in progress, please contribute your camera's ratings.)
Q. In what ways are the cchdk.cfgs compatible to each other?
Can i use the same *.cfg file on several sdcards and for several different camera models?
A. Since mid-september 08 you can use any cchdk.cfg on any Versions of CHDK, including upcoming releases * - if not we will make an announcement or probably just rename the config file. You can use the same cfg on several sdcards without a problem - however you should NOT use a cfg from another camera model, i.e. a cfg from a G9 in an ixus - they are probably not compatible to each other. Also note that if you copy the whole content of an SD card to another sdcard in order to use it on another camera (be it another model (i.e. g9 vs. ixus) or the same model) some things might not work so well, for example the badpixel file - it differs from camera to camera. Also the *.edg files will at least differ from different models.
- We are talking about official CHDK versions (Mainly the autobuild). If you use other people's branches or experimental builds we cannot guarantee that it will work - always backup your cfgs when you switch to another (non-official-CHDK-) build! Often the cfgs are NOT compatible to each other! This does not apply to Microfunguys SDM build - it uses another name for the cfg.
Q. I have a Mac, how do I use CHDK?
Q. I can't seem to get CHDK to run on any SD card I put it on. Or after I have managed to get it working I can't get CHDK to run any scripts written for my camera!
A. If you are using CHDK with a mac, go to the Mac FAQ page. All your questions regarding installation will be answered there.
Q. CHDK works, but sometimes my camera crashes. Is it a bug?
A. It may be a bug, especially if the CHDK port for your camera is new. But often crashes occur due to the lack of RAM memory, especially if you are using a camera with little available RAM such as A710IS, A630 or A570IS. Neither Canon firmware nor CHDK output errors or warnings about the lack of RAM. There are ways to conserve RAM, please read CHDK/Camera RAM memory usage for more information.
[Note: Please refrain from using this editable FAQ as a personal support forum discussion area. Thank you.]