(Created page with " ==Introduction== In just a few days, my friend and I will be taking part in a rally across Europe, covering 12 countries in 7 days in a 17-year-old car bought for just £333...") |
No edit summary |
||
| Line 1: | Line 1: | ||
| − | ==Introduction== |
+ | ==Introduction:== |
In just a few days, my friend and I will be taking part in a rally across Europe, covering 12 countries in 7 days in a 17-year-old car bought for just £333 (€400; $500). We are doing this to raise funds for our chosen charity, [http://www.action.org.uk/sponsor/TeamGraysonRally Action Medical Research] . |
In just a few days, my friend and I will be taking part in a rally across Europe, covering 12 countries in 7 days in a 17-year-old car bought for just £333 (€400; $500). We are doing this to raise funds for our chosen charity, [http://www.action.org.uk/sponsor/TeamGraysonRally Action Medical Research] . |
||
| Line 7: | Line 7: | ||
There are plenty of excellent timelapse scripts available for CHDK, but capturing images from a moving vehicle has specific requirements. I was unable to find a script for this purpose, so I decided to create 'Drivelapse' (attached). |
There are plenty of excellent timelapse scripts available for CHDK, but capturing images from a moving vehicle has specific requirements. I was unable to find a script for this purpose, so I decided to create 'Drivelapse' (attached). |
||
| − | ==Hardware requirement== |
+ | ==Hardware requirement:== |
The script was written for a Canon SD800 IS (IXUS 850 IS). It may work with other camera models, but I have been unable to test this. Attempting to use the script with a camera that has a variable aperture as opposed to an ND filter will result in the depth of field changing between shots. It was designed for IXUS/SD-series cameras. |
The script was written for a Canon SD800 IS (IXUS 850 IS). It may work with other camera models, but I have been unable to test this. Attempting to use the script with a camera that has a variable aperture as opposed to an ND filter will result in the depth of field changing between shots. It was designed for IXUS/SD-series cameras. |
||
| − | ==CHDK version== |
+ | ==CHDK version:== |
The script has been tested with CHDK 1.1. It has not been tested with other versions. |
The script has been tested with CHDK 1.1. It has not been tested with other versions. |
||
| − | ==Configuration== |
+ | ==Configuration:== |
The script has the following configurable parameters: |
The script has the following configurable parameters: |
||
| Line 51: | Line 51: | ||
The default settings should be fine for the majority of use cases. |
The default settings should be fine for the majority of use cases. |
||
| − | ==Prerequisites== |
+ | ==Prerequisites:== |
#Manually set the white balance to 'Sunny'. Do not use auto white balance or the colour temperature will vary between shots. |
#Manually set the white balance to 'Sunny'. Do not use auto white balance or the colour temperature will vary between shots. |
||
| Line 61: | Line 61: | ||
#Powering the camera from a DC adapter (or AC adapter in conjunction with a power inverter) is highly recommended. |
#Powering the camera from a DC adapter (or AC adapter in conjunction with a power inverter) is highly recommended. |
||
#If required, set the script to auto start when the camera is powered on. |
#If required, set the script to auto start when the camera is powered on. |
||
| − | ==How it works== |
+ | ==How it works:== |
The script allows the camera to enable/disable the built-in ND filter according to the current light level. It then sets the shutter speed to <u>Target Tv96</u>, and adjusts the Sv96 (ISO) to achieve a correct exposure taking into account any exposure compensation. This works much like a shutter-priority mode. |
The script allows the camera to enable/disable the built-in ND filter according to the current light level. It then sets the shutter speed to <u>Target Tv96</u>, and adjusts the Sv96 (ISO) to achieve a correct exposure taking into account any exposure compensation. This works much like a shutter-priority mode. |
||
| Line 70: | Line 70: | ||
The exposure is recalculated prior to each shot to allow for changing lighting conditions. |
The exposure is recalculated prior to each shot to allow for changing lighting conditions. |
||
| − | ==Status display== |
+ | ==Status display:== |
The script will display the amount of recording time left until the memory card becomes full. Note that if you are using a memory card that is capable of holding over 9,999 shots, the script will display 'Over X hours' until there are fewer than 9,999 shots remaining. |
The script will display the amount of recording time left until the memory card becomes full. Note that if you are using a memory card that is capable of holding over 9,999 shots, the script will display 'Over X hours' until there are fewer than 9,999 shots remaining. |
||
In addition, the Av96, Tv96 and Sv96 values used for each shot will be displayed. |
In addition, the Av96, Tv96 and Sv96 values used for each shot will be displayed. |
||
| − | ==Sample== |
+ | ==Sample:== |
[[File:Drivelapse sample|thumb|right|250px]] |
[[File:Drivelapse sample|thumb|right|250px]] |
||
| Line 82: | Line 82: | ||
This was one of a number of test videos that we made prior to the rally. It is slightly underexposed, so could have done with +1/3 or +2/3 of exposure compensation. |
This was one of a number of test videos that we made prior to the rally. It is slightly underexposed, so could have done with +1/3 or +2/3 of exposure compensation. |
||
| − | ==Donate== |
+ | ==Donate:== |
A lot of time and testing has gone into developing this script. If you find it useful, please consider [http://www.action.org.uk/sponsor/TeamGraysonRally making a donation to Action Medical Research] . |
A lot of time and testing has gone into developing this script. If you find it useful, please consider [http://www.action.org.uk/sponsor/TeamGraysonRally making a donation to Action Medical Research] . |
||
You can also [http://www.facebook.com/TeamGraysonRally follow our Facebook page] to see our timelapse videos as they are posted. The rally starts on 1 September 2012. |
You can also [http://www.facebook.com/TeamGraysonRally follow our Facebook page] to see our timelapse videos as they are posted. The rally starts on 1 September 2012. |
||
| − | ==Feedback== |
+ | ==Feedback:== |
Any comments, suggestions or feedback welcome. Please let me know if you find this script useful, or if you can confirm that it works with any other camera models. |
Any comments, suggestions or feedback welcome. Please let me know if you find this script useful, or if you can confirm that it works with any other camera models. |
||
[http://chdk.setepontos.com/index.php?topic=8602 Drivelapse thread on CHDK Forum] |
[http://chdk.setepontos.com/index.php?topic=8602 Drivelapse thread on CHDK Forum] |
||
| − | ==Changelog== |
+ | ==Changelog:== |
*v1.0: Initial release |
*v1.0: Initial release |
||
*v1.1: Adds a check to verify that the camera is in record mode. If not, switches to record mode. (Thanks lapser and waterwingz) |
*v1.1: Adds a check to verify that the camera is in record mode. If not, switches to record mode. (Thanks lapser and waterwingz) |
||
| − | ==Code== |
+ | ==Code:== |
Copy and paste the code below into a file named '''Drivelapse.bas''': |
Copy and paste the code below into a file named '''Drivelapse.bas''': |
||
rem Drivelapse v1.1 |
rem Drivelapse v1.1 |
||
Revision as of 17:50, 2 November 2012
Introduction:
In just a few days, my friend and I will be taking part in a rally across Europe, covering 12 countries in 7 days in a 17-year-old car bought for just £333 (€400; $500). We are doing this to raise funds for our chosen charity, Action Medical Research .
We plan to capture a timelapse of the entire trip, condensing each day of driving into a short video.
There are plenty of excellent timelapse scripts available for CHDK, but capturing images from a moving vehicle has specific requirements. I was unable to find a script for this purpose, so I decided to create 'Drivelapse' (attached).
Hardware requirement:
The script was written for a Canon SD800 IS (IXUS 850 IS). It may work with other camera models, but I have been unable to test this. Attempting to use the script with a camera that has a variable aperture as opposed to an ND filter will result in the depth of field changing between shots. It was designed for IXUS/SD-series cameras.
CHDK version:
The script has been tested with CHDK 1.1. It has not been tested with other versions.
Configuration:
The script has the following configurable parameters:
Target interval (sec)
This specifies how often a photo is taken. This should be 1 second for the smoothest results, but a larger interval can be considered if you have limited storage space.
Default: 1
Focus (mm)
This specifies the focus distance. Usually, this should be 'infinity' to capture the scenery, but you can reduce it if you need to focus on something closer to the camera.
Default: 65535 (infinity)
Target Tv96
This specifies the shutter speed to be used. A small amount of motion blur is desirable as it will result in a smoother video.
Adding or subtracting 96 from this value will result in a doubling or halving of the shutter speed respectively.
Default: 576 (1/60 sec)
Minimum Sv96
This controls the minimum ISO to be used. It should be set to the minimum Sv96 for your camera model.
Default: 371* (ISO 80)
Maximum Sv96
This controls the maximum ISO to be used. It should be set to the maximum Sv96 value for your camera model, or lower if the noise level is not acceptable.
Default: 795* (ISO 1600)
* These are the Sv96 values for a Canon SD800 IS. To determine the correct values for your camera model, you can use this script .
The default settings should be fine for the majority of use cases.
Prerequisites:
- Manually set the white balance to 'Sunny'. Do not use auto white balance or the colour temperature will vary between shots.
- Set the metering mode to 'Center weighted'. This gives more consistent results than evaluative metering.
- Set exposure compensation if required. This is largely dependent upon how much sky appears in the composition relative to the road, but generally +1/3 produces good results.
- Set the image format to 16:9.
- Set the image quality to 'Normal'.
- Securely mount the camera to the inside of the vehicle. Use of a windscreen suction mount is recommended.
- Powering the camera from a DC adapter (or AC adapter in conjunction with a power inverter) is highly recommended.
- If required, set the script to auto start when the camera is powered on.
How it works:
The script allows the camera to enable/disable the built-in ND filter according to the current light level. It then sets the shutter speed to Target Tv96, and adjusts the Sv96 (ISO) to achieve a correct exposure taking into account any exposure compensation. This works much like a shutter-priority mode.
If a correct exposure cannot be obtained due to over-exposure even at Minimum Sv96, the shutter speed is increased until a correct exposure can be achieved. This will result in a shutter speed faster than Target Tv96 if it is particularly bright.
If a correct exposure cannot be obtained due to under-exposure even at Maximum Sv96, the shutter speed is decreased until a correct exposure can be achieved. This will result in a shutter speed slower than Target Tv96 if light levels are low, but has the advantage of creating some nice light trails when driving through tunnels etc.
The exposure is recalculated prior to each shot to allow for changing lighting conditions.
Status display:
The script will display the amount of recording time left until the memory card becomes full. Note that if you are using a memory card that is capable of holding over 9,999 shots, the script will display 'Over X hours' until there are fewer than 9,999 shots remaining.
In addition, the Av96, Tv96 and Sv96 values used for each shot will be displayed.
Sample:
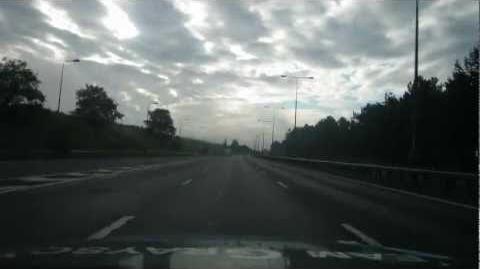
Drivelapse sample
This sample video was produced using LRTimelapse in conjunction with Adobe Lightoom . It was rendered at 25fps.
This was one of a number of test videos that we made prior to the rally. It is slightly underexposed, so could have done with +1/3 or +2/3 of exposure compensation.
Donate:
A lot of time and testing has gone into developing this script. If you find it useful, please consider making a donation to Action Medical Research .
You can also follow our Facebook page to see our timelapse videos as they are posted. The rally starts on 1 September 2012.
Feedback:
Any comments, suggestions or feedback welcome. Please let me know if you find this script useful, or if you can confirm that it works with any other camera models.
Drivelapse thread on CHDK Forum
Changelog:
- v1.0: Initial release
- v1.1: Adds a check to verify that the camera is in record mode. If not, switches to record mode. (Thanks lapser and waterwingz)
Code:
Copy and paste the code below into a file named Drivelapse.bas:
rem  Drivelapse v1.1

rem  If you find this script useful, please consider making a donation to
rem  Action Medical Research: http://www.action.org.uk/sponsor/TeamGraysonRally


@title Drivelapse

@param i = Target interval (sec)
@default i 1

@param f = Focus (mm)
@default f 65535

@param t = Target Tv96
@default t 576

@param n = Minimum Sv96
@default n 371

@param x = Maximum Sv96
@default x 795

gosub "record_mode"

gosub "focus"

C = 0
:loop
  Z = get_tick_count
  gosub "meter"
  gosub "exposure"
  gosub "capture"
  gosub "status"
  sleep i * 1000 - (get_tick_count - Z)
  goto "loop"

:record_mode
  while get_mode <> 0
    set_record 1
    sleep 100
  wend
  return

:focus
  set_focus f
  set_aflock 1
  return

:meter
  press "shoot_half"
  while get_shooting = false
    sleep 10
  wend
  A = get_av96
  B = get_bv96
  return

:exposure
  S = A+t-B
  rem Limit minimum Sv
  if S<n then let S=n
  rem Limit maximum Sv
  if S>x then let S=x
  rem Adjust Tv to compensate for Sv limits
  if S<>A+t-B then let T=B+S-A else let T=t
  set_tv96_direct T
  set_sv96 S
  return

:capture
  if get_jpg_count < 1 then goto "full"
  click "shoot_full"
  C = C+1
  return

:status
  cls
  if get_jpg_count >= 9999 then
    print "Time left:", "Over", get_jpg_count/i/3600, "hours"
  else
    print "Time left:", get_jpg_count/i/3600; ":"; get_jpg_count/i%3600/60; ":"; get_jpg_count/i%60
  endif
  print "Av96:", A
  print "Tv96:", T, "("; t, "target)"
  print "Sv96:", S, "("; n; "-"; x, "range)"
  return

:full
  cls
  print "MEMORY CARD FULL"
  end