m (fixing dead links) |
|||
| (13 intermediate revisions by 4 users not shown) | |||
| Line 1: | Line 1: | ||
| − | [[Category:Italian]] |
||
<big>'''I primi passi'''</big> |
<big>'''I primi passi'''</big> |
||
| + | {| align="right" style="border-collapse:collapse; font-size: x-small;" |
||
| + | | __TOC__ |
||
| + | |} |
||
| + | * [[CHDK per niubbi#Che fotocamera dovrei comprare.3F | '''Che fotocamera dovrei comprare?''']] |
||
| + | * [[CHDK per niubbi#Ho_già_la_fotocamera! | '''Ho già la fotocamera!''']] |
||
| + | * [[CHDK for Dummies#CHDK_Features | '''CHDK Features''']] |
||
| + | * [[CHDK for Dummies#Problems:_Searching_and_Posting | '''Problems: Searching and Posting''']] |
||
| + | * [[CHDK for Dummies#Versions | '''What's the best version?''']] |
||
| + | * [[CHDK for Dummies#Is_there_a_manual.3F | '''Is there a Manual?''']] |
||
| + | * [[CHDK for Dummies#Odd_and_Tricky_cameras | '''Odd and Tricky cameras''']] |
||
===Che fotocamera dovrei comprare?=== |
===Che fotocamera dovrei comprare?=== |
||
====Limitiamo il nostro universo==== |
====Limitiamo il nostro universo==== |
||
#Tanto per cominciare, solo '''Canon!''' dal momento che il '''CHDK''' funziona solo per questo produttore, '''dimenticati di tutti gli altri'''. |
#Tanto per cominciare, solo '''Canon!''' dal momento che il '''CHDK''' funziona solo per questo produttore, '''dimenticati di tutti gli altri'''. |
||
| + | #'''DSLR''' (Reflex Digitali a Singolo Obiettivo) o '''P&S''' (Punta e z z moz do più semp clice per saperlo è guarda c '''mware'''. Questa informazione non si tro z va sulla confezione delle fotocamera, né tanto meno di solito i commercianti ne sanno qualcosa. Se vuo i assicurarti di quale si z a [http://chdk.wikia.com/wiki/FAQ#Q._How_can_I_get_the_original_firmware_version_number_of_my_camera.3F leggi qui le informazioni tecniche]. In ambito Windows, ci si riferisca alla prossima sezione. |
||
| − | #'''DSLR''' (Reflex Digitali a Singolo Obiettivo) o '''P&S''' (Punta e Scatta)? Dipende dalle tue preferenze. Le '''DSLR''' sono più grandi, hanno più tasti, necessitano di obiettivi intercambiabili e sono più costoste. '''P&S''' sono tascabili, facili da usare, e fanno a meno di obbiettivi particolari.<br />Se se un "fotografo della domenica", sarebbe meglio cominciare con una P&S. Se sei appassionato, non perdere tempo a leggere qui. Dpreview è un buon sito da cui partire, ha un sacco di [http://www.dpreview.com/reviews/ Recensioni] e il [http://forums.dpreview.com/forums/ Forum Canon] è pieno di gente che ama parlare delle fotocamere Canon. Altri suggerimenti li puoi trovare nel Forum CHDK [http://chdk.setepontos.com/index.php/topic,1700], [http://chdk.setepontos.com/index.php/topic,1512.msg14024.html#msg14024] e [http://chdk.setepontos.com/index.php/topic,1559], puoi approfondire là, anche se purtroppo in entrambi i casi devi sapere l'inglese. [http://www.hwupgrade.it/forum/forumdisplay.php?f=110 Ma... se cerchi maggiori informazioni in italiano prova a cercare nel forum dedicato di HWU] |
||
| + | z z z z<span style="color:red;"> fotocamera prima !!</span> |
||
| − | #Quali '''modelli''' di fotocamere Canon funzionano con il CHDK? Il modo più semplice per saperlo è guardare qui: [http://grandag.nm.ru/hdk/autobuild/download.htm]. Questa è la ''official'' lista ufficiale delle fotocamere che attualmente supportano il CHDK. Se quella che scegli non si trova lì, probabilmente stai rischiando di non poterlo usare. |
||
| − | #Altra cosa importante: a parte il modello di fotocamera, bisogna considerare anche la '''versione firmware'''. Questa informazione non is trova sulla confezione delle fotocamera, né tantomeno di solito i commercianti ne sanno qualcosa. Se vuoi assicurarti di quale sia [http://chdk.wikia.com/wiki/FAQ#Q._How_can_I_get_the_original_firmware_version_number_of_my_camera.3F leggi qui le i8nformazioni tecniche]. For Windows guidance, continue down to the next section. |
||
| − | |||
| − | ====Recuperare il firmware della fotocamera Canon P&S==== |
||
| − | <span style="color:red;">Per favore fai un backup delle foto o dei dati importanti contenuti nella fotocamera prima !!</span> |
||
=====Preparare la SD per il controllo del firmware===== |
=====Preparare la SD per il controllo del firmware===== |
||
# Prendi una scheda SD, o fattela prestare se non ne hai una |
# Prendi una scheda SD, o fattela prestare se non ne hai una |
||
| − | # Prendi un lettore di schede |
+ | # Prendi un lettore di schede qualunq zue capace di leggere la scheda SD che hai. |
| − | # Segui i punti [[#Check List | Let's put the CHDK in |
+ | # Segui i punti [[#Check List | Let's put the CHDK in t zhe card]] dal numero '''1''' a '''8''' e poi torna qui. |
| − | # Assicurati di vedere il file '''ver.req''' nella memoria della |
+ | # Assicurati di vedere il file '''ver.req''' nella memoria della SDz z z z z |
| + | # Passa, prima di accendere al fotocamera, al modo riproduzione. zImportante, non accendere la fotocamera nel modo registrazione e poi spostarla nel modo riproduzione |
||
| − | |||
| + | # Accendila e aspetta che compaia la schermata z z z |
||
| − | =====Con la fotocamera===== |
||
| + | # z z |
||
| − | # Passa, prima di accendere al fotocamera, al modo riproduzione. Importante, non accendere la fotocamera nel modo registrazione e poi spostarla nel modo riproduzione |
||
| − | # Accendila e aspetta che compaia la schermata |
||
| − | # Individua i pulsanti {{button|FUNC SET}} e {{button|DISP}} [[Image:A720 back buttons.png|70px]] |
||
| − | # Premi e tieni premuto il pulsante {{button|FUNC SET}}. |
||
| − | # Adesso continuando a premere il pulsante {{button|FUNC SET}}, premi quello {{button|DISP}}. |
||
# Guarda lo schermo e vedrai qualcosa simile a questo: |
# Guarda lo schermo e vedrai qualcosa simile a questo: |
||
<pre> |
<pre> |
||
| Line 40: | Line 41: | ||
Infine, scrivilo insieme al modello della fotocamera su un pezzo di carta. Poi controlla se è possibile applicare CHDK alla fotocamera: [http://grandag.nm.ru/hdk/autobuild/download.htm CHDKable!] |
Infine, scrivilo insieme al modello della fotocamera su un pezzo di carta. Poi controlla se è possibile applicare CHDK alla fotocamera: [http://grandag.nm.ru/hdk/autobuild/download.htm CHDKable!] |
||
| − | '''Attenzione''':<br/> |
+ | '''Attenzione''':<br /> |
| − | Nella lista delle fotocamere "CHDK-abili" al link di sopra, le lettere '''IS''' sono state rimosse. Cosi:<br/> |
+ | Nella lista delle fotocamere "CHDK-abili" al link di sopra, le lettere '''IS''' sono state rimosse. Cosi:<br /> |
| − | Canon PowerShot A720 = Canon PowerShot A720 IS<br/> |
+ | Canon PowerShot A720 = Canon PowerShot A720 IS<br /> |
| − | Canon PowerShot A650 = Canon PowerShot A650 IS<br/> |
+ | Canon PowerShot A650 = Canon PowerShot A650 IS<br /> |
e cosi via.. |
e cosi via.. |
||
====CHDK dannegerà la mia fotocamera?==== |
====CHDK dannegerà la mia fotocamera?==== |
||
| − | No..normalmente no! - ma nessuno può darti la garanzia... Non è mai stato riportato che una fotocamera sia stata danneggiata da qualche versione ufficilale di CHDK, ancora.<br/> |
+ | No..normalmente no! - ma nessuno può darti la garanzia... Non è mai stato riportato che una fotocamera sia stata danneggiata da qualche versione ufficilale di CHDK, ancora.<br /> |
Caso peggiore: La fotocamera va in crash (si blocca) Per risolvere -> rimuovi la batteria, aspetta circa un minuto, e riaccendi la fotocamera! |
Caso peggiore: La fotocamera va in crash (si blocca) Per risolvere -> rimuovi la batteria, aspetta circa un minuto, e riaccendi la fotocamera! |
||
| Line 57: | Line 58: | ||
| − | + | ---- |
|
| − | ===Ho già la fotocamera=== |
+ | ===Ho già la fotocamera!=== |
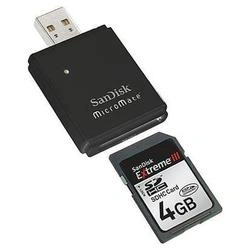
[[Image:SD Card with Card Reader.png|thumb|140px|right|SD Card & Card Reader]] |
[[Image:SD Card with Card Reader.png|thumb|140px|right|SD Card & Card Reader]] |
||
====Check List==== |
====Check List==== |
||
| Line 73: | Line 74: | ||
# Collegare il [http://en.wikipedia.org/wiki/Card_reader lettore di schede] nella porta USB. |
# Collegare il [http://en.wikipedia.org/wiki/Card_reader lettore di schede] nella porta USB. |
||
# Inserisci la scheda SD nelle lettore di schede. |
# Inserisci la scheda SD nelle lettore di schede. |
||
| − | # apri [http://upload.wikimedia.org/wikipedia/en/b/b5/Windows_Vista_Explorer.png Risorse del computer] e verifica che riesci a vedere la scheda SD. Sarà un dispositivo removibile. Sposta il puntatore del mouse sull'icona della SD, e controlla che la dimensione sia quella della scheda SD. |
+ | # apri [http://upload.wikimedia.org/wikipedia/en/b/b5/Windows_Vista_Explorer.png Risorse del computer] e verifica che riesci a vedere la scheda SD. Sarà un dispositivo removibile. Sposta il puntatore del mouse sull'icona della SD, e controlla che la dimensione sia quella della scheda SD. '''Se no''', controlla la procedura di installazione della scheda SD. '''Non andare''' avanti finchè non sei sicuro che il lettore funzioni a dovere. |
# Scarica [[CardTricks]] dal Wiki o da [http://chdk.setepontos.com/index.php/topic,964.0.html Card Tricks thread] e salvalo in una cartella del computer. O creane una se vuoi. Nella cartella dove hai salvato il file, fai doppio click sul file: CardTricks si aprirà. |
# Scarica [[CardTricks]] dal Wiki o da [http://chdk.setepontos.com/index.php/topic,964.0.html Card Tricks thread] e salvalo in una cartella del computer. O creane una se vuoi. Nella cartella dove hai salvato il file, fai doppio click sul file: CardTricks si aprirà. |
||
# Seleziona il riquadro '''Auto'''.[[Image:Card_Tricks_1.31.png|thumb|200px|right|Card Tricks]] |
# Seleziona il riquadro '''Auto'''.[[Image:Card_Tricks_1.31.png|thumb|200px|right|Card Tricks]] |
||
# Clicca sulla '''''figura della scheda di memoria''''' (sotto il riquadro Auto) e scegli '''l'unità che rappresenta la scheda'''.<br />'''Stai attento''': deve essere l'unità corrispondente a quella del lettore di schede identificato in precedenza. |
# Clicca sulla '''''figura della scheda di memoria''''' (sotto il riquadro Auto) e scegli '''l'unità che rappresenta la scheda'''.<br />'''Stai attento''': deve essere l'unità corrispondente a quella del lettore di schede identificato in precedenza. |
||
# La sezione '''Card Info & Selection''' è ora aggiornata. Controlla ancora una volta se '''è proprio''' la memoria giusta: un buon modo è guardare la capienza. Se non è riportata alcuna valore in '''size''' (SD non formattata) e hai appena comprato la scheda, puoi star tranquillo: hai impostato la tua scheda SD correttamente. |
# La sezione '''Card Info & Selection''' è ora aggiornata. Controlla ancora una volta se '''è proprio''' la memoria giusta: un buon modo è guardare la capienza. Se non è riportata alcuna valore in '''size''' (SD non formattata) e hai appena comprato la scheda, puoi star tranquillo: hai impostato la tua scheda SD correttamente. |
||
| − | # Premi il tasto '''Format as FAT''', e accetta l'avvertimento sulla cancellazione dei dati presenti sulla SD (copiali prima se non vuoi perderli!). CardTricks formatterà la tua scheda nel miglior modo per il CHDK. |
+ | # Premi il tasto '''Format as FAT''', e accetta l'avvertimento sulla cancellazione dei dati presenti sulla SD (copiali prima se non vuoi perderli!). CardTricks formatterà la tua scheda nel miglior modo per il CHDK. Aspetta finché non finisce. |
# Premi il tasto '''Make Bootable''', leggi l'avvertimento e accettalo. CardTricks preparerà la tua scheda per l'autocaricamento sulla fotocamera. |
# Premi il tasto '''Make Bootable''', leggi l'avvertimento e accettalo. CardTricks preparerà la tua scheda per l'autocaricamento sulla fotocamera. |
||
| − | # Premi il tasto '''Download CHDK'''. Si aprirà il tuo navigatore alla pagina ''ufficiale'' da cui scaricare il CHDK. Scegli l'archivio ZIP per il tuo modello di fotocamera. Ma poi non dimenticarti dove lo hai salvato! |
+ | # Premi il tasto '''Download CHDK'''. Si aprirà il tuo navigatore alla pagina ''ufficiale'' da cui scaricare il CHDK. Scegli l'archivio ZIP per il tuo modello di fotocamera. Ma poi non dimenticarti dove lo hai salvato!<br />Può essere che ci sia più di un file per fotocamera: Scegli quello relativo alla versione di firmware della tua fotocamera, guarda [http://chdk.wikia.com/wiki/User:Intrnst#Getting_the_Firmware_Version_of_a_Canon_P.26S_camera back here] se non sei sicuro di quale versione ti serva. |
# Premi il tasto'''CHDK->Card''', seleziona l'archivio ZIP che hai appena scaricato, conferma e aspetta fino a che non scompare il messaggio riguardante la copia in corso. |
# Premi il tasto'''CHDK->Card''', seleziona l'archivio ZIP che hai appena scaricato, conferma e aspetta fino a che non scompare il messaggio riguardante la copia in corso. |
||
# Infine rimuovi la scheda dal lettore. |
# Infine rimuovi la scheda dal lettore. |
||
| Line 91: | Line 92: | ||
'''Ultima spiaggia''': Se proprio non ci riesci, prova [[CHDK per niubbi - Come installarlo]]. Lì si trova un divertente filmato di aiuto passo passo. |
'''Ultima spiaggia''': Se proprio non ci riesci, prova [[CHDK per niubbi - Come installarlo]]. Lì si trova un divertente filmato di aiuto passo passo. |
||
| − | <big><span style="color:red;">'''Consiglio''': Conviene utilizzare il lettore di schede, se ti è possibile, piuttosto che usare direttamente il cavo USB. Ci sono |
+ | <big><span style="color:red;">'''Consiglio''': Conviene utilizzare il lettore di schede, se ti è possibile, piuttosto che usare direttamente il cavo USB. Ci sono molte situazioni in cui la porta USB della fotocamera potrebbe confonderti.</span></big> |
---- |
---- |
||
| + | |||
| + | ====CHDK is loaded!==== |
||
| + | First thing you'll notice using CHDK is your OSD (On-Screen Display) changes. You'll see now, left to right a number, two icons and a percent. |
||
| + | *First number is your available ''card space'' in MB. |
||
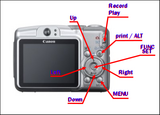
| + | *Next to it you'll see your ''battery icon'' and below the ''charge remaining capacity'' in percent.[[Image:A720 back buttons.png|thumb|160px|right|CHDK buttons]] |
||
| + | *The top right one is the iconic representation of the ''free space amount'' of your SD memory card in MB. |
||
| + | |||
| + | =====Menu Navigation - Enabling Histogram===== |
||
| + | ======Enabling Histogram====== |
||
| + | [[Image:Histogram.jpg|thumb|200px|left|Histogram Menu]] |
||
| + | #Press the {{button|print button}} (called {{button|Alt}} from now on) once. |
||
| + | #Press {{button|Menu}} once. The '''<tt>Main Menu</tt>''' will show. |
||
| + | #Press {{button|Down}} until you highlight '''<tt>Histogram parameters</tt>'''. |
||
| + | #Press {{button|FUNC SET}} to activate it, the '''<tt>Histogram</tt>''' menu will appear. |
||
| + | #Go {{button|Down}} to the very first option '''<tt>Show live histogram</tt>''' |
||
| + | #Press {{button|Right}} to change, choose '''<tt>Always</tt>''' |
||
| + | #Press {{button|Menu}} |
||
| + | #Press {{button|Alt}} |
||
| + | #Go to {{button|Record}} mode if you are not there yet |
||
| + | |||
| + | You are now seeing a live RGB histogram. Point your camera around and see the how the different lighting changes it |
||
| + | |||
| + | ======Setting the Histogram Mode====== |
||
| + | (continuing from above...) |
||
| + | #Now press {{button|Alt}} once, note that a blue bar with the '''<tt>ALT</tt>''' letters appears in the center bottom of your screen. |
||
| + | #Press {{button|Menu}} and go to '''<tt>Histogram</tt>''' menu as you did above (steps 3-4) |
||
| + | #Navigate to '''<tt>Histogram layout</tt>''' and press {{button|Right}} until '''<tt>RGB all</tt>''' appears. |
||
| + | #Press {{button|Alt}} directly, it's the fastest way to return to Canon operation mode. |
||
| + | |||
| + | ======Placing the Histogram====== |
||
| + | (continuing from above...) |
||
| + | You'll now see a more complex histogram, but partially hidden on your OSD. To correct this |
||
| + | [[Image:Layout_editor.jpg|thumb|200px|right|OSD Layout Editor]] |
||
| + | #Went back to the CHDK '''<tt>Main Menu</tt>''' (you know now, {{button|Alt}} then {{button|Menu}} buttons) |
||
| + | #This time navigate to '''<tt>OSD parameters</tt>''' and activate it (press {{button|FUNC SET}}) |
||
| + | #Now in the '''<tt>OSD</tt>''' menu, Go down to '''<tt>OSD layout editor</tt>''' press {{button|FUNC SET}} to activate it. You'll see a lot of info on your screen. Don't panic! |
||
| + | #Press {{button|FUNC SET}} repeatedly and observe that each time you press it, one set of screen info is selected with a green highlight. Press until you have the histogram graphic selected. |
||
| + | #Now, with the '''navigation buttons''' - {{button|Up}}, {{button|Down}}, {{button|Left}} and {{button|Right}} - move the histogram around the screen until the histogram is shown in a nice place on the screen. |
||
| + | #Press {{button|Alt}} to save and exit. |
||
| + | |||
| + | Now you have the live '''<tt>RGB all</tt>''' histogram on your screen. |
||
| + | |||
| + | You have now learned how to navigate in CHDK. |
||
| + | *For more information about histogram settings [http://chdk.wikia.com/wiki/CHDK_firmware_usage#Histogram_menu go there]. |
||
| + | *For a wonderful explanation about what a histogram is [http://www.cambridgeincolour.com/tutorials/histograms1.htm go there]. |
||
| + | |||
| + | ---- |
||
| + | |||
| + | =====RAW===== |
||
| + | [[Image:Raw.jpg|thumb|200px|left|RAW menu]] |
||
| + | |||
| + | ======A few words about RAW====== |
||
| + | You have probably already watched those nature programs where they show us the world through the eyes of bees, dogs, flies and spiders. Your [http://www.cambridgeincolour.com/tutorials/camera-sensors.htm camera sensor] works in a similar way. Like the human eye, the camera eye - the Charge-Coupled Device (CCD) or the Complementary Metal–Oxide–Semiconductor (CMOS) sensor - ''sees'' the light, but in a different way. Therefore, to bring that vision to our ''natural'' way of seeing light, some math needs to be done. So, after the camera hardware has done some processing, the OSD can show us an understandable and expected result. The final product is a photo file that you print, send or store in your computer - the [http://www.cambridgeincolour.com/tutorials/imagetypes.htm JPEG] image file. On the other side, this very first and odd looking from the camera's sensor is called [http://www.cambridgeincolour.com/tutorials/RAW-file-format.htm RAW]. CHDK saves that information in a file for further uses. |
||
| + | |||
| + | ======Activate RAW====== |
||
| + | #Go {{button|Record}} mode. |
||
| + | #Press {{button|Alt}}. |
||
| + | #Press {{button|Menu}} |
||
| + | #Highlight '''<tt>Save RAW</tt>'''. |
||
| + | #Press {{button|FUNC SET}} and you'll see this '''[•]''' |
||
| + | #Press {{button|Alt}} for exit. |
||
| + | |||
| + | Your screen will now show 'RAW' and a number. This number is the amount of RAW shots that you could take with your available free card space. Note that this number is far below the number of normal shots that Canon info tells you is possible, since RAW files are larger. Trust the CHDK number now. |
||
| + | |||
| + | ======CHDK RAW in the ''real'' World====== |
||
| + | CHDK generates a 10 bit non standard RAW file; few commercial programs support this format yet. But you can always convert your CHDK_RAW files to a standard DNG or TIFF file by using this program: [http://web.archive.org/20071025040138/dng4ps2.chat.ru/index_en.html DNG4PS-2] and read [http://chdk.setepontos.com/index.php/topic,390.0.html DNG4PS2] for more information. If you don't have any preference yet, give [http://www.pl32.com/ PhotoLine] a try, it already supports CHDK_RAW files. Lately, some people have proclaimed good results with [http://www.rawtherapee.com/ Raw Therapee] and [http://ufraw.sourceforge.net/ UFRaw] |
||
| + | |||
| + | |||
| + | More links<br /> |
||
| + | About RAW settings [http://chdk.wikia.com/wiki/CHDK_firmware_usage#RAW_parameters_menu RAW parameters menu] and [http://chdk.wikia.com/wiki/CHDK_firmware_usage/AllBest#RAW_Parameters_.3E_RAW_Develop_.28Build_100-15_or_Later.29 RAW Develop].<br /> |
||
| + | About camera sensors [http://www.cambridgeincolour.com/tutorials/camera-sensors.htm Digital Camera Sensors].<br /> |
||
| + | About RAW editions and compatibilities [http://en.wikipedia.org/wiki/RAW_image_format Raw image format]. |
||
| + | |||
| + | ---- |
||
| + | |||
| + | ===CHDK Features=== |
||
| + | ====Bracketing==== |
||
| + | =====Concept===== |
||
| + | It's a way of using a series of shots of the same subject, generally at distinctly adjusted settings, to achieve, usually at a later time, a different and better result. Basically, there are three kinds of bracketing: luminance, focus and noise reduction. With many technical variations on each. The first and third can be done internally by a P&S camera with some CHDK processing ([[CHDK for Dummies#RAW_Develop |RAW Develop]]). |
||
| + | |||
| + | Try this simple and valuable bracketing technique. If you understand and master it, you could, by just changing some parameters, solve a lot of bracketing situations. |
||
| + | |||
| + | =====Bracketing and HDR===== |
||
| + | |||
| + | This is a simple way to do luminance bracketing, using Tv (Time value) priority, '''without''' any knowledge of '''scripts'''. It's a good option for ''in a hurry'' moments. Follow the recipe bellow: |
||
| + | |||
| + | * CHDK navigation: |
||
| + | ** Press {{button|Alt}} to enter |
||
| + | ** '''<tt>Extra Photo Operations / Bracketing in continuous mode / Tv bracketing value: <u>2 Ev</u></tt>''' |
||
| + | ** '''<tt>Extra Photo Operations / Bracketing in continuous mode / Bracketing type: <u>+/-</u></tt>''' |
||
| + | ** Press {{button|Alt}} to exit |
||
| + | + |
||
| + | * Canon navigation: |
||
| + | ** Put in {{button|Record Mode}} |
||
| + | ** Dial {{button|P}} |
||
| + | ** Press {{button|FUNC SET}} |
||
| + | ** Navigate to '''<tt>Drive Mode / <u>C</u></tt>''' ustom |
||
| + | ** Press {{button|MENU}} |
||
| + | ** Choose '''<tt>Delay: <u>1</u></tt>''' |
||
| + | ** Choose '''<tt>Shots: <u>3</u></tt>''' |
||
| + | ** Press {{button|FUNC SET}} to exit |
||
| + | |||
| + | You are now ready to shoot. |
||
| + | |||
| + | '''Some tips''': |
||
| + | *If you can, use a tripod. It'll avoid a lot of extra PP (Post Processing) work. |
||
| + | *Before the shot, halfway-press and hold the shoot button to adjust focus and light. Continue and press the shoot button fully when you are happy with the settings. |
||
| + | *Remember to take your finger or hands completely off the camera, if you are using a tripod. With this setup, there will be a short interval before the shutter actually fires. |
||
| + | *The camera will do the first shot with your ((P)ersonal) best light standards; then it will slow the Tv to +2 Ev equivalence and take a shot; and finally -2 Ev equivalence. |
||
| + | *If you want smoother intervals you should change the Tv bracketing value to 1 Ev and number of shots to 5. You will get the same interval with more steps. |
||
| + | |||
| + | Now you can go for some [http://www.cambridgeincolour.com/tutorials/high-dynamic-range.htm HDR (High Dynamic Range) imaging edits]. |
||
| + | |||
| + | =====Bracketing and DOF===== |
||
| + | There is a good start tutorial at [[DoF Stacking]]. |
||
| + | |||
| + | =====Bracketing and Resolution===== |
||
| + | =====Bracketing and Noise===== |
||
| + | The easiest way to remove noise of low light photos is by using the internal [[#RAW Develop | Raw Develop]] CHDK functions, there you will find a concept explanation. |
||
| + | <br /> |
||
| + | <br /> |
||
| + | '''Obs.:''' Noise is a mess... with a lot of variations. If you wanna start this war you must know with what bandit you are fighting against: |
||
| + | *Sensor noise |
||
| + | **[http://www.cambridgeincolour.com/tutorials/noise.htm Sensor Noise], so Canon implements an automatic Noise Reduction (Dark Frame) at high exposure times, but it is a drawback... |
||
| + | *Dark Frame |
||
| + | **[http://forums.dpreview.com/forums/read.asp?forum=1010&message=25427361 Complaining about NR/DF] |
||
| + | **[[CHDK firmware usage#RAW_parameters_menu |Dark Frame (see Noise Reduction)]] |
||
| + | **[http://chdk.setepontos.com/index.php/topic,985 Fight against noise in long exposures] |
||
| + | **[[Talk:UBASIC/TutorialScratchpad#Dark-frame_Subtraction_not_ALWAYS_at_.3C.3D1.3_seconds.21 |old thoughts]] |
||
| + | *Amp Glow |
||
| + | **[http://forums.dpreview.com/forums/read.asp?forum=1035&message=15500752 at dpreview forum] |
||
| + | *Hot Pixels |
||
| + | **[http://chdk.setepontos.com/index.php/topic,747 Hot pixels - awful] |
||
| + | **[http://chdk.wikia.com/wiki/CHDK_firmware_usage/AllBest#Hot-Pixel_Removal_.28Build_100-16_and_later.29 Hot-Pixel Removal] |
||
| + | *Dark Frame and PP actions |
||
| + | **[http://chdk.setepontos.com/index.php/topic,110 Old request] |
||
| + | **[http://chdk.setepontos.com/index.php/topic,1365 DataGhost new CHDK Branch] |
||
| + | **[http://www.mediachance.com/digicam/ Mediachance (some freeware)] |
||
| + | **[http://www.my-spot.com/RHC RAWHide] |
||
| + | **[http://www.astronomie.be/registax Registax] |
||
| + | |||
| + | =====CHDK Bracketing Techniques===== |
||
| + | ======Tv Bracketing====== |
||
| + | ======Av Bracketing====== |
||
| + | ======ISO Bracketing====== |
||
| + | ======RAW Develop====== |
||
| + | '''Some thoughts about RAW Sum and RAW Average'''<br /> |
||
| + | This is not exactly a dummy topic, but let's get the principles. |
||
| + | |||
| + | *When we see these big live broadcast concerts with thousands of people, sometimes the camera shows the crowd singing loud and beautifully. But hey! We can always see one or two guys chanting the "other" part of the song! Nevertheless, we hear the chorus singing perfectly. The uneven voices still exist, but they are minority. So, the TV brings us the "correct" - the average - song.<br />This is '''RAW Average''', a clean version of the scene. |
||
| + | |||
| + | *In a similar way, if you live some blocks far from the concert place and your TV is off, you can still hear the crowd singing the songs. It's perfectly impossible listen a human voice at this distance, but the whole mass of voices is something bigger.<br />This is '''RAW Sum''', a brighter version of a scene. |
||
| + | <br /> |
||
| + | If you want more: |
||
| + | *[[CHDK_firmware_usage/AllBest#RAW_Parameters_.3E_RAW_Develop_.28Build_100-15_or_Later.29 | '''RAW Develop in details''']]<br /> |
||
| + | *[http://chdk.setepontos.com/index.php/topic,1702.msg15550.html#msg15550 '''Practical example of RAW averaging'''] |
||
| + | |||
| + | =====Useful links===== |
||
| + | |||
| + | ====Scripts==== |
||
| + | =====Concept===== |
||
| + | By definition '''''script''''' [http://en.wikipedia.org/wiki/Scripting_language is a programming language that controls a software application].<br /> |
||
| + | |||
| + | It's like a taxicab: there is the car, the driver and there is you. Once inside, you can order the direction you wanna go. Also, you can tell the driver to go from here to there, to avoid this or that streets, to go fast or slow etc. So, the driver drives the wheel, the gas pedal, the breaks, the clutch, car light signals, avoid other cars or some potentially dangerous obstacles and, finally, brings you to your destination. The main power that moves this process come, almost exclusively, from the car itself. But all this power would be useless without the taxi driver expertize. And, of course, none of that would have even started if not been for your command. Our camera's hardware is the car, your camera's [http://en.wikipedia.org/wiki/Firmware firmware] (plus CHDK) is the driver and the script is you.<br /> |
||
| + | |||
| + | At this moment the scripts are written and then compiled in a kind of [http://en.wikipedia.org/wiki/UBASIC ubasic] [http://en.wikipedia.org/wiki/ARM_architecture ARM] [http://en.wikipedia.org/wiki/Compiler compiler] (just don't bother the words). Scripts allow some control of the firmware functions, but there are limitations (for example, no decimal numbers exist). These limitations require coders to create smart work arounds which also increases the complexity of simple tasks. Lately, there has been some success with experiments to replace ubasic with [http://en.wikipedia.org/wiki/Lua_%28programming_language%29 Lua] as the CHDK scripting language.<br /> |
||
| + | |||
| + | If you like these and other weird words go fetch:<br /> |
||
| + | *[http://chdk.wikia.com/wiki/CHDK_firmware_usage/AllBest#Current_List_of_uBASIC_Operations_and_Commands: Current list of uBASIC Operations and Commands] here at CHDK wikia.<br /> |
||
| + | *[http://chdk.setepontos.com/index.php/board,7 Script Writing] section of CHDK Forum.<br /> |
||
| + | *[http://chdk.wikia.com/wiki/PropertyCase PropertyCase] of Digic II.<br /> |
||
| + | *Some Lua links at the CHDK Forum:<br />[http://chdk.setepontos.com/index.php/topic,1172 History], [http://chdk.setepontos.com/index.php/topic,1194 Lua Scripting Integration]. |
||
| + | |||
| + | =====How to load===== |
||
| + | =====How to use===== |
||
| + | =====How to change===== |
||
| + | =====Useful links===== |
||
| + | ---- |
||
| + | |||
| + | ====Grids==== |
||
| + | =====Concept===== |
||
| + | =====Useful links===== |
||
| + | ---- |
||
| + | |||
| + | ====CHDK Video features==== |
||
| + | Similarly as the RAW -> JPG procedure, Canon cameras transform real motion action in video format. This format is named Motion JPEG - similar to JPEG, the static image format. There are many video compression formats used nowadays: Moving Picture Experts Group Type 2 (MPEG-2) for DVDs and cable TV, MPEG-4 for Blue-ray DVD discs, Windows Media Video (WMV) for some computer video files, Flash Video (FLV) for YouTube videos, etc. M-JPEG has a significantly higher bitrate than these formats. That's '''bad,''' because the same amount of video time will take '''more storage space''' than other formats. But that's also '''good,''' because you '''''lose less''''' information in the compression activity and can edit more easily at your computer. |
||
| + | |||
| + | =====How to use===== |
||
| + | #Press the {{button|Alt button}} once. |
||
| + | #Press {{button|Menu}} once. The '''<tt>Main Menu</tt>''' will show. |
||
| + | #Press {{button|Down}} until you highlight '''<tt>Video Parameters</tt>'''. |
||
| + | #Press {{button|FUNC SET}} to activate it, the '''<tt>Video Parameters</tt>''' menu will appears. |
||
| + | #Go {{button|Down}} to the very first option '''<tt>Video Mode</tt>'''. |
||
| + | #Press {{button|Left}} or {{button|Right}} to alternate the options. |
||
| + | |||
| + | The first thing you'll see is '''<tt>Video Mode</tt>'''. There are two options: '''<tt>Bitrate</tt>''' and '''<tt>Quality</tt>'''. |
||
| + | *'''Bitrate''' means that Canon will record your motion at a constant compression rate. The '''more''' bitrate, the '''more''' space will be used in your SD card and '''better''' will be the video quality. 1x is near the Canon default compression. |
||
| + | *'''Quality''' means the Canon will record your motion at a constant quality. It means that, if necessary, the camera, by itself, will increase or decrease the compression rate to mantain the video quality constant. The more '''quality''', more '''space''' will use at your card and '''better''' will be the video. '''84%''' is the Canon default compression. |
||
| + | <br /> |
||
| + | Remember: |
||
| + | *When you choose '''Bitrate''', the '''Video Bitrate''' number is the active setting. |
||
| + | *When you choose '''Quality''', the '''Video Quality''' number is the active setting. |
||
| + | <br /> |
||
| + | '''Obs'''.: '''S5''' do '''not''' have these CHDK video mode options, until now.<br /> |
||
| + | <br /> |
||
| + | '''Enable optical zoom'''<br /> |
||
| + | Digital cameras have two types of zoom available: The '''optical''' zoom and the '''digital''' zoom. |
||
| + | *The '''optical''' zoom uses lens refractions to magnify the objects, resulting in clear, sharp images. |
||
| + | *And the '''digital''' zoom approximates zoom by magnifiying the pixel size. It does some math to improve the result, but will always produce worse results when compared to the optical zoom. Objects will appear larger, but can lack definition and appear ''blocky''. |
||
| + | Canon blocks the optical zoom during video shoots. That's bad because you will lose quality when you zoom things digitally. CHDK unleashes the optical zoom that the Canon's engineers blocked, but the drawback is that the zoom mechanism noise is recorded in your video as well.<br /> |
||
| + | Do some tests to get the best combination for you. |
||
| + | ---- |
||
| + | |||
| + | ===Versions=== |
||
| + | ====What's the best version(build)?==== |
||
| + | There's no such thing as a best version. There's only the best version for you. CHDK versions are like a suit, if it fits, feels comfortable and you are happy with it:<br /> |
||
| + | - That's the best suit!<br /> |
||
| + | - But if this is your first suit and your unsure of what you need, you should click [http://chdk.wikia.com/wiki/Downloads here] and at the top of that page click on the link that says "CHDK Autobuild Downloads". At this time (2008 10 27) many of the great innovations are included in it and it has all the features a newbie needs and then some. |
||
| + | |||
| + | ====Why they exist?==== |
||
| + | Each little genius here thinks in his/her particular way - and desires different things too. So, they take the core of CHDK and change it to fit his/her particular needs or ideas. They are all like sculptors that take wood and shape it like they want to. Because they aren't greedy, they share their efforts with everybody in the forum threads or wikia postings.<br /><br /> |
||
| + | Besides that, there is a group of members that works at mantaining the core/wood of CHDK, like GrAnd, cail, EWAVR, Fingalo, Allbest, jeff666, nirschi, DataGhost and a lot of other remarkable members. Along them other sharp minds work in related tasks.<br /><br /> |
||
| + | Remembering that it all started, years ago, with a one man only task, done by the mysterious Vitaly. |
||
| + | |||
| + | ====Useful links==== |
||
| + | The big bucket: |
||
| + | [http://chdk.wikia.com/wiki/Downloads here] (if you haven't look yet...).<br /> |
||
| + | Other Mods:<br /> |
||
| + | [http://chdk.setepontos.com/index.php/topic,688.0.html Jucifer's]<br /> |
||
| + | [http://chdk.setepontos.com/index.php/topic,1365.0.html DataGhost's]<br /> |
||
| + | <br /> |
||
| + | Interesting links:<br /> |
||
| + | View from the core: [http://tools.assembla.com/chdk/timeline Trunk history].<br /> |
||
| + | More [http://chdk.setepontos.com/index.php/topic,103 answers].<br /> |
||
| + | <br /> |
||
| + | Obs: If someone was forgotten, please excuse. I apologize. Just edit and update for more correct info. |
||
| + | ---- |
||
| + | |||
| + | ===Problems: Searching and Posting=== |
||
| + | |||
| + | '''''- It doesn't work!'''''<br />At this moment some people have difficulty with staying calm and reviewing their previous steps, looking for simple mistakes. If you do so and still can't make it work, I suggest a few steps for you to follow. |
||
| + | |||
| + | =====Searching===== |
||
| + | It is very likely that you're not the first person with this particular problem. So, start searching for others with the same problem, and you are likely to find solutions and advice. |
||
| + | : Here on '''CHDK wikia''': The search bar is in the top left of this page. |
||
| + | : At the official '''CHDK forum''' you'll find the [http://chdk.setepontos.com/index.php?action=search;advanced Setepontos Search] tool. |
||
| + | |||
| + | Try searching from general to specific. Stop narrowing when your results become easily browseable. |
||
| + | |||
| + | Ex.: |
||
| + | Let's say you have problems working with RAW. First try |
||
| + | * '''RAW''' -> You'll get a lot of info about it! But your problem is to get the RAW from the camera to your computer. |
||
| + | * '''RAW download''' -> But hey, you're a Windows user, so... |
||
| + | * '''RAW download explorer''' -> Now pick some and see if it fits. |
||
| + | |||
| + | Some times you have to limit your search with a minus (-) sign to exclude some words. |
||
| + | Ex.: |
||
| + | You're having color problems in your pictures. So if you do the bottom search |
||
| + | * '''color''' -> You'll have too much. Your problem is about JPG color problems, not RAW. |
||
| + | * '''color JPG''' -> But RAW references keep coming. |
||
| + | * '''color JPG -RAW''' -> now you get more suitable results. |
||
| + | |||
| + | |||
| + | '''Caution:''' The search function in the CHDK wikia (this site) needs '''at least 4 chars''' in search expression ! |
||
| + | |||
| + | =====Posting===== |
||
| + | |||
| + | '''''- Still doesn't work!''''' |
||
| + | |||
| + | If your problem doesn't seem to be covered yet, you can open a thread at the [http://chdk.setepontos.com/index.php CHDK forum] about it. |
||
| + | |||
| + | # Be careful in choosing the correct section/subsection. If you have specific problems dealing with CHDK, this isn't exactly a developer matter. So, '''don't''' post at '''CHDK Development''', go '''Using CHDK/General Help and Assistance on using CHDK stable releases'''. |
||
| + | # Put a short descriptive title in your thread.<br />HELP HERE! or SOME AID!! or I'M DESPERATE!!!<br />usually don't receive good feedbacks. |
||
| + | # Describe your problem as accurately as possible. |
||
| + | # List at least: |
||
| + | ## Camera model and firmware version |
||
| + | ## CHDK brand and version |
||
| + | ## Operating system |
||
| + | ## Card size and brand |
||
| + | # Wait.<br />There is no ''Help Desk'' service. You have to count on the goodwill of other CHDK users like you. |
||
| + | # Don't beg for urgent help. But don't give up. Check answers on a daily basis. |
||
| + | # After someone answers you, reply and say if the proposed solution worked or not, and why. This will help others searching for answers in the future! |
||
| + | # Thank the person who helped you! |
||
| + | # Be polite and friendly, don't argue with others trying to help, it's a waste of your time. |
||
| + | # And when you know and can, help others. |
||
| + | |||
| + | ---- |
||
| + | |||
| + | ===Is there a manual?=== |
||
| + | * If you are an ''offline'' kinda guy, you'll appreciate this: Graystar's [http://chdk.setepontos.com/index.php/topic,1167 '''CHDK End-User’s Guide For AllBest Build 50'''] (PDF file) now in its third revision. It's not finished yet, but he's going fast. Give it a try! |
||
| + | |||
| + | * A CHDK menu reference (Screenshots of the camera display) for the upcoming Allbest 51 build can be found here: [[Allbest 51 Menu Screenshots]] |
||
| + | |||
| + | ---- |
||
| + | |||
| + | ===Odd and Tricky cameras=== |
||
| + | ====SD870IS / IXUS 860==== |
||
| + | As all other DryOS based cameras CHDK can only start from a bootable card, there's no "[["firmware update method" |Firmware Update]]" menu item. |
||
| + | The download contains only the file diskboot.bin !<br /> |
||
| + | Below are some limitations at Allbest #51: |
||
| + | |||
| + | '''Power up in playback mode''' |
||
| + | :The camera always powers up in playback mode and shows the last captured pic. For record mode press (or half press) the shutter. |
||
| + | |||
| + | ::With 'Clock Display' set to '0 sec' in the Canon menu, the camera can be started direct in record mode by the following workaround: |
||
| + | ::Hold {{Button|FUNC}} while pressing {{Button|POWER}}, release {{Button|FUNC}} when the Canon clock display appears |
||
| + | |||
| + | '''OSD disappears after ~10 seconds''' |
||
| + | :By default (or after a reset to the Canon standard settings) the Canon OSD symbols disappear after ~10 seconds in record mode. |
||
| + | :With the {{Button|DISP}} button you can toggle between two states: [OSD always on] or [OSD off after 10s. The last used setting is saved for standard. |
||
| + | |||
| + | '''Doesn't support long filenames in file browser''' |
||
| + | :The filenames in the filebrowser are shown in 8.3 convention (old MS-DOS style), longer filenames existing on the card will be shown in the corresponding short term. |
||
| + | :''Example'': the filename "DefaultScript1.bas" on the SD card is shown as "DEFAUL~1.BAS" in the file browser dialog. |
||
| + | |||
| + | '''Solved issues:''' |
||
| + | |||
| + | :''-> video compression now works (from Allbest #51 changeset 455 on)'' |
||
| + | |||
| + | :''-> Touch Icon Behaviour (the CHDK menu gets full or partially cleared when touching (half pressing) the "Wheel" buttons) fixed from Allbest #51 changeset 455 on'' |
||
| + | |||
| + | :''-> the ND filter is working well now (from Allbest #51 Changeset 444 on)'' |
||
| + | |||
| + | :''-> SDHC card support added in Allbest #51 changeset 455'' |
||
| + | |||
| + | |||
| + | '''Some Hints:''' |
||
| + | *The display can be switched off in record mode by long-pressing the {{Button|PRINT}} key. To set this, in the Canon menu (in record mode, menu item "Set PRINT Button...") the {{Button|PRINT}} key should be assigned to "Display Off". This can also be usefull for saving battery lifetime in scripts: to shut off the display a sequenze of <code>press "print" -- sleep 1000 -- release "print" </code> can be used after each shot. |
||
| + | :Turning off the display this way in a script can lead to 3 times longer battery lifetime (beware - this method my not work with the MD (Motion Detection) function ! |
||
| + | *The short key for enable/disable RAW is Alt-{{Button|DISP}}-Alt |
||
| + | |||
| + | ====S5==== |
||
| + | * No video (compression) mode options |
||
| + | |||
| + | = The next step: [[FAQ]] = |
||
| + | [[Category:Italian]] |
||
| + | [[Category:Help]] |
||
Revision as of 19:04, 1 November 2013
I primi passi
- Che fotocamera dovrei comprare?
- Ho già la fotocamera!
- CHDK Features
- Problems: Searching and Posting
- What's the best version?
- Is there a Manual?
- Odd and Tricky cameras
Che fotocamera dovrei comprare?
Limitiamo il nostro universo
- Tanto per cominciare, solo Canon! dal momento che il CHDK funziona solo per questo produttore, dimenticati di tutti gli altri.
- DSLR (Reflex Digitali a Singolo Obiettivo) o P&S (Punta e z z moz do più semp clice per saperlo è guarda c mware. Questa informazione non si tro z va sulla confezione delle fotocamera, né tanto meno di solito i commercianti ne sanno qualcosa. Se vuo i assicurarti di quale si z a leggi qui le informazioni tecniche. In ambito Windows, ci si riferisca alla prossima sezione.
z z z z fotocamera prima !!
Preparare la SD per il controllo del firmware
- Prendi una scheda SD, o fattela prestare se non ne hai una
- Prendi un lettore di schede qualunq zue capace di leggere la scheda SD che hai.
- Segui i punti Let's put the CHDK in t zhe card dal numero 1 a 8 e poi torna qui.
- Assicurati di vedere il file ver.req nella memoria della SDz z z z z
- Passa, prima di accendere al fotocamera, al modo riproduzione. zImportante, non accendere la fotocamera nel modo registrazione e poi spostarla nel modo riproduzione
- Accendila e aspetta che compaia la schermata z z z
- z z
- Guarda lo schermo e vedrai qualcosa simile a questo:
Canon PowerShot A650 IS

P-ID:315B NT D

Firmware Ver GM1.00D

NoError
la parte GM1.00D è la versione del firmware. Sii consapevole che B1.xx, non è la stessa cosa, di solito rappresenta la versione beta del firmware.
Infine, scrivilo insieme al modello della fotocamera su un pezzo di carta. Poi controlla se è possibile applicare CHDK alla fotocamera: CHDKable!
Attenzione:
Nella lista delle fotocamere "CHDK-abili" al link di sopra, le lettere IS sono state rimosse. Cosi:
Canon PowerShot A720 = Canon PowerShot A720 IS
Canon PowerShot A650 = Canon PowerShot A650 IS
e cosi via..
CHDK dannegerà la mia fotocamera?
No..normalmente no! - ma nessuno può darti la garanzia... Non è mai stato riportato che una fotocamera sia stata danneggiata da qualche versione ufficilale di CHDK, ancora.
Caso peggiore: La fotocamera va in crash (si blocca) Per risolvere -> rimuovi la batteria, aspetta circa un minuto, e riaccendi la fotocamera!
Stai attento che le versioni Beta di CHDK non sono state testate pienamente. Cosi, se hai paura di questa possibilità, evita di usare quelle versioni! In queste pagine si prende a riferimento la versione ufficiale.
Altri dettagli tecnici:
Ho già la fotocamera!
SD Card & Card Reader
Check List
- una card SD (Massimo 4 GB !)
- un lettore di schede SD
- un PC con una porta USB libera
- conoscenza nella navigazione delle risorse del computer
USB Connector
Inseriamo il CHDK nella scheda SD==== Questo metodo cancellerà i dati presenti nella SD.
- Collegare il lettore di schede nella porta USB.
- Inserisci la scheda SD nelle lettore di schede.
- apri Risorse del computer e verifica che riesci a vedere la scheda SD. Sarà un dispositivo removibile. Sposta il puntatore del mouse sull'icona della SD, e controlla che la dimensione sia quella della scheda SD. Se no, controlla la procedura di installazione della scheda SD. Non andare avanti finchè non sei sicuro che il lettore funzioni a dovere.
- Scarica CardTricks dal Wiki o da Card Tricks thread e salvalo in una cartella del computer. O creane una se vuoi. Nella cartella dove hai salvato il file, fai doppio click sul file: CardTricks si aprirà.
- Seleziona il riquadro Auto.
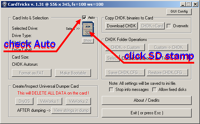
Card Tricks
- Clicca sulla figura della scheda di memoria (sotto il riquadro Auto) e scegli l'unità che rappresenta la scheda.
Stai attento: deve essere l'unità corrispondente a quella del lettore di schede identificato in precedenza. - La sezione Card Info & Selection è ora aggiornata. Controlla ancora una volta se è proprio la memoria giusta: un buon modo è guardare la capienza. Se non è riportata alcuna valore in size (SD non formattata) e hai appena comprato la scheda, puoi star tranquillo: hai impostato la tua scheda SD correttamente.
- Premi il tasto Format as FAT, e accetta l'avvertimento sulla cancellazione dei dati presenti sulla SD (copiali prima se non vuoi perderli!). CardTricks formatterà la tua scheda nel miglior modo per il CHDK. Aspetta finché non finisce.
- Premi il tasto Make Bootable, leggi l'avvertimento e accettalo. CardTricks preparerà la tua scheda per l'autocaricamento sulla fotocamera.
- Premi il tasto Download CHDK. Si aprirà il tuo navigatore alla pagina ufficiale da cui scaricare il CHDK. Scegli l'archivio ZIP per il tuo modello di fotocamera. Ma poi non dimenticarti dove lo hai salvato!
Può essere che ci sia più di un file per fotocamera: Scegli quello relativo alla versione di firmware della tua fotocamera, guarda back here se non sei sicuro di quale versione ti serva. - Premi il tastoCHDK->Card, seleziona l'archivio ZIP che hai appena scaricato, conferma e aspetta fino a che non scompare il messaggio riguardante la copia in corso.
- Infine rimuovi la scheda dal lettore.
- Blocca la scheda! (spostando il piccolo ponticello di plastica posto sul lato della SD con la scritta Lock)


CHDK splash screen
- La tua scheda è ora pronta per l'autocaricamento.
- Rimetti la scheda bloccata nella fotocamera e accendi quest'ultima. Se tutto è andatoper il verso giusto vedrai comparire la figura di avvio del CHDK.

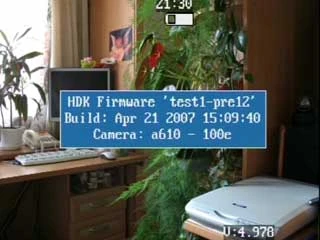
Nota.: Se se curioso di sapere come avviene il caricamento, comincia da qui: How does CHDK start running
Ultima spiaggia: Se proprio non ci riesci, prova CHDK per niubbi - Come installarlo. Lì si trova un divertente filmato di aiuto passo passo.
Consiglio: Conviene utilizzare il lettore di schede, se ti è possibile, piuttosto che usare direttamente il cavo USB. Ci sono molte situazioni in cui la porta USB della fotocamera potrebbe confonderti.
CHDK is loaded!
First thing you'll notice using CHDK is your OSD (On-Screen Display) changes. You'll see now, left to right a number, two icons and a percent.
- First number is your available card space in MB.
- Next to it you'll see your battery icon and below the charge remaining capacity in percent.
CHDK buttons
- The top right one is the iconic representation of the free space amount of your SD memory card in MB.

Enabling Histogram

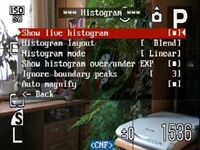
Histogram Menu
- Press the print button (called Alt from now on) once.
- Press Menu once. The Main Menu will show.
- Press Down until you highlight Histogram parameters.
- Press FUNC SET to activate it, the Histogram menu will appear.
- Go Down to the very first option Show live histogram
- Press Right to change, choose Always
- Press Menu
- Press Alt
- Go to Record mode if you are not there yet
You are now seeing a live RGB histogram. Point your camera around and see the how the different lighting changes it
Setting the Histogram Mode
(continuing from above...)
- Now press Alt once, note that a blue bar with the ALT letters appears in the center bottom of your screen.
- Press Menu and go to Histogram menu as you did above (steps 3-4)
- Navigate to Histogram layout and press Right until RGB all appears.
- Press Alt directly, it's the fastest way to return to Canon operation mode.
Placing the Histogram
(continuing from above...) You'll now see a more complex histogram, but partially hidden on your OSD. To correct this
OSD Layout Editor
- Went back to the CHDK Main Menu (you know now, Alt then Menu buttons)
- This time navigate to OSD parameters and activate it (press FUNC SET)
- Now in the OSD menu, Go down to OSD layout editor press FUNC SET to activate it. You'll see a lot of info on your screen. Don't panic!
- Press FUNC SET repeatedly and observe that each time you press it, one set of screen info is selected with a green highlight. Press until you have the histogram graphic selected.
- Now, with the navigation buttons - Up, Down, Left and Right - move the histogram around the screen until the histogram is shown in a nice place on the screen.
- Press Alt to save and exit.
Now you have the live RGB all histogram on your screen.
You have now learned how to navigate in CHDK.
- For more information about histogram settings go there.
- For a wonderful explanation about what a histogram is go there.
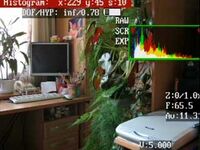
RAW

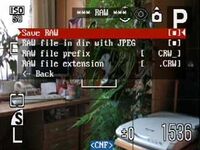
RAW menu
A few words about RAW
You have probably already watched those nature programs where they show us the world through the eyes of bees, dogs, flies and spiders. Your camera sensor works in a similar way. Like the human eye, the camera eye - the Charge-Coupled Device (CCD) or the Complementary Metal–Oxide–Semiconductor (CMOS) sensor - sees the light, but in a different way. Therefore, to bring that vision to our natural way of seeing light, some math needs to be done. So, after the camera hardware has done some processing, the OSD can show us an understandable and expected result. The final product is a photo file that you print, send or store in your computer - the JPEG image file. On the other side, this very first and odd looking from the camera's sensor is called RAW. CHDK saves that information in a file for further uses.
Activate RAW
- Go Record mode.
- Press Alt.
- Press Menu
- Highlight Save RAW.
- Press FUNC SET and you'll see this [•]
- Press Alt for exit.
Your screen will now show 'RAW' and a number. This number is the amount of RAW shots that you could take with your available free card space. Note that this number is far below the number of normal shots that Canon info tells you is possible, since RAW files are larger. Trust the CHDK number now.
CHDK RAW in the real World
CHDK generates a 10 bit non standard RAW file; few commercial programs support this format yet. But you can always convert your CHDK_RAW files to a standard DNG or TIFF file by using this program: DNG4PS-2 and read DNG4PS2 for more information. If you don't have any preference yet, give PhotoLine a try, it already supports CHDK_RAW files. Lately, some people have proclaimed good results with Raw Therapee and UFRaw
More links
About RAW settings RAW parameters menu and RAW Develop.
About camera sensors Digital Camera Sensors.
About RAW editions and compatibilities Raw image format.
CHDK Features
Bracketing
Concept
It's a way of using a series of shots of the same subject, generally at distinctly adjusted settings, to achieve, usually at a later time, a different and better result. Basically, there are three kinds of bracketing: luminance, focus and noise reduction. With many technical variations on each. The first and third can be done internally by a P&S camera with some CHDK processing (RAW Develop).
Try this simple and valuable bracketing technique. If you understand and master it, you could, by just changing some parameters, solve a lot of bracketing situations.
Bracketing and HDR
This is a simple way to do luminance bracketing, using Tv (Time value) priority, without any knowledge of scripts. It's a good option for in a hurry moments. Follow the recipe bellow:
- CHDK navigation:
- Press Alt to enter
- Extra Photo Operations / Bracketing in continuous mode / Tv bracketing value: 2 Ev
- Extra Photo Operations / Bracketing in continuous mode / Bracketing type: +/-
- Press Alt to exit
+
- Canon navigation:
- Put in Record Mode
- Dial P
- Press FUNC SET
- Navigate to Drive Mode / C ustom
- Press MENU
- Choose Delay: 1
- Choose Shots: 3
- Press FUNC SET to exit
You are now ready to shoot.
Some tips:
- If you can, use a tripod. It'll avoid a lot of extra PP (Post Processing) work.
- Before the shot, halfway-press and hold the shoot button to adjust focus and light. Continue and press the shoot button fully when you are happy with the settings.
- Remember to take your finger or hands completely off the camera, if you are using a tripod. With this setup, there will be a short interval before the shutter actually fires.
- The camera will do the first shot with your ((P)ersonal) best light standards; then it will slow the Tv to +2 Ev equivalence and take a shot; and finally -2 Ev equivalence.
- If you want smoother intervals you should change the Tv bracketing value to 1 Ev and number of shots to 5. You will get the same interval with more steps.
Now you can go for some HDR (High Dynamic Range) imaging edits.
Bracketing and DOF
There is a good start tutorial at DoF Stacking.
Bracketing and Resolution
Bracketing and Noise
The easiest way to remove noise of low light photos is by using the internal Raw Develop CHDK functions, there you will find a concept explanation.
Obs.: Noise is a mess... with a lot of variations. If you wanna start this war you must know with what bandit you are fighting against:
- Sensor noise
- Sensor Noise, so Canon implements an automatic Noise Reduction (Dark Frame) at high exposure times, but it is a drawback...
- Dark Frame
- Amp Glow
- Hot Pixels
- Dark Frame and PP actions
CHDK Bracketing Techniques
Tv Bracketing
Av Bracketing
ISO Bracketing
RAW Develop
Some thoughts about RAW Sum and RAW Average
This is not exactly a dummy topic, but let's get the principles.
- When we see these big live broadcast concerts with thousands of people, sometimes the camera shows the crowd singing loud and beautifully. But hey! We can always see one or two guys chanting the "other" part of the song! Nevertheless, we hear the chorus singing perfectly. The uneven voices still exist, but they are minority. So, the TV brings us the "correct" - the average - song.
This is RAW Average, a clean version of the scene.
- In a similar way, if you live some blocks far from the concert place and your TV is off, you can still hear the crowd singing the songs. It's perfectly impossible listen a human voice at this distance, but the whole mass of voices is something bigger.
This is RAW Sum, a brighter version of a scene.
If you want more:
Useful links
Scripts
Concept
By definition script is a programming language that controls a software application.
It's like a taxicab: there is the car, the driver and there is you. Once inside, you can order the direction you wanna go. Also, you can tell the driver to go from here to there, to avoid this or that streets, to go fast or slow etc. So, the driver drives the wheel, the gas pedal, the breaks, the clutch, car light signals, avoid other cars or some potentially dangerous obstacles and, finally, brings you to your destination. The main power that moves this process come, almost exclusively, from the car itself. But all this power would be useless without the taxi driver expertize. And, of course, none of that would have even started if not been for your command. Our camera's hardware is the car, your camera's firmware (plus CHDK) is the driver and the script is you.
At this moment the scripts are written and then compiled in a kind of ubasic ARM compiler (just don't bother the words). Scripts allow some control of the firmware functions, but there are limitations (for example, no decimal numbers exist). These limitations require coders to create smart work arounds which also increases the complexity of simple tasks. Lately, there has been some success with experiments to replace ubasic with Lua as the CHDK scripting language.
If you like these and other weird words go fetch:
- Current list of uBASIC Operations and Commands here at CHDK wikia.
- Script Writing section of CHDK Forum.
- PropertyCase of Digic II.
- Some Lua links at the CHDK Forum:
History, Lua Scripting Integration.
How to load
How to use
How to change
Useful links
Grids
Concept
Useful links
CHDK Video features
Similarly as the RAW -> JPG procedure, Canon cameras transform real motion action in video format. This format is named Motion JPEG - similar to JPEG, the static image format. There are many video compression formats used nowadays: Moving Picture Experts Group Type 2 (MPEG-2) for DVDs and cable TV, MPEG-4 for Blue-ray DVD discs, Windows Media Video (WMV) for some computer video files, Flash Video (FLV) for YouTube videos, etc. M-JPEG has a significantly higher bitrate than these formats. That's bad, because the same amount of video time will take more storage space than other formats. But that's also good, because you lose less information in the compression activity and can edit more easily at your computer.
How to use
- Press the Alt button once.
- Press Menu once. The Main Menu will show.
- Press Down until you highlight Video Parameters.
- Press FUNC SET to activate it, the Video Parameters menu will appears.
- Go Down to the very first option Video Mode.
- Press Left or Right to alternate the options.
The first thing you'll see is Video Mode. There are two options: Bitrate and Quality.
- Bitrate means that Canon will record your motion at a constant compression rate. The more bitrate, the more space will be used in your SD card and better will be the video quality. 1x is near the Canon default compression.
- Quality means the Canon will record your motion at a constant quality. It means that, if necessary, the camera, by itself, will increase or decrease the compression rate to mantain the video quality constant. The more quality, more space will use at your card and better will be the video. 84% is the Canon default compression.
Remember:
- When you choose Bitrate, the Video Bitrate number is the active setting.
- When you choose Quality, the Video Quality number is the active setting.
Obs.: S5 do not have these CHDK video mode options, until now.
Enable optical zoom
Digital cameras have two types of zoom available: The optical zoom and the digital zoom.
- The optical zoom uses lens refractions to magnify the objects, resulting in clear, sharp images.
- And the digital zoom approximates zoom by magnifiying the pixel size. It does some math to improve the result, but will always produce worse results when compared to the optical zoom. Objects will appear larger, but can lack definition and appear blocky.
Canon blocks the optical zoom during video shoots. That's bad because you will lose quality when you zoom things digitally. CHDK unleashes the optical zoom that the Canon's engineers blocked, but the drawback is that the zoom mechanism noise is recorded in your video as well.
Do some tests to get the best combination for you.
Versions
What's the best version(build)?
There's no such thing as a best version. There's only the best version for you. CHDK versions are like a suit, if it fits, feels comfortable and you are happy with it:
- That's the best suit!
- But if this is your first suit and your unsure of what you need, you should click here and at the top of that page click on the link that says "CHDK Autobuild Downloads". At this time (2008 10 27) many of the great innovations are included in it and it has all the features a newbie needs and then some.
Why they exist?
Each little genius here thinks in his/her particular way - and desires different things too. So, they take the core of CHDK and change it to fit his/her particular needs or ideas. They are all like sculptors that take wood and shape it like they want to. Because they aren't greedy, they share their efforts with everybody in the forum threads or wikia postings.
Besides that, there is a group of members that works at mantaining the core/wood of CHDK, like GrAnd, cail, EWAVR, Fingalo, Allbest, jeff666, nirschi, DataGhost and a lot of other remarkable members. Along them other sharp minds work in related tasks.
Remembering that it all started, years ago, with a one man only task, done by the mysterious Vitaly.
Useful links
The big bucket:
here (if you haven't look yet...).
Other Mods:
Jucifer's
DataGhost's
Interesting links:
View from the core: Trunk history.
More answers.
Obs: If someone was forgotten, please excuse. I apologize. Just edit and update for more correct info.
Problems: Searching and Posting
- It doesn't work!
At this moment some people have difficulty with staying calm and reviewing their previous steps, looking for simple mistakes. If you do so and still can't make it work, I suggest a few steps for you to follow.
Searching
It is very likely that you're not the first person with this particular problem. So, start searching for others with the same problem, and you are likely to find solutions and advice.
- Here on CHDK wikia: The search bar is in the top left of this page.
- At the official CHDK forum you'll find the Setepontos Search tool.
Try searching from general to specific. Stop narrowing when your results become easily browseable.
Ex.: Let's say you have problems working with RAW. First try
- RAW -> You'll get a lot of info about it! But your problem is to get the RAW from the camera to your computer.
- RAW download -> But hey, you're a Windows user, so...
- RAW download explorer -> Now pick some and see if it fits.
Some times you have to limit your search with a minus (-) sign to exclude some words. Ex.: You're having color problems in your pictures. So if you do the bottom search
- color -> You'll have too much. Your problem is about JPG color problems, not RAW.
- color JPG -> But RAW references keep coming.
- color JPG -RAW -> now you get more suitable results.
Caution: The search function in the CHDK wikia (this site) needs at least 4 chars in search expression !
Posting
- Still doesn't work!
If your problem doesn't seem to be covered yet, you can open a thread at the CHDK forum about it.
- Be careful in choosing the correct section/subsection. If you have specific problems dealing with CHDK, this isn't exactly a developer matter. So, don't post at CHDK Development, go Using CHDK/General Help and Assistance on using CHDK stable releases.
- Put a short descriptive title in your thread.
HELP HERE! or SOME AID!! or I'M DESPERATE!!!
usually don't receive good feedbacks. - Describe your problem as accurately as possible.
- List at least:
- Camera model and firmware version
- CHDK brand and version
- Operating system
- Card size and brand
- Wait.
There is no Help Desk service. You have to count on the goodwill of other CHDK users like you. - Don't beg for urgent help. But don't give up. Check answers on a daily basis.
- After someone answers you, reply and say if the proposed solution worked or not, and why. This will help others searching for answers in the future!
- Thank the person who helped you!
- Be polite and friendly, don't argue with others trying to help, it's a waste of your time.
- And when you know and can, help others.
Is there a manual?
- If you are an offline kinda guy, you'll appreciate this: Graystar's CHDK End-User’s Guide For AllBest Build 50 (PDF file) now in its third revision. It's not finished yet, but he's going fast. Give it a try!
- A CHDK menu reference (Screenshots of the camera display) for the upcoming Allbest 51 build can be found here: Allbest 51 Menu Screenshots
Odd and Tricky cameras
SD870IS / IXUS 860
As all other DryOS based cameras CHDK can only start from a bootable card, there's no "Firmware Update" menu item.
The download contains only the file diskboot.bin !
Below are some limitations at Allbest #51:
Power up in playback mode
- The camera always powers up in playback mode and shows the last captured pic. For record mode press (or half press) the shutter.
- With 'Clock Display' set to '0 sec' in the Canon menu, the camera can be started direct in record mode by the following workaround:
- Hold FUNC while pressing POWER, release FUNC when the Canon clock display appears
OSD disappears after ~10 seconds
- By default (or after a reset to the Canon standard settings) the Canon OSD symbols disappear after ~10 seconds in record mode.
- With the DISP button you can toggle between two states: [OSD always on] or [OSD off after 10s. The last used setting is saved for standard.
Doesn't support long filenames in file browser
- The filenames in the filebrowser are shown in 8.3 convention (old MS-DOS style), longer filenames existing on the card will be shown in the corresponding short term.
- Example: the filename "DefaultScript1.bas" on the SD card is shown as "DEFAUL~1.BAS" in the file browser dialog.
Solved issues:
- -> video compression now works (from Allbest #51 changeset 455 on)
- -> Touch Icon Behaviour (the CHDK menu gets full or partially cleared when touching (half pressing) the "Wheel" buttons) fixed from Allbest #51 changeset 455 on
- -> the ND filter is working well now (from Allbest #51 Changeset 444 on)
- -> SDHC card support added in Allbest #51 changeset 455
Some Hints:
- The display can be switched off in record mode by long-pressing the PRINT key. To set this, in the Canon menu (in record mode, menu item "Set PRINT Button...") the PRINT key should be assigned to "Display Off". This can also be usefull for saving battery lifetime in scripts: to shut off the display a sequenze of
press "print" -- sleep 1000 -- release "print"can be used after each shot.
- Turning off the display this way in a script can lead to 3 times longer battery lifetime (beware - this method my not work with the MD (Motion Detection) function !
- The short key for enable/disable RAW is Alt-DISP-Alt
S5
- No video (compression) mode options