Waterwingz (talk | contribs) (→Total Beginner: changed logo image to a more recent picture) |
Waterwingz (talk | contribs) mNo edit summary |
||
| Line 1: | Line 1: | ||
{{Notice|Current documentation for SD card formatting is here : [[Bootable_SD_card]]}} |
{{Notice|Current documentation for SD card formatting is here : [[Bootable_SD_card]]}} |
||
== Total Beginner == |
== Total Beginner == |
||
| − | + | # Take an SD memory card 4GB or less (for cards over 4GB, see [http://chdk.wikia.com/wiki/Using_SDMinste_to_Create_Dual_Partition_SD_cards here]) and insert it into a card reader (a USB Card Reader, Internal Card Reader, etc). You can buy one from RadioShack, Bestbuy, Amazon, any electronics store |
|
# Connect the card reader to the computer |
# Connect the card reader to the computer |
||
# When the message shows up asking what you want to do with the files on the card, ignore it, and click on the X to close it |
# When the message shows up asking what you want to do with the files on the card, ignore it, and click on the X to close it |
||
Revision as of 16:55, 30 June 2012
|
Current documentation for SD card formatting is here : Bootable_SD_card |
Total Beginner
- Take an SD memory card 4GB or less (for cards over 4GB, see here) and insert it into a card reader (a USB Card Reader, Internal Card Reader, etc). You can buy one from RadioShack, Bestbuy, Amazon, any electronics store
- Connect the card reader to the computer
- When the message shows up asking what you want to do with the files on the card, ignore it, and click on the X to close it
- Download and install CardTricks
- After CardTricks starts, click on the stamp icon of the SD card. Pick the SD card's drive letter (usually the last one)
- You will see the details for the SD card
- Click Format As FAT, click through the warnings (make sure that the card does not have anything you need). This will take up 10 minutes. You can check the progress in a command prompt window to the right of the CardTricks window on the taskbar
- After the format is finished, click Make Bootable, and click OK
- Download a build of CHDK for your camera - most likely it will be the latest one (if you purchased your camera recently). However, in a lot of cases it is not. But either way, you will find out soon.
- Click CHDK->Card in CardTricks. Select the build you just downloaded
- Click OK, and the build should now be on your card
- VERY IMPORTANT STEP!!!!: Take the card out of the card reader, and slide the lock to
- the "ON" position. Insert the card into your camera....
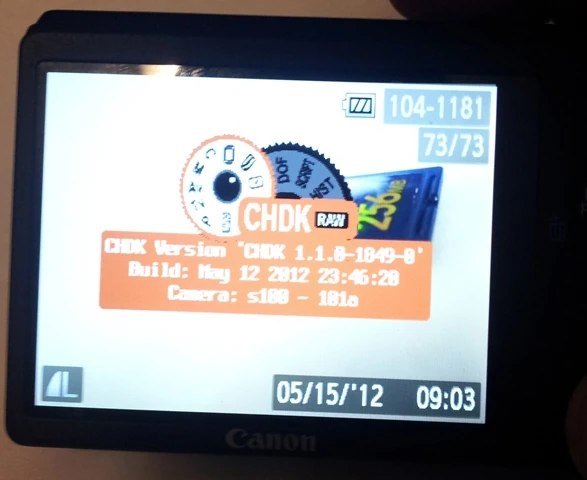
- Turn the camera on. You should see a screen like this:
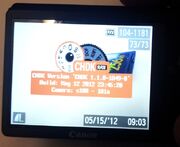
CHDK LOGO
- If you don't, either you made a mistake following the directions OR you have the wrong firmware version number. To find out:
- Turn your camera to PLAY mode
- Hold down The SET key
- Keeping SET down, press Display
- You should see something that says Firmware Ver GMx.xxy (example GM1.01B)
- Remember what x.xxy are. This is your firmware version.
- Repeat the procedure above, downloading the correct firmware
- If you do not see any of this, most likely you installed the wrong version of CHDK. Try checking the lock slider, and that you pressed the CHDK->Card Button!
Email me at adz@jewc.org for questions.