(Adding categories) |
|||
| (3 intermediate revisions by one other user not shown) | |||
| Line 1: | Line 1: | ||
| ⚫ | |||
| − | + | [[File:Hdr-sample-image.jpg|thumb|300px|CHDK Bracketing allows you to create Tonemapped HDR images.]] |
|
| ⚫ | |||
| + | |||
| − | CHDK allows you to quickly and easily perform bracketing using an extra photo override. CHDK bracketed photos are perfect for making HDR (High Dynamic Range) images in your favorite photo editor. In this post I will guide you |
+ | CHDK allows you to quickly and easily perform bracketing using an extra photo override. CHDK bracketed photos are perfect for making HDR (High Dynamic Range) images in your favorite photo editor. In this post I will guide you through the steps required to take bracketed photos using your Canon Powershot Camera and [http://chdk.wikia.com/wiki/CHDK CHDK.] |
You can also use the bracketing techniques mentioned in this post to make HDR panoramas and equirectangular images for use in 3D graphics packages with the addition of [http://hugin.sourceforge.net/ HUGIN] or [http://www.ptgui.com/ PTGUI]. |
You can also use the bracketing techniques mentioned in this post to make HDR panoramas and equirectangular images for use in 3D graphics packages with the addition of [http://hugin.sourceforge.net/ HUGIN] or [http://www.ptgui.com/ PTGUI]. |
||
| − | |||
| − | |||
| − | |||
==Setting Up CHDK Bracketing== |
==Setting Up CHDK Bracketing== |
||
| Line 12: | Line 10: | ||
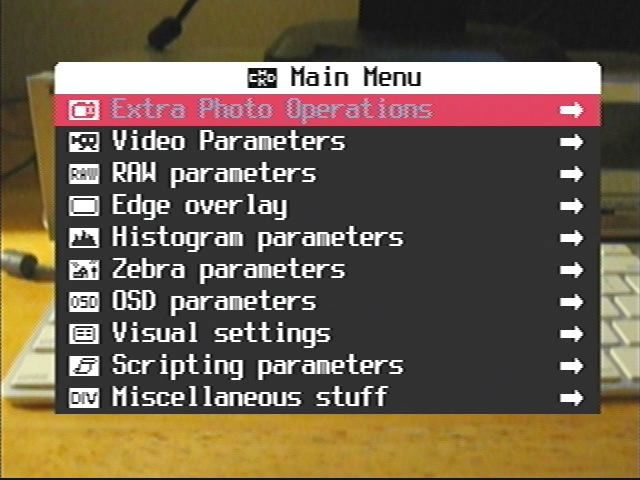
1. Open the CHDK Main Menu. |
1. Open the CHDK Main Menu. |
||
| − | [[File:Main-menu.jpg| |
+ | [[File:Main-menu.jpg|caption|250px|CHDK Main Menu]] |
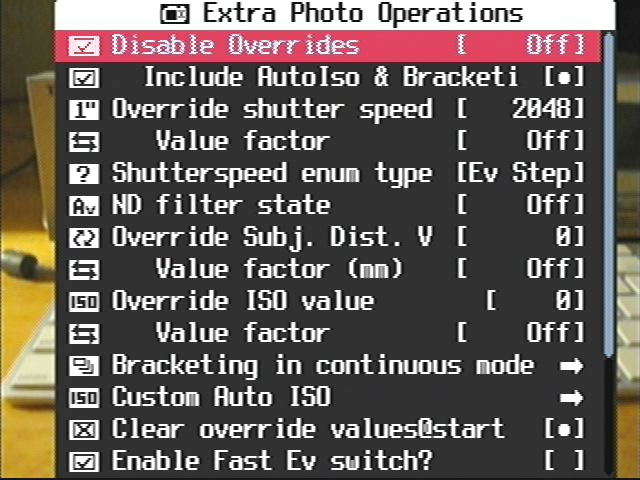
2. Load the Extra Photo Operations Menu. |
2. Load the Extra Photo Operations Menu. |
||
| Line 18: | Line 16: | ||
3. Set Disable Overrides to Off. |
3. Set Disable Overrides to Off. |
||
| − | [[File:Disable-overrides.jpg| |
+ | [[File:Disable-overrides.jpg|caption|250px|CHDK Extra Photo Operations Menu]] |
4. Open the Bracketing in continuous mode menu. |
4. Open the Bracketing in continuous mode menu. |
||
| Line 24: | Line 22: | ||
5. Change the TV bracketing value from Off to something like 1 Ev. |
5. Change the TV bracketing value from Off to something like 1 Ev. |
||
| − | If you want you can enable "Clear Bracket Values on Start" which will reset the bracketing settings when you restart the camera. |
+ | If you want you can enable "Clear Bracket Values on Start" which will reset the bracketing settings when you restart the camera. |
| + | |||
| + | [[File:Bracketing-value-1ev.jpg|caption|250px|CHDK allows us to shoot photos with bracketing in continuous mode.]] |
||
6. Close the CHDK Menus and exit ALT mode. |
6. Close the CHDK Menus and exit ALT mode. |
||
| Line 30: | Line 30: | ||
7. Switch to the Continuous Photo mode. |
7. Switch to the Continuous Photo mode. |
||
| − | [[File:Continuous-mode.jpg| |
+ | [[File:Continuous-mode.jpg|caption|250px|We need to enable continuous photo mode in the Canon settings.]] |
8. Hold down the Shutter button to take your bracketed photo sequence. |
8. Hold down the Shutter button to take your bracketed photo sequence. |
||
| ⚫ | |||
| ⚫ | |||
| + | |||
| + | ==Automatic Bracketing== |
||
| + | |||
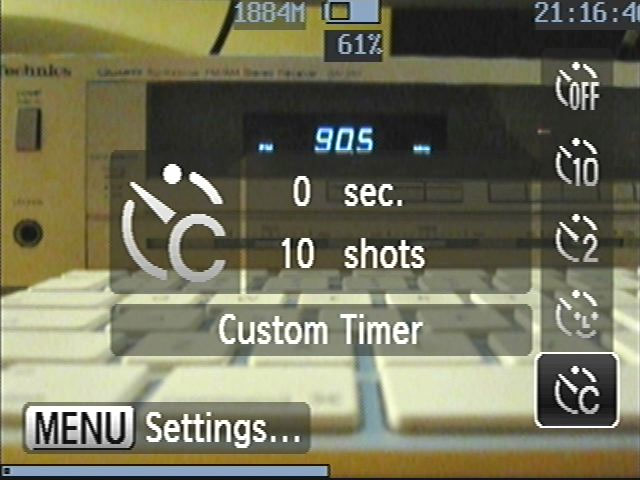
| ⚫ | If you want an automated bracketing solution you can press the self timer button on your camera and scroll down to enable the Custom Timer. Press the Menu button when the Custom Timer is selected to change the delay to 0 seconds and the shots to a value like 10. The shots setting will specify how many pictures are taken automatically when you press the shutter button once. |
||
| + | |||
| + | [[File:Custom-timer.jpg|caption|250px|Enable the Custom Timer]] |
||
| + | |||
| ⚫ | |||
| + | ==Post Processing Bracketed Images== |
||
| ⚫ | |||
| ⚫ | After you transfer the bracketed sequence to your computer you can process the images using your favorite HDR software. [http://www.adobe.com/products/photoshop.html Photoshop], [http://www.hdrsoft.com/ Photomatix], and [http://enblend.sourceforge.net/ Enfuse ]are popular tools for creating HDR images. |
||
| ⚫ | |||
| ⚫ | |||
| ⚫ | |||
| + | You can also create HDR panoramas from CHDK bracketed images using the [http://hugin.sourceforge.net/ Hugin] or [http://www.ptgui.com/ PTGui] photo stitching software. |
||
| ⚫ | |||
[[Category:Help]] |
[[Category:Help]] |
||
[[Category:CHDK]] |
[[Category:CHDK]] |
||
Latest revision as of 16:08, 19 November 2013
Bracketing Overview
CHDK Bracketing allows you to create Tonemapped HDR images.
CHDK allows you to quickly and easily perform bracketing using an extra photo override. CHDK bracketed photos are perfect for making HDR (High Dynamic Range) images in your favorite photo editor. In this post I will guide you through the steps required to take bracketed photos using your Canon Powershot Camera and CHDK.
You can also use the bracketing techniques mentioned in this post to make HDR panoramas and equirectangular images for use in 3D graphics packages with the addition of HUGIN or PTGUI.
Setting Up CHDK Bracketing
1. Open the CHDK Main Menu.
2. Load the Extra Photo Operations Menu.
3. Set Disable Overrides to Off.
4. Open the Bracketing in continuous mode menu.
5. Change the TV bracketing value from Off to something like 1 Ev.
If you want you can enable "Clear Bracket Values on Start" which will reset the bracketing settings when you restart the camera.

6. Close the CHDK Menus and exit ALT mode.
7. Switch to the Continuous Photo mode.

8. Hold down the Shutter button to take your bracketed photo sequence.
Automatic Bracketing
If you want an automated bracketing solution you can press the self timer button on your camera and scroll down to enable the Custom Timer. Press the Menu button when the Custom Timer is selected to change the delay to 0 seconds and the shots to a value like 10. The shots setting will specify how many pictures are taken automatically when you press the shutter button once.
When you are finished taking your HDR sequence set the Self-Timer to OFF.
Post Processing Bracketed Images
After you transfer the bracketed sequence to your computer you can process the images using your favorite HDR software. Photoshop, Photomatix, and Enfuse are popular tools for creating HDR images.

You can also create HDR panoramas from CHDK bracketed images using the Hugin or PTGui photo stitching software.